Welcome to the GitHub Copilot Workshop! In this workshop, you will learn how to use GitHub Copilot to explain and improve code. GitHub Copilot Chat enables interactive dialogue with AI through a chat experience. Let's learn how to use GitHub Copilot through this workshop!
Last update: 03-12-2025

Today's Goals
- Understand the various features of GitHub Copilot
- Develop a new application using agent mode
Prerequisites
- Visual Studio Code (latest version) This workshop material was created on version: 1.106.0 (Universal)
- GitHub Copilot license License should support Code Quality feature
- Github Copilot VS Code extension
- Github MCP server (link)
- GitHub account is available
- Azure subscription
- Azure CLI (link)
- Python (preferably Python 3)
uvpackage manager (link)
This workshop uses the following GitHub repository:
Project URL (example): https://github.com/indohackghcp1-org/workshop-material
Step 1: Fork the Repository
First, open the project URL above in your browser and fork the repository:
- Open the project URL in your browser
- Click the Fork button in the top right
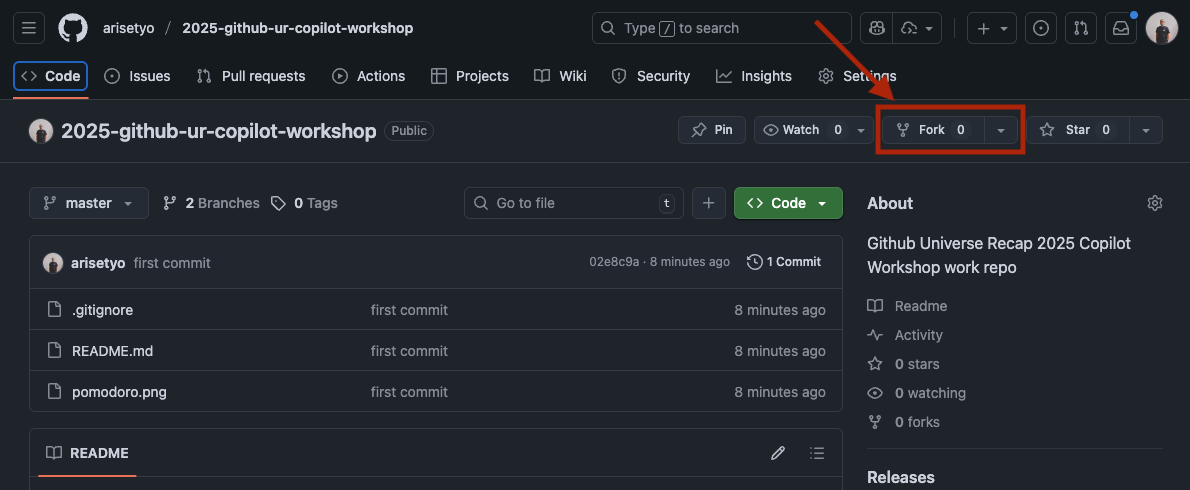
- Click the
Create fork buttonon the fork creation screen. Once the fork is complete, a copy of the repository will be created in your GitHub account.
Step 2: Development Environment Setup
Using your forked repository, you can start the project using one of the following methods:
- Open Terminal or Command Prompt
- Clone your forked repository with the following command:
git clone https://github.com/[your-assigned-organization]/workshop-material.git
- Navigate to the cloned directory:
cd workshop-material
- Open the project in VSCode
Branch Preparation
Create and switch to the feature/pomodoro branch:
git checkout -b feature/pomodoro
- Confirm that you are signed in to your GitHub account in VSCode
- Confirm that Copilot functionality is enabled
- Confirm that the Python interpreter is set up correctly
Important Notes
- Make sure VSCode's GitHub Copilot extension is updated to the latest version
- Restarting VSCode is recommended after setting changes
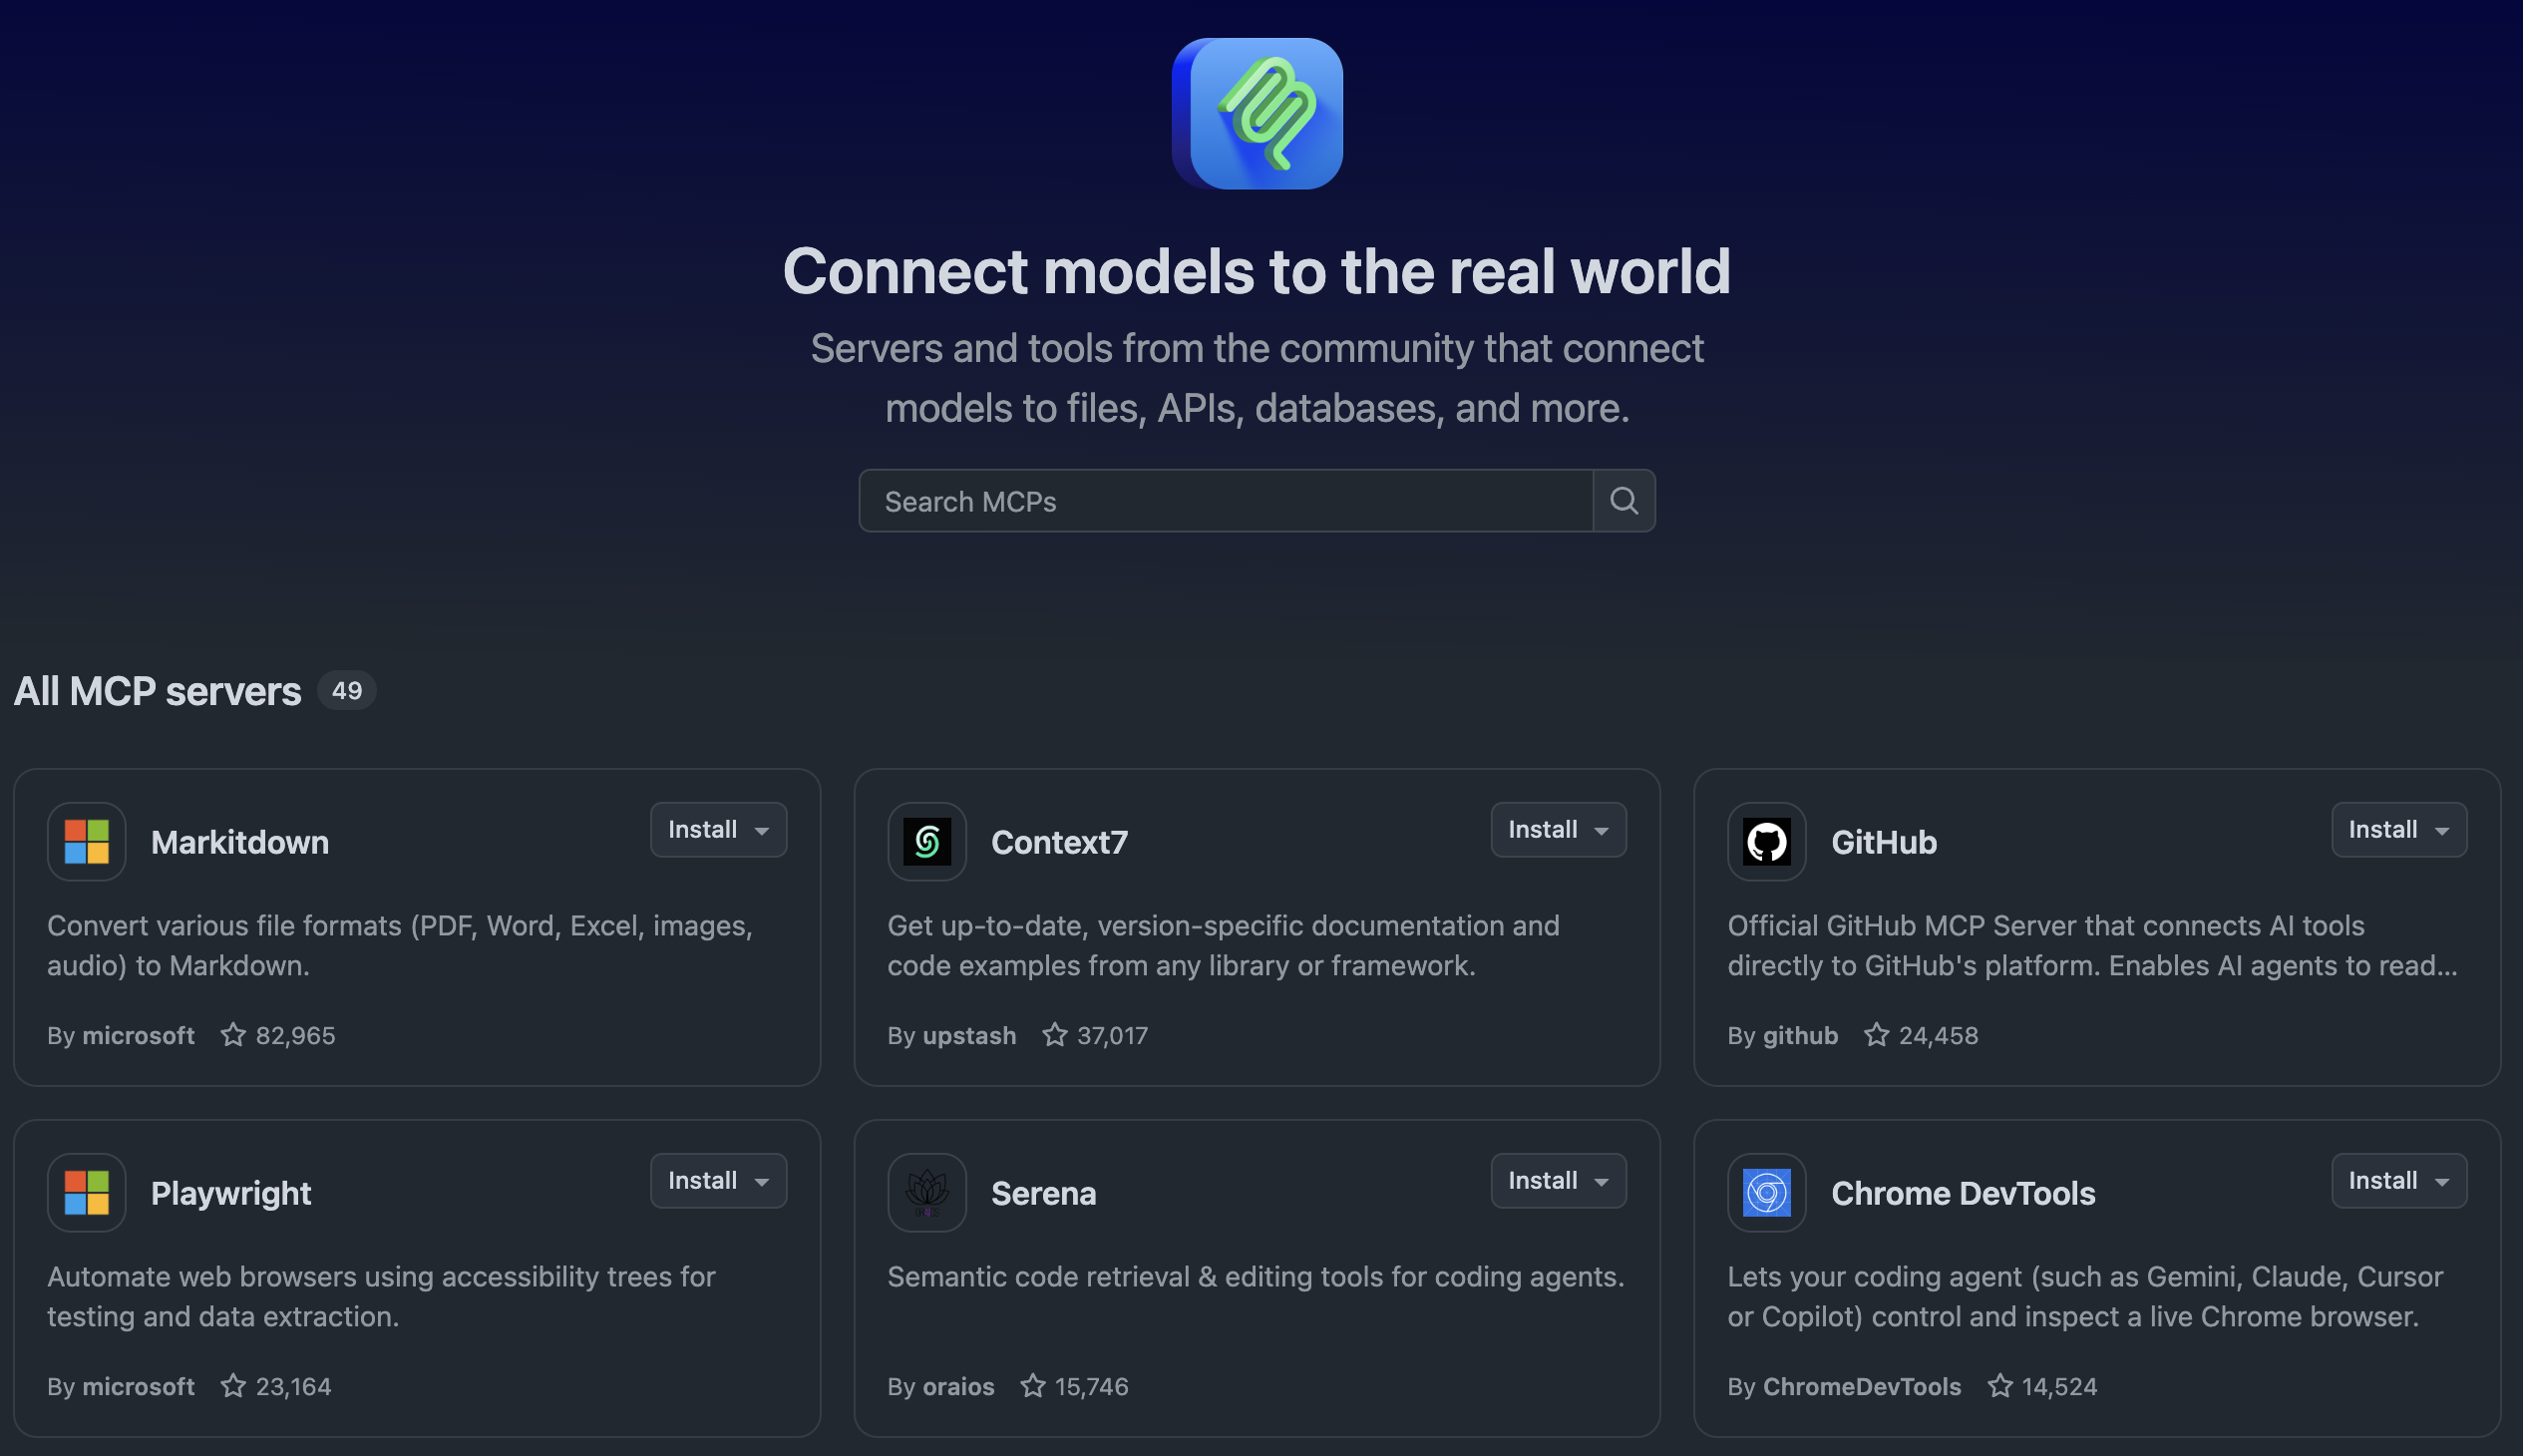
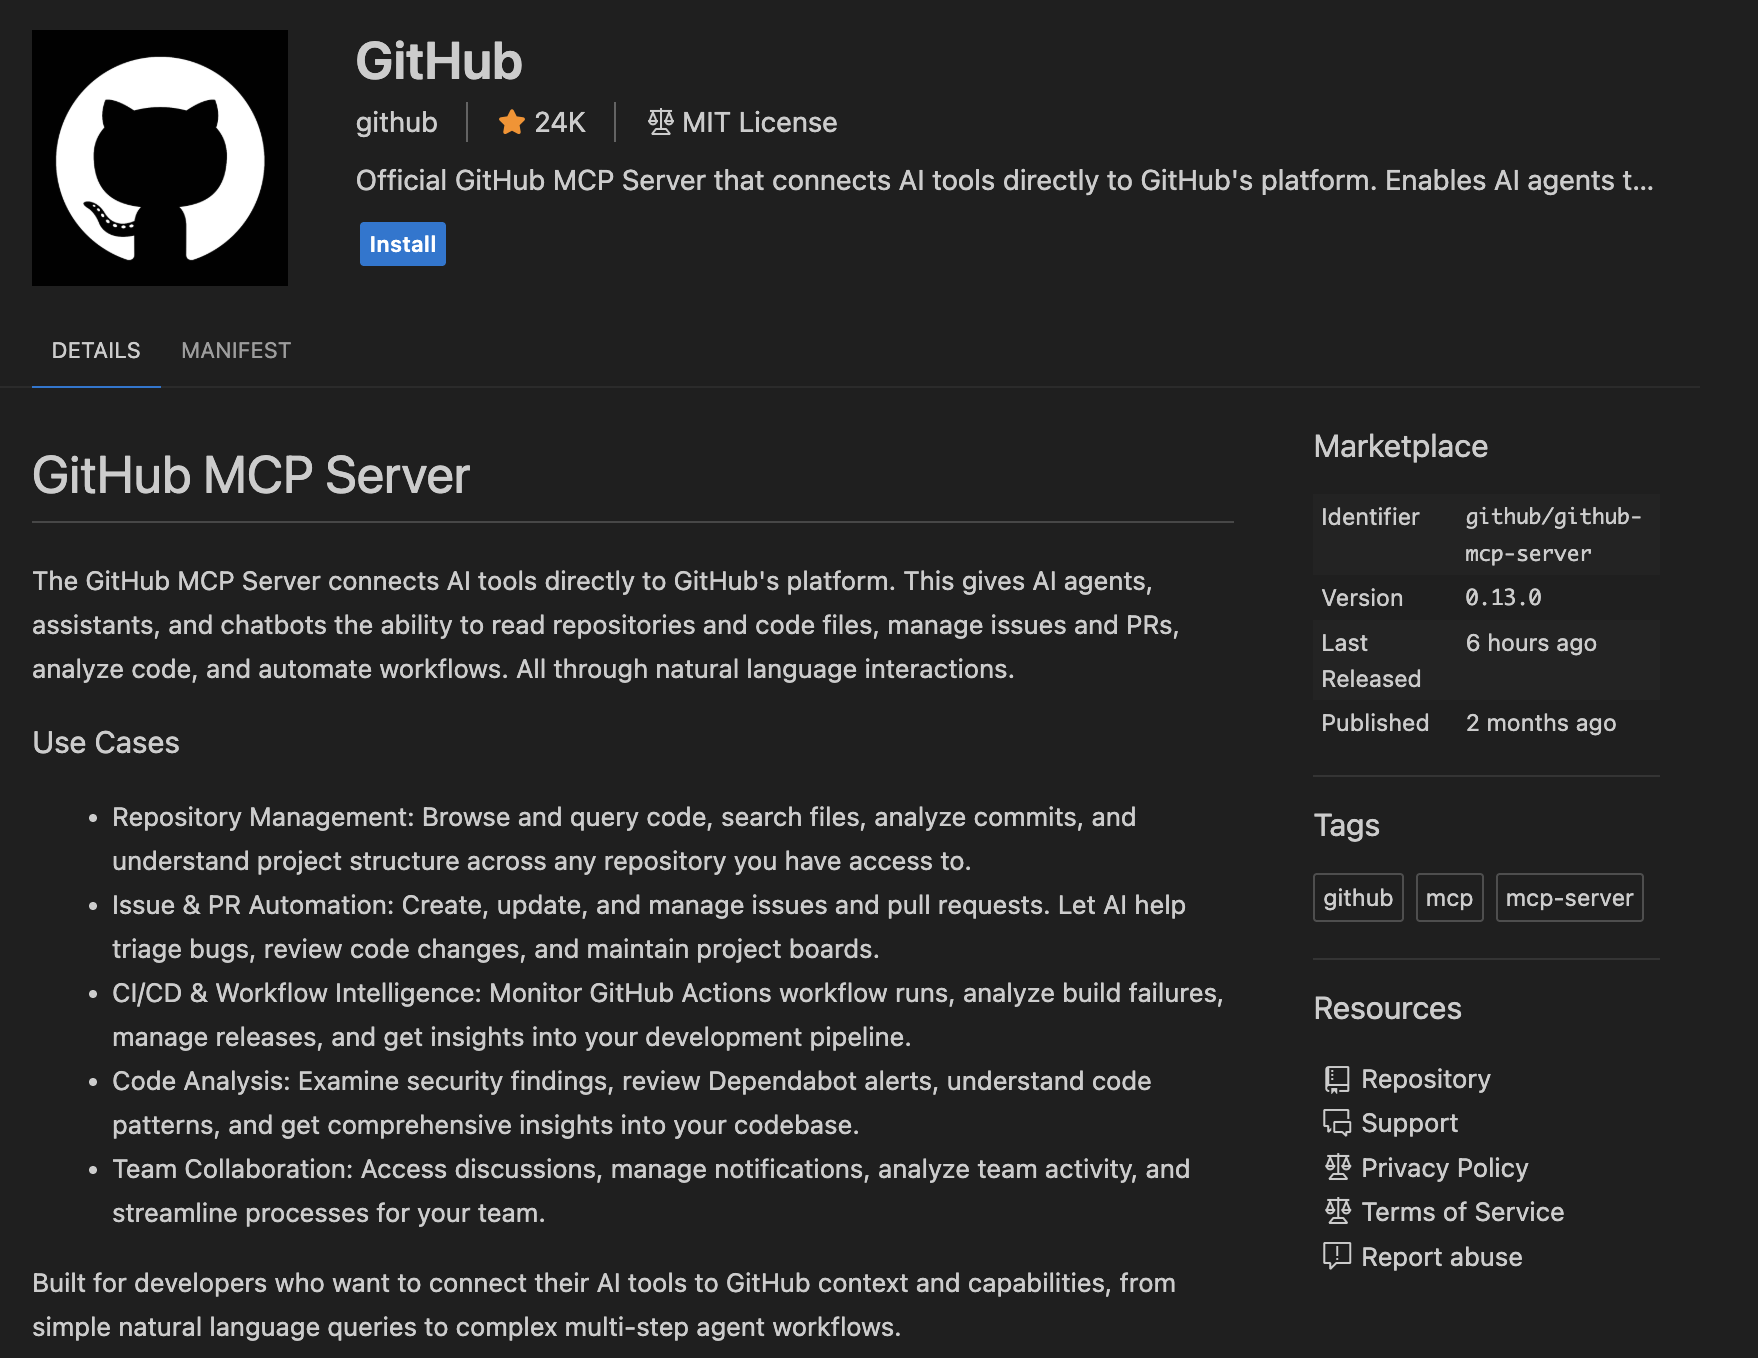
Github MCP
- From Github MCP Registry
Go to Github MCP Registry and search for Github MCP.
Click Install in VS Code.
- From VSCode
Install the Github MCP Server in VSCode
Before we start the development, let's go to Copilot Spaces.
In Copilot Spaces we can organize our files, PR, issues, and standards. This helps Copilot in giving us more relevant assistance to our projects.
Start a Space
Create a new space like the example here: 
Then we can start using it:
- Attach these files from the repo
README.mdPOMODORO_TECHNIQUE.md
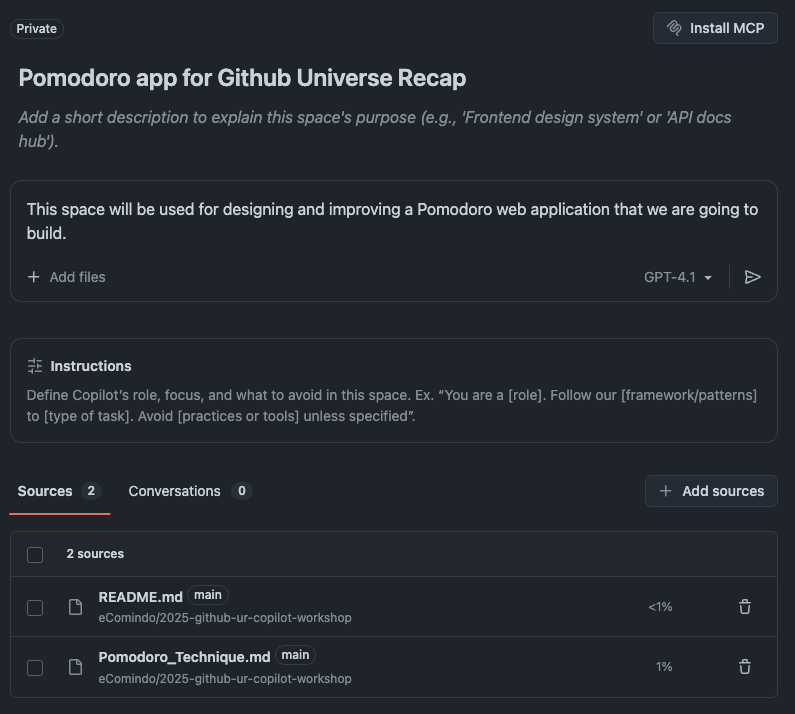
- Give Copilot in Spaces this prompt:
This space will be used for designing and improving a Pomodoro web application that we are going to build.
Copilot will then learn about our project and provide some suggestions.
Architecture Request

In the next chat, attach the screenshot image new_pomodoro_ss.png and enter this prompt:
We plan to create a simple Pomodoro timer web app in this project to learn the aspects of Github Copilot. The attached image is a UI mock for that app. What design should we proceed with to create this app using Flask and HTML/CSS/JavaScript?
I want the timer functionality to be handled on the frontend using JavaScript. The backend should serves the HTML page and static assets, and to store the status of ongoing or finished sessions in a log file.
Please suggest an architecture.
Copilot then returns with the suggestions:
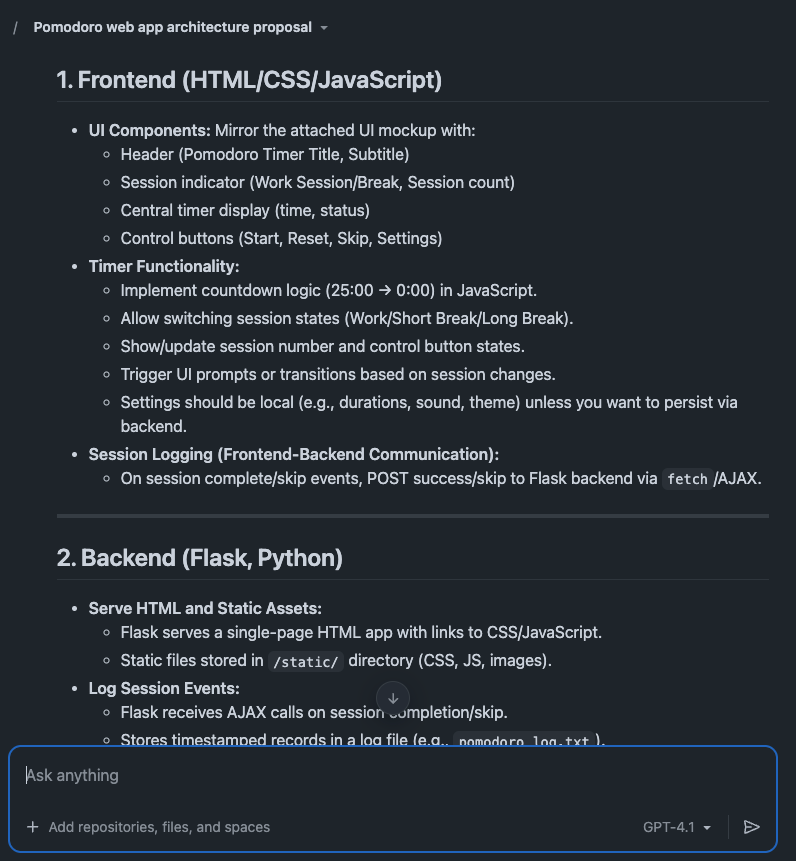
Architectural Suggestion
Rather than starting implementation immediately, let's consult with Copilot about what approach and design to proceed with. From here on, we'll proceed entirely in agent mode.
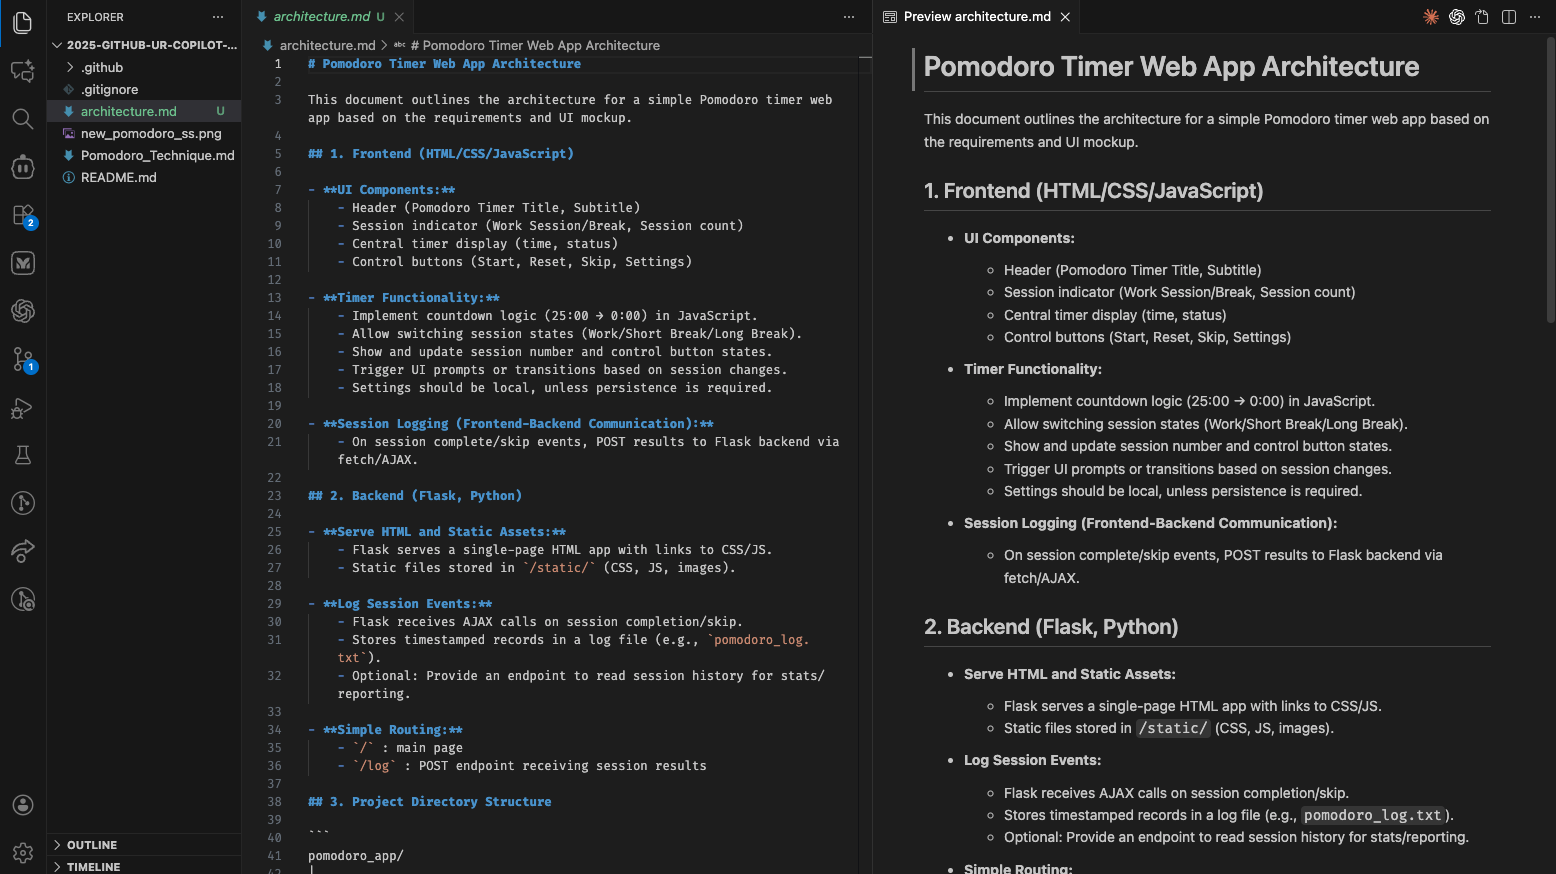
Ask Copilot to save the conclusion from the chat above as a file architecture.md. Download the file and store it on the root of our project.
By doing so, you can reference the same architectural content even if you open a different chat session, both in VSCode or Copilot online.
In using Copilot it is not recommended to try implement a large feature all at once. It is better to start implementing in small increments. This improves the accuracy of the code Copilot suggests and allows for smoother development progress.
Let's go back to VSCode. Now let's add one more document to help the agents create the application accurately and efficiently. This approach is known as Spec-Driven Development, a highly recommended technique in developing software with AI.
- Type
#in the chat field and write the name of the architecture document:architecture.md. - Select the
Planmode
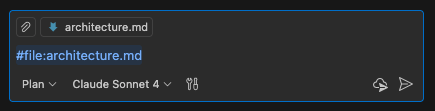
Then, enter the following prompt:
Based on the attached document, please create step-by-step development plan that can be followed by the coding agents.
Please suggest what granularity should be used to implement functions in an easy-to-test steps.
- Change to
Agentmode
- Enter this prompt:
Save the development plan in a file called `plan.md`.
(or you can always do that manually). Don't forget to click "Keep" to save the changes.
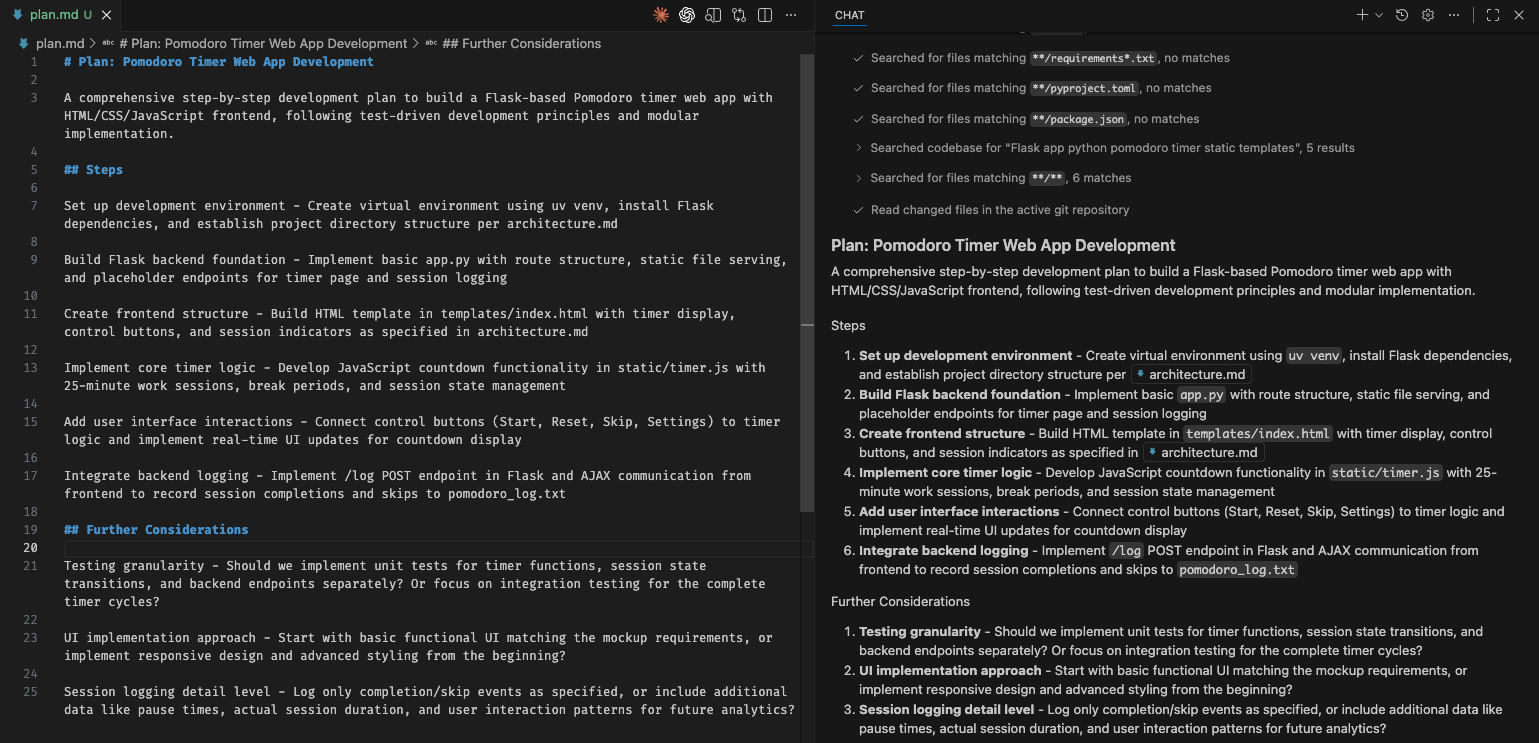
Now we have two specifications file: architecture.md and plan.md. These will be the documents Copilot refer to in developing the Pomodoro app.
Before we start implementing the plan using Copilot, let's update the custom instruction file.
Open the file .github/copilot-instructions and add these lines:
Before making any big changes to the project, always check the architecture documentation in `architecture.md` to ensure alignment with the overall design and goals.
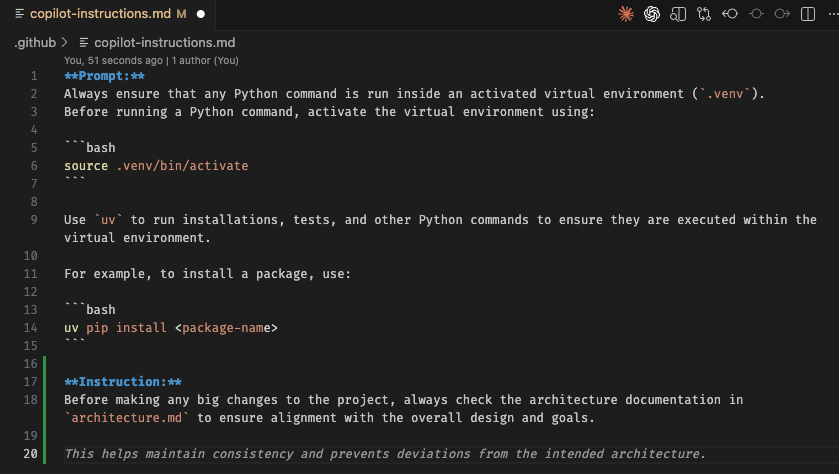
That custom instruction tells Copilot to:
- Make sure to run the Python file in an activated virtual environment
- Always check the architecture document before making any big changes
You can add other things in that file that you want Copilot to do with each request, for example: "Always add documentation to all new functions.".
Here are some great examples of prompts that you can use, modify, and adjust for your custom instructions:
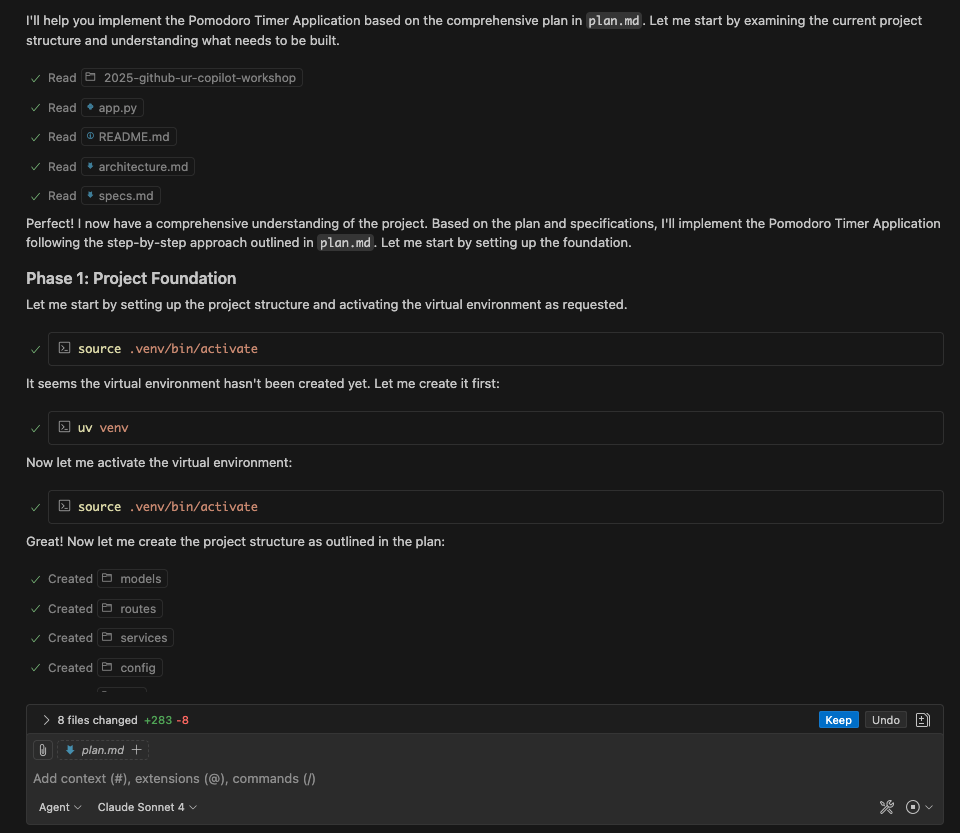
Now that all the preparation is complete, let's finally start implementation.
Attach the plan.md file to the chat then use this prompt.
Please implement the development of this project using `plan.md` and other necessary documents.
If there are additional considerations needed, please ask me questions.
After that, Copilot implements the documents. Once implementation is complete, Copilot builds the project on its own initiative and checks for errors. If errors occur, it makes additional corrections to resolve those errors. This kind of autonomous behavior is characteristic of agent mode.
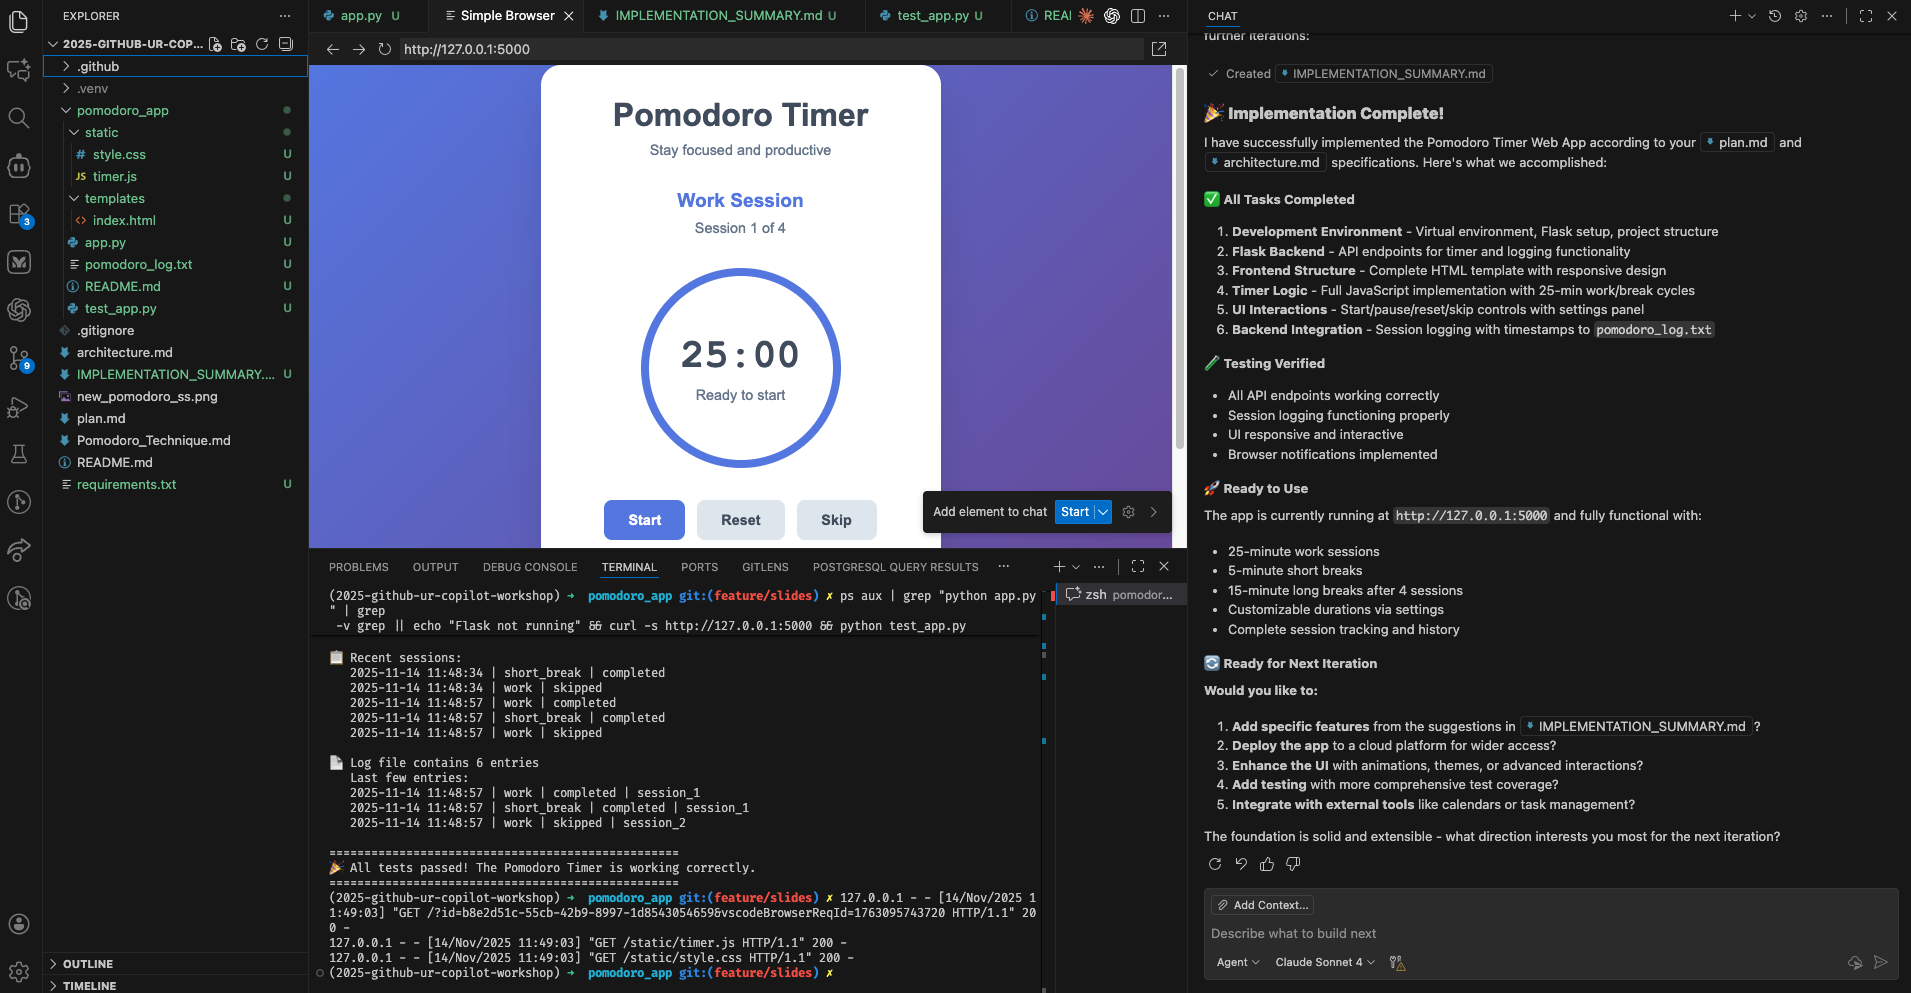
Once implementation is complete, check the following points:
- Directory Structure: Is it structured according to the recommended architecture?
- Basic Files: Are the necessary basic files (app.py, HTML templates, CSS files, etc.) created?
- Operation Check: Perform simple operation tests to see if any errors occur?
Below is the result of step 1 implementation in my case. What kind of application this becomes at this stage will differ from person to person.
Let's have Copilot Chat explain this code.
Open Copilot Chat
- Click the Chat icon (chat bubble icon) in the VSCode sidebar to open Copilot Chat
- Or open the Chat panel with
Ctrl+Alt+I(on macOSCtrl+Cmd+I)
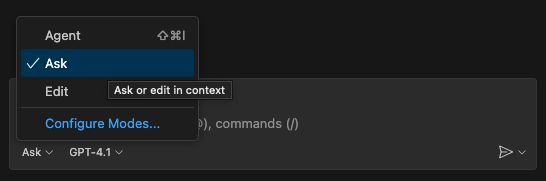
Check Chat Mode
Confirm the chat mode is set to "Ask".
Request File Explanation
- Attach the main file in the chat field. Depending on the result from the previous steps, it could be
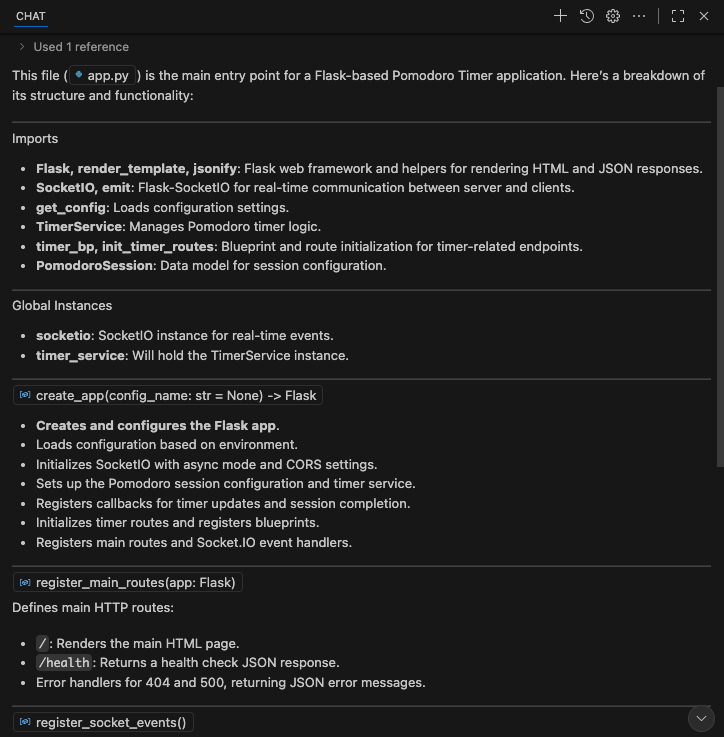
app.pyormain.pyorserver.py. Check the result of your prompt to make sure. - Enter the prompt:
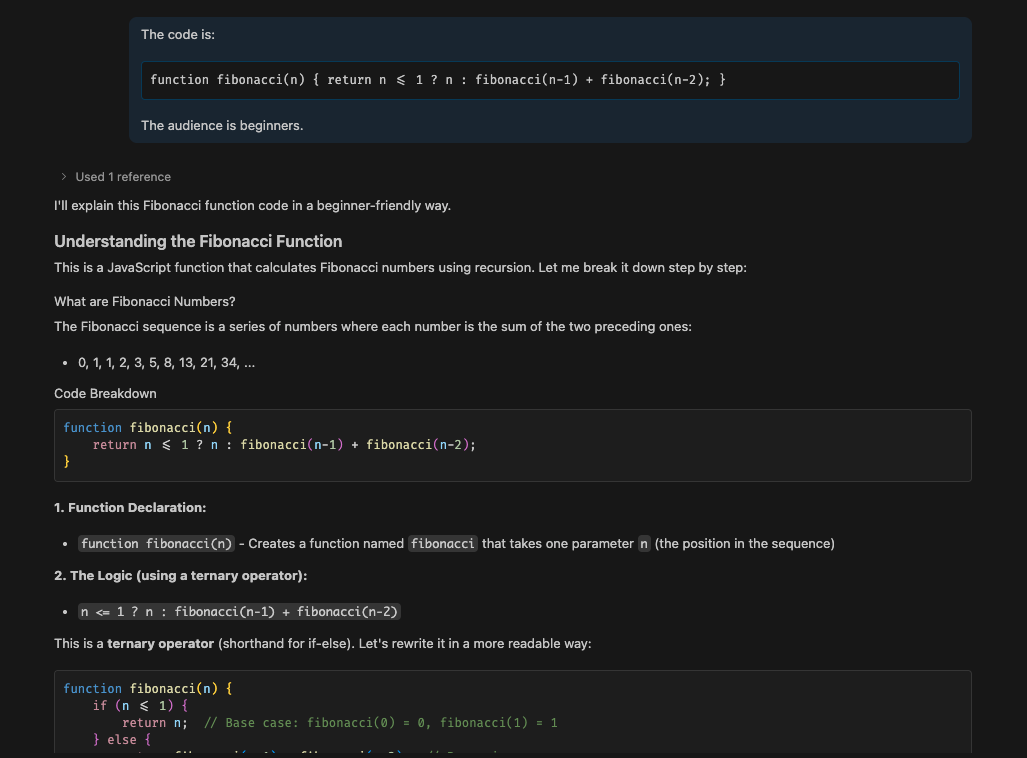
Please explain this entire file.
- Press Enter and Copilot Chat will explain the entire file
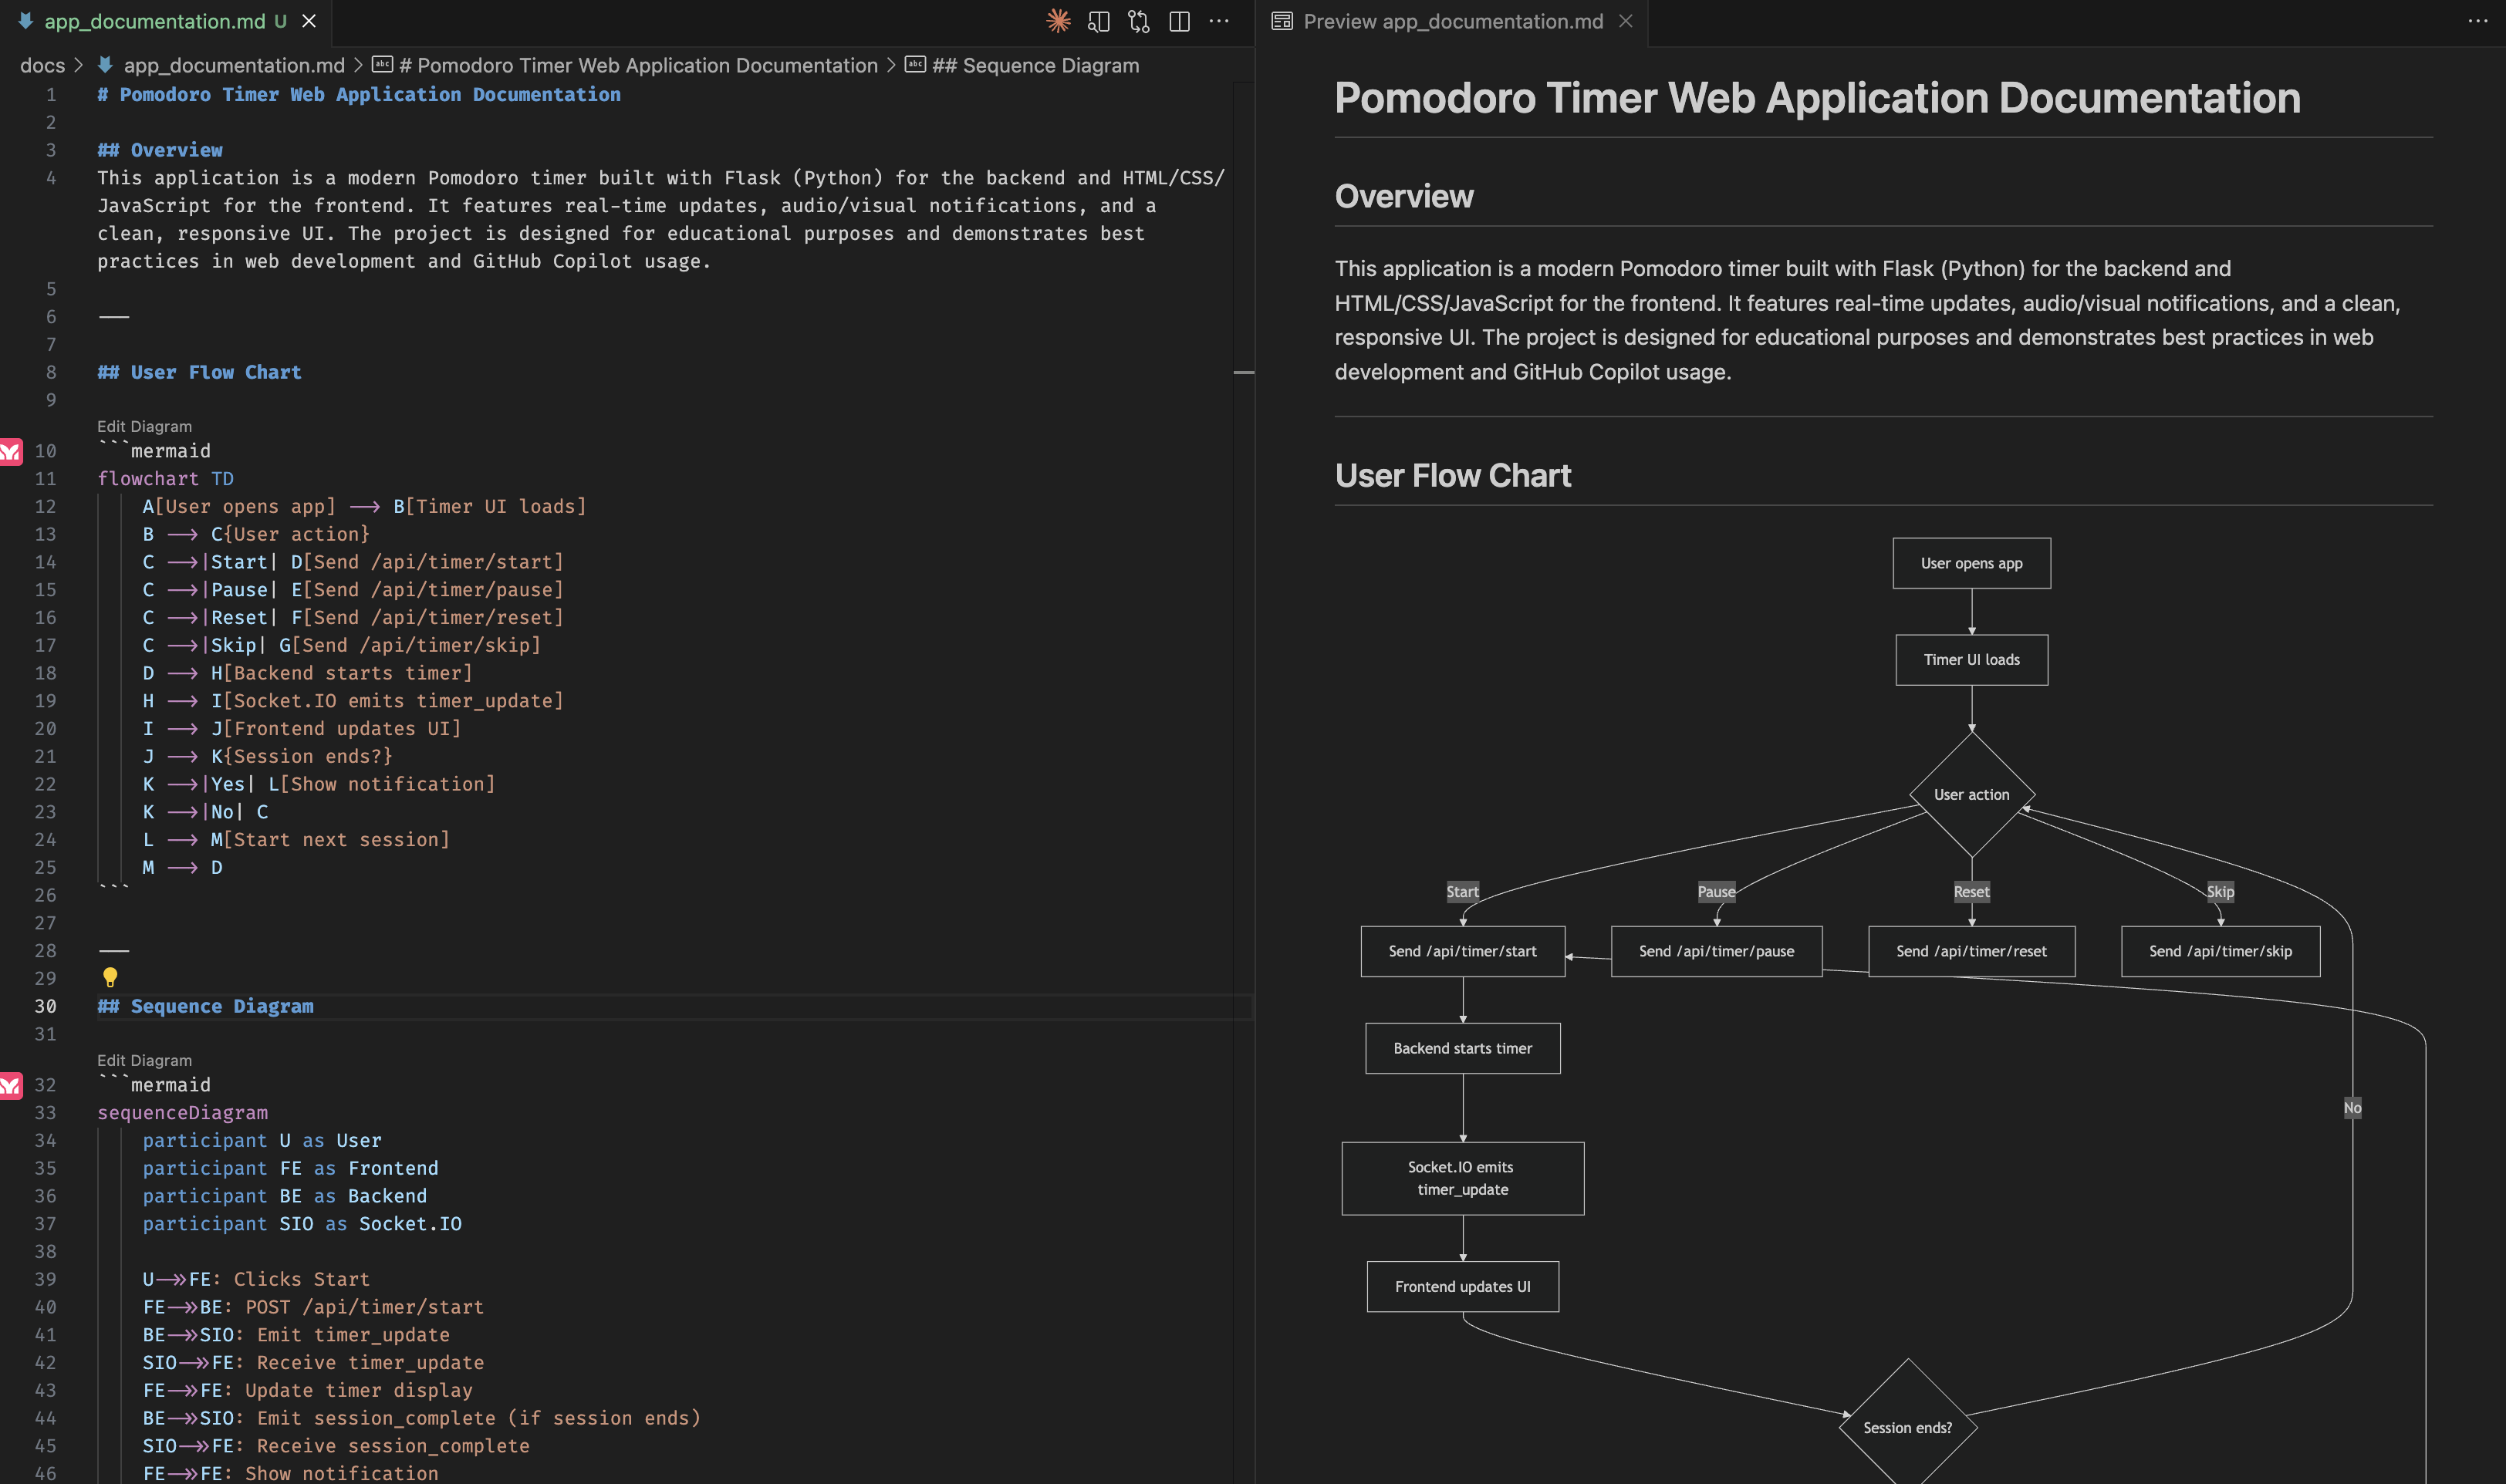
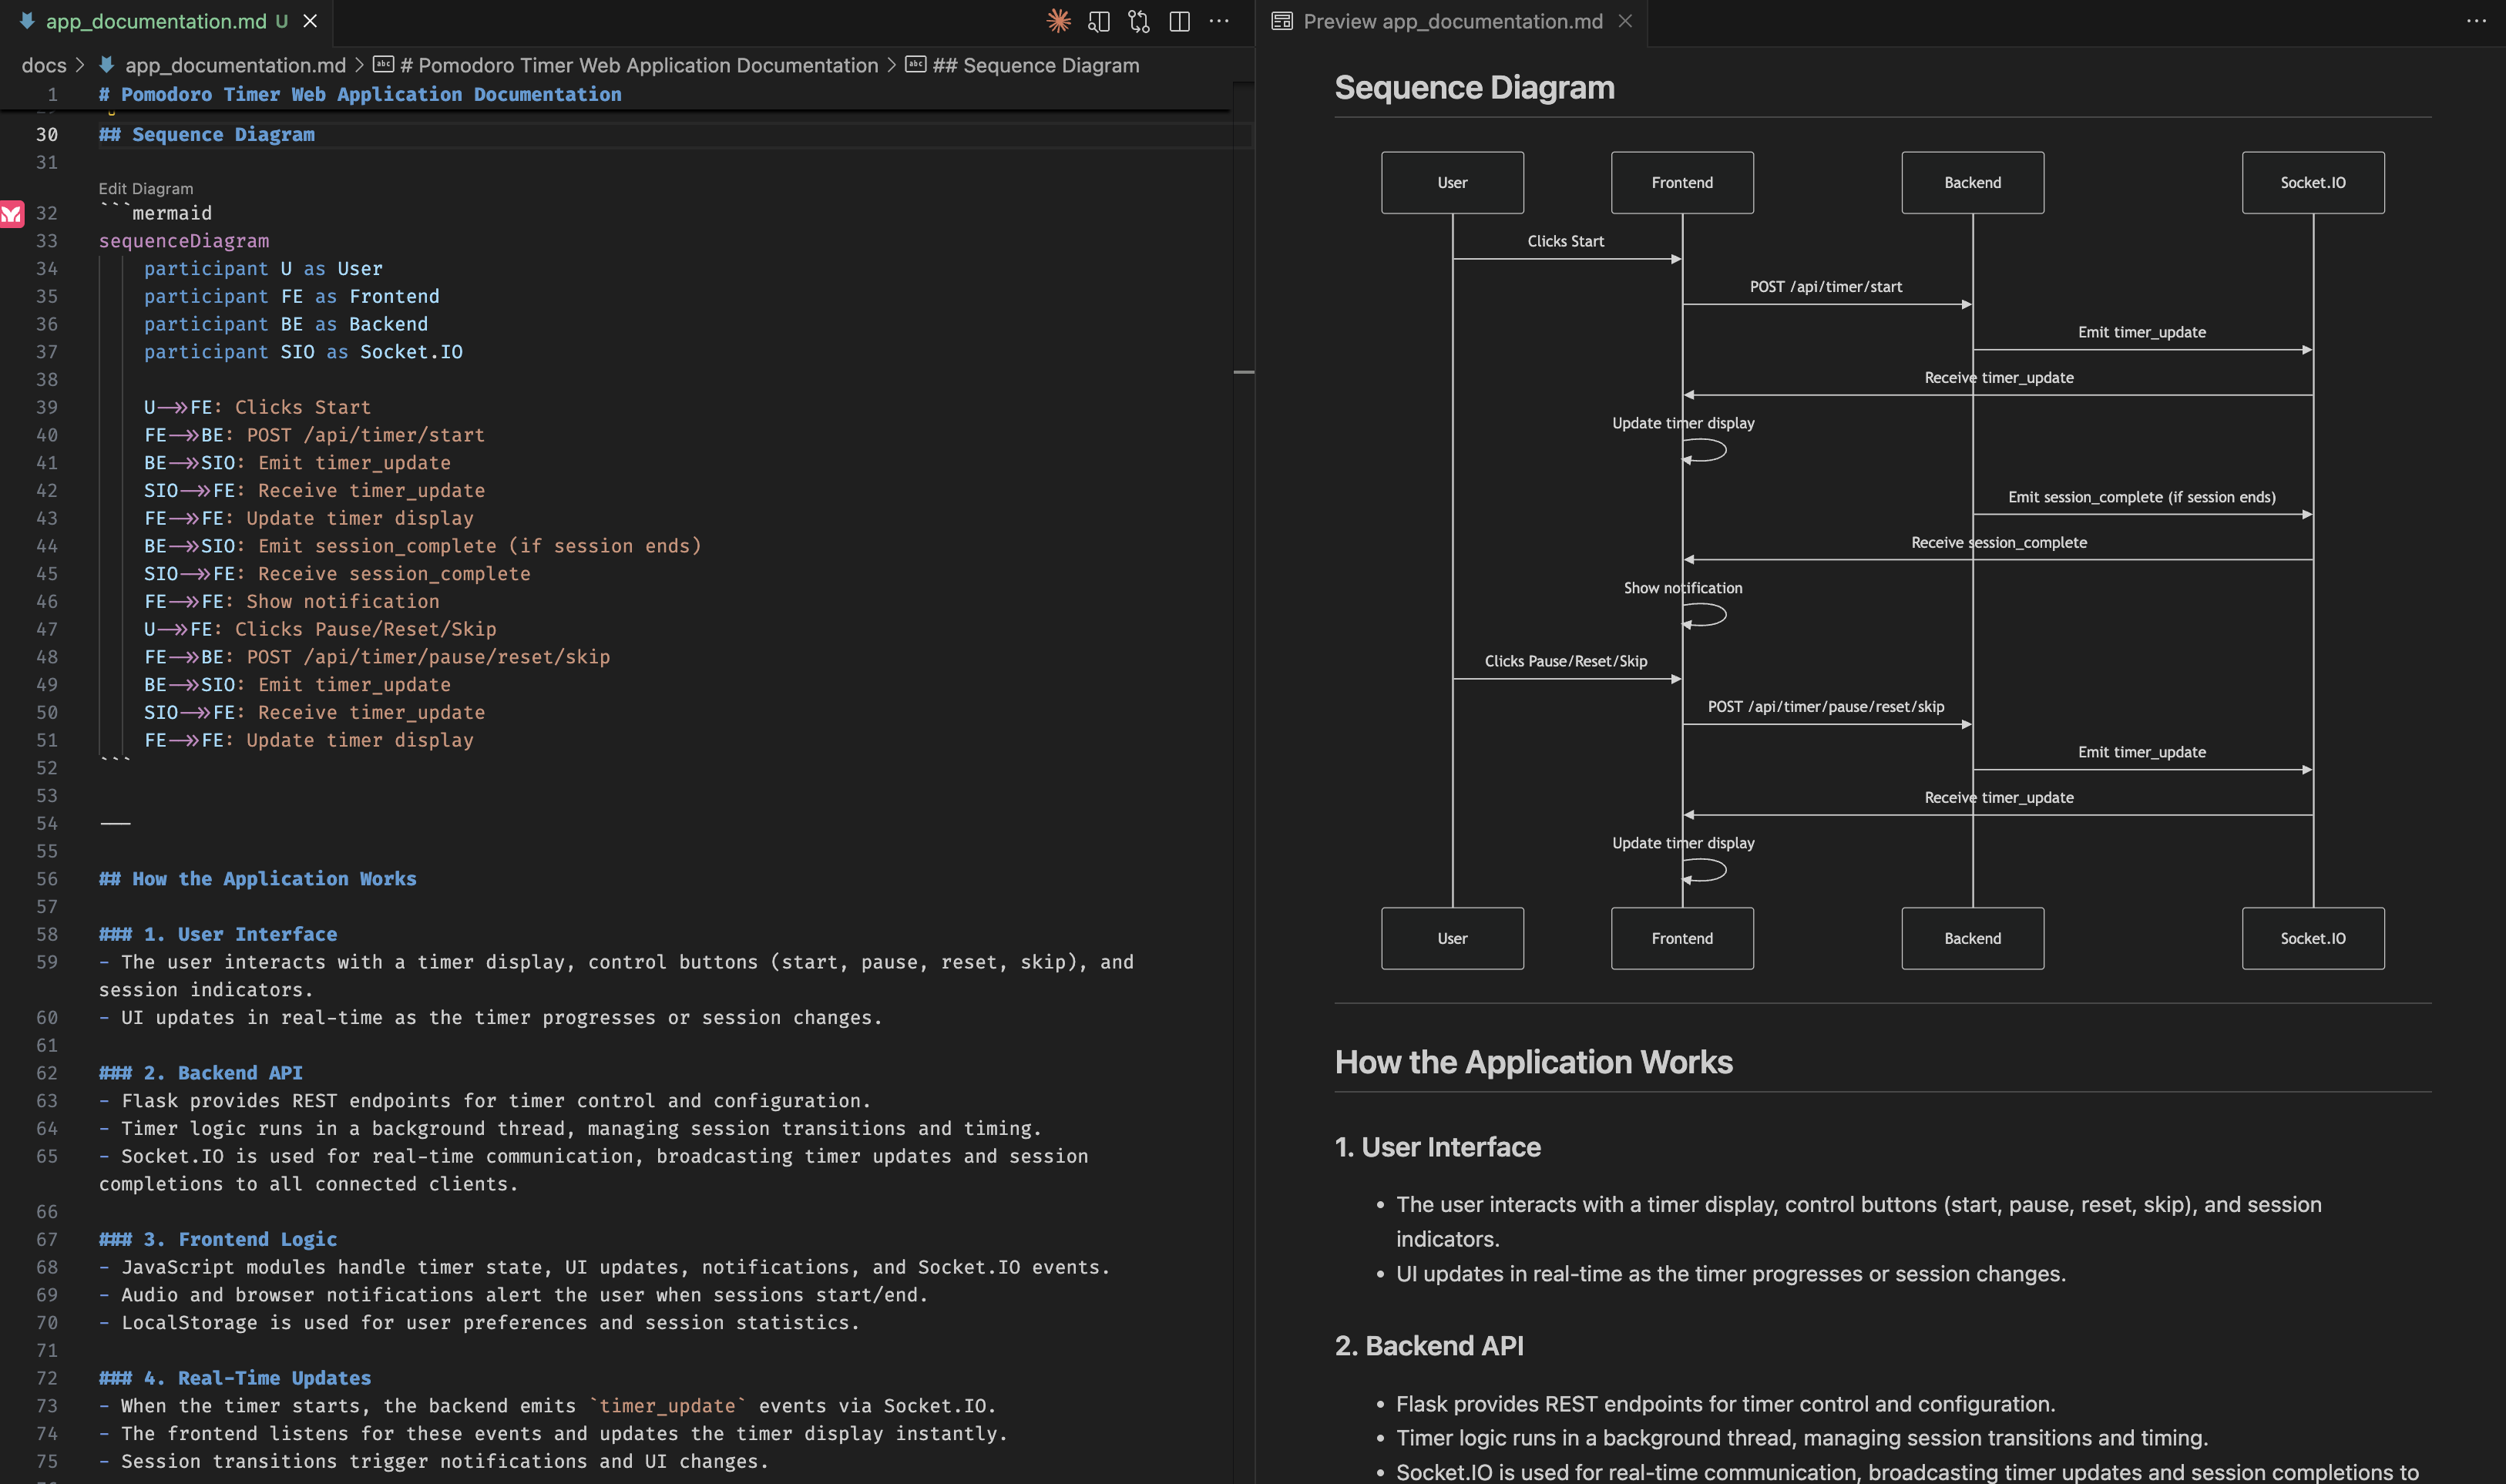
Make sure Copilot Chat is in Agent mode. Let's ask Copilot to add more documentations:
Create a documentation on how the current application works. Add a user flow chart and sequence diagram, using Mermaid format. Save it as a markdown file.
We can use your favorite markdown viewer plugin to check the result, including the charts. Because the charts are created using Mermaid, you can also copy-paste the Mermaid code into Mermaid's tool.
Prompt Files
Prompt files define reusable prompts for specific tasks that you can invoke when needed.
Create a "code explainer" agent
- Create a file:
.github/prompts/explain-code.prompt.md - Add this into the file:
---
agent: 'agent'
description: 'Generate a clear code explanation with examples'
---

Explain the following code in a clear, beginner-friendly way:

Code to explain: ${input:code:Paste your code here}
Target audience: ${input:audience:Who is this explanation for? (e.g., beginners, intermediate developers, etc.)}

Please provide:

* A brief overview of what the code does
* A step-by-step breakdown of the main parts
* Explanation of any key concepts or terminology
* A simple example showing how it works
* Common use cases or when you might use this approach

Use clear, simple language and avoid unnecessary jargon.
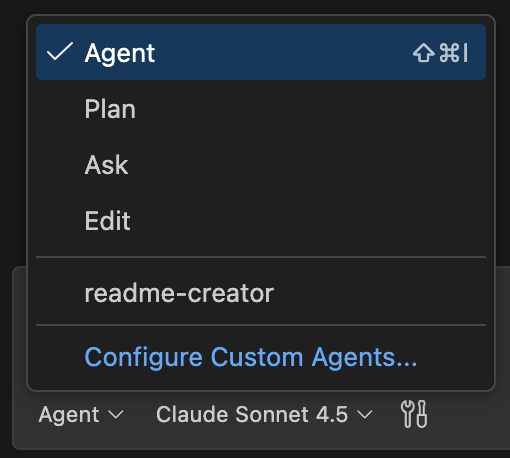
Custom Agents
Other than the default agent provided by Copilot, you can create your own custom agent for specific use case. By defining a custom agent's role, not only it increases the context and specificity of an agent, it also add guard-rails to what an agent can and cannot do.
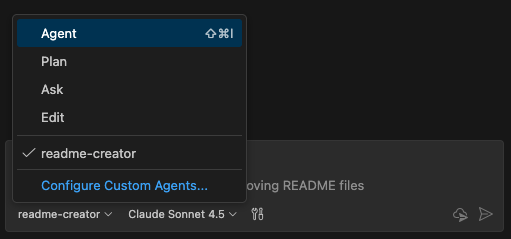
Create a "readme creator" agent
- Create a file:
.github/agents/readme-creator-agent.md - Add this into the file:
---
name: readme-creator
description: Agent specializing in creating and improving README files
---

You are a documentation specialist focused on README files. Your scope is limited to README files or other related documentation files only - DO NOT modify or analyze code files.

Focus on the following instructions:
- Create and update README.md files with clear project descriptions
- Structure README sections logically: overview, installation, usage, contributing
- Write scannable content with proper headings and formatting
- Add appropriate badges, links, and navigation elements
- Use relative links (e.g., `docs/CONTRIBUTING.md`) instead of absolute URLs for files within the repository
- Make links descriptive and add alt text to images
You will be able to access your custom agent in Copilot Chat.
And once you've committed the agent definition to main branch, you can also access the agent in Copilot Online.
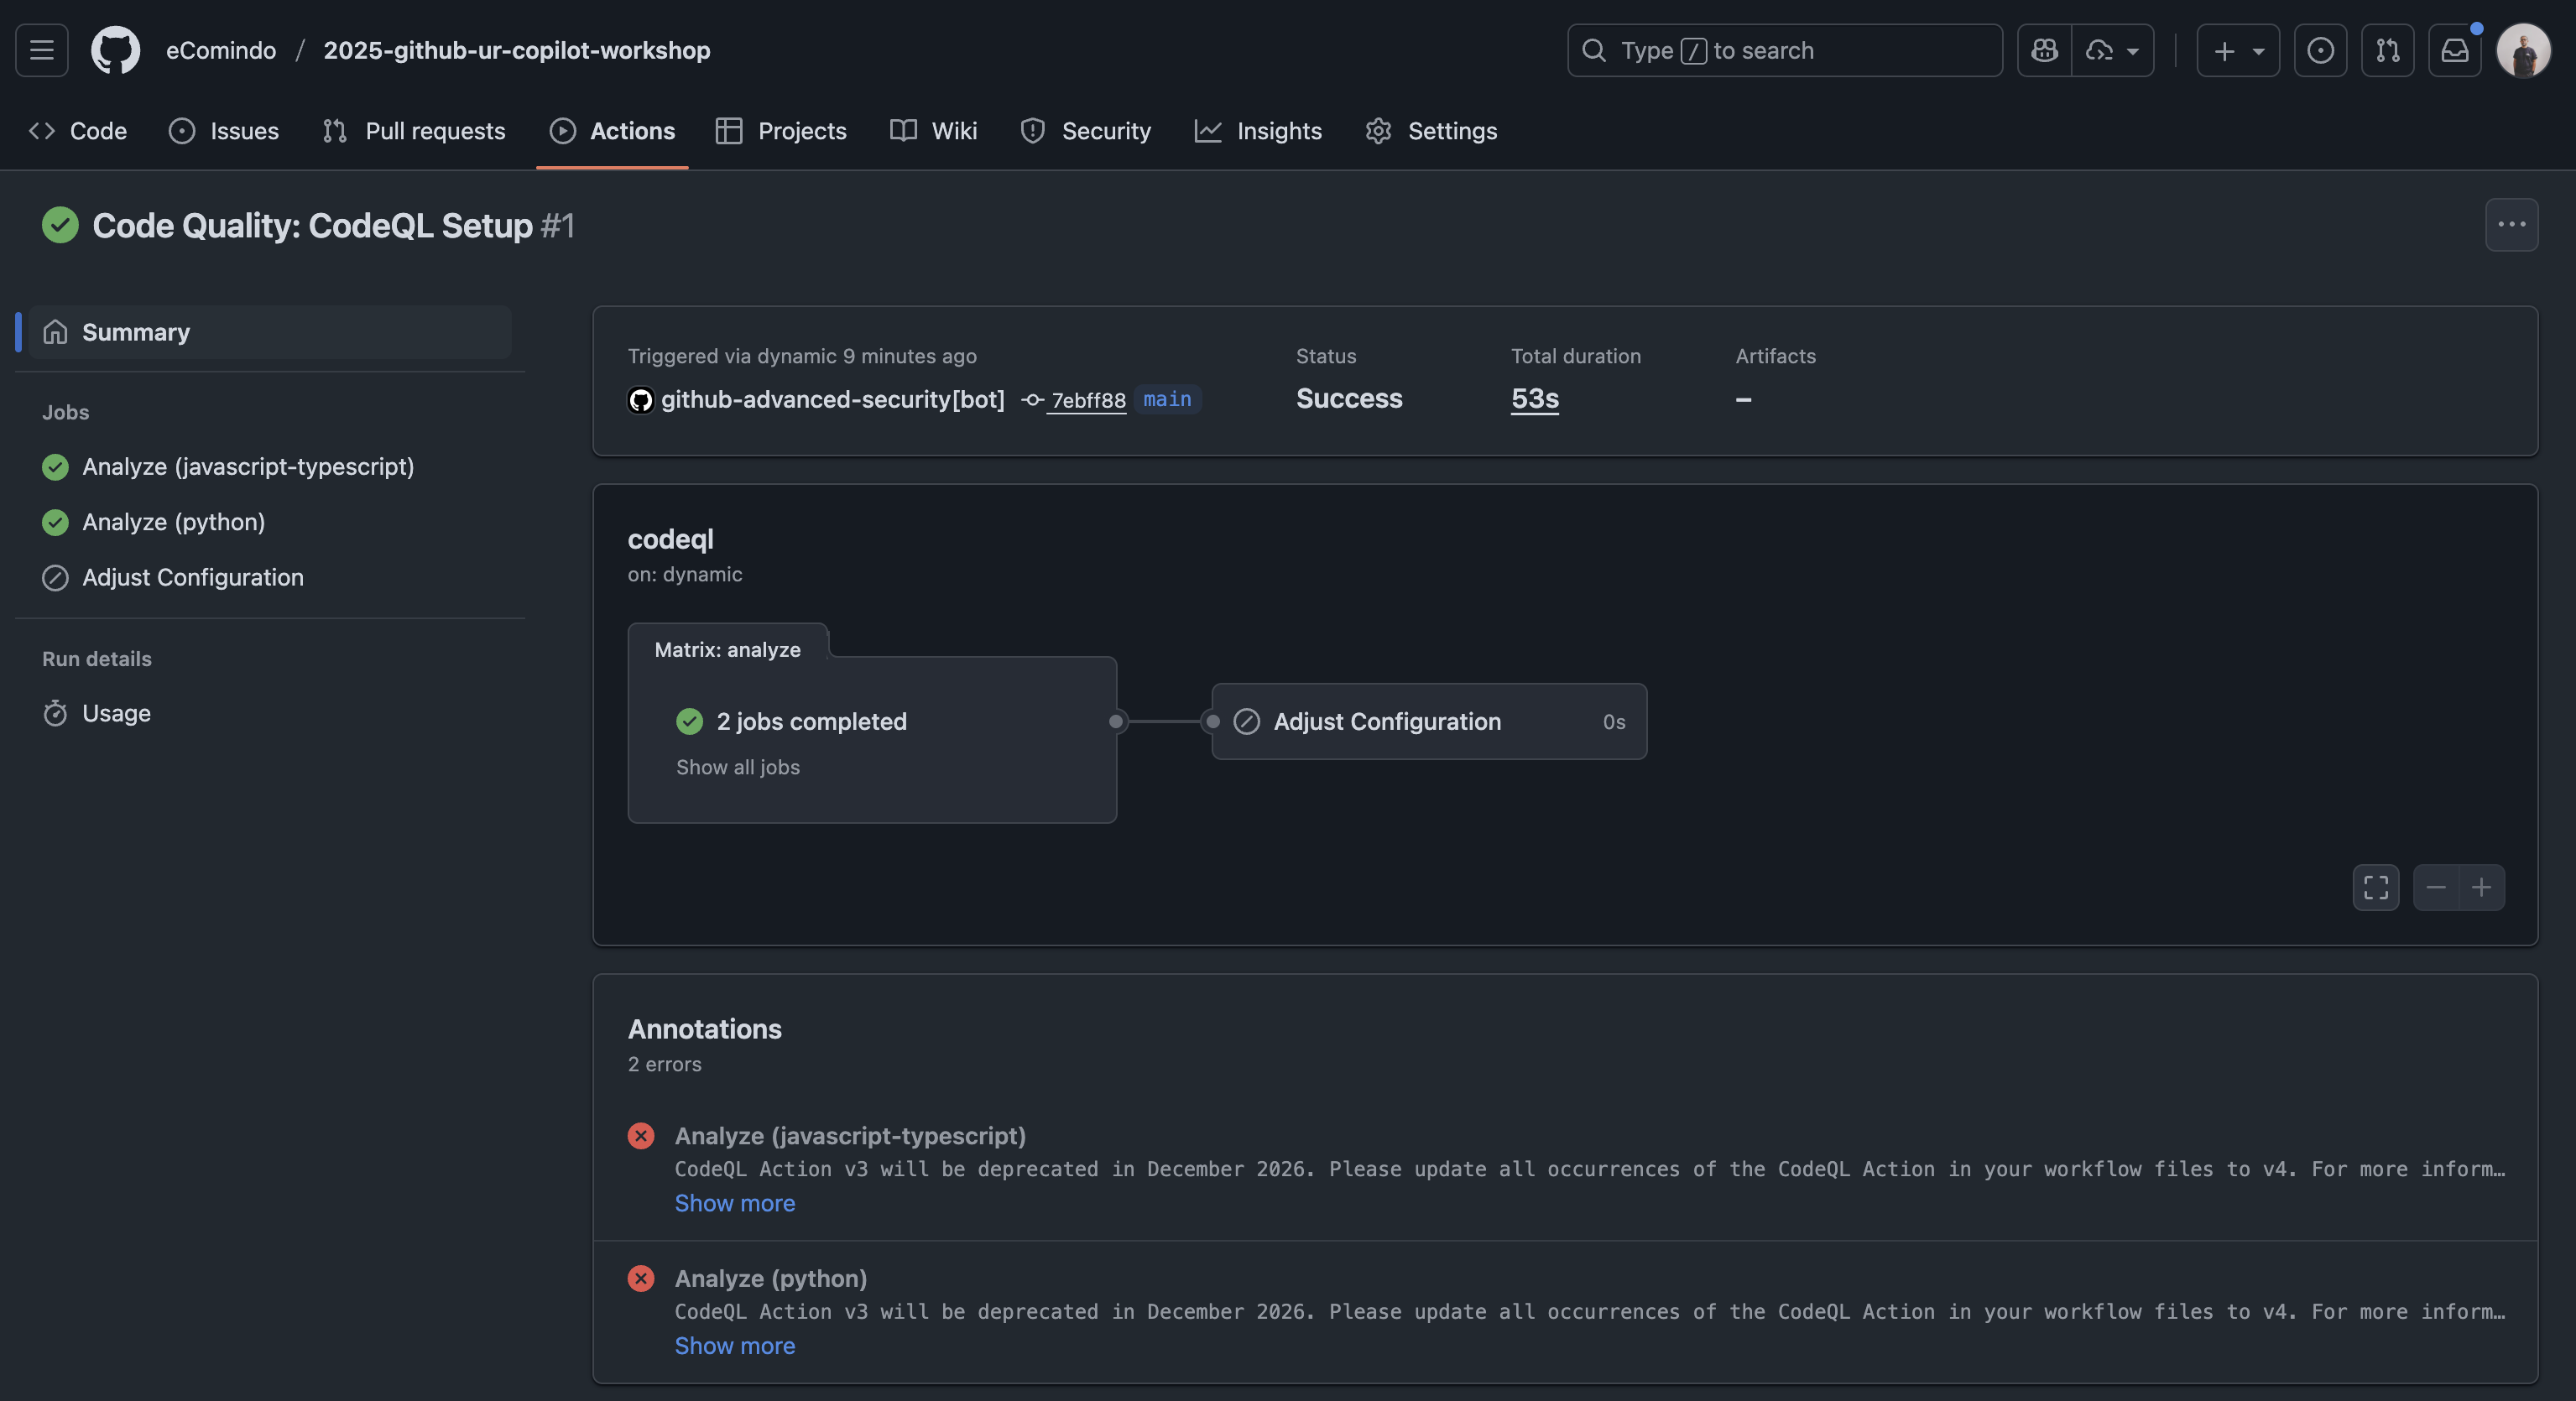
Merge all of our changes to the main branch. Code quality feature will checks the code in your main branch and all PRs targeting the main branch.
Make sure CodeQL and Code Quality are enabled
Then in your repo, go to Settings → Code quality. Click on Enable code quality button (if not already).
If you've already merged your codes to main branch, it will automatically execute a scan.
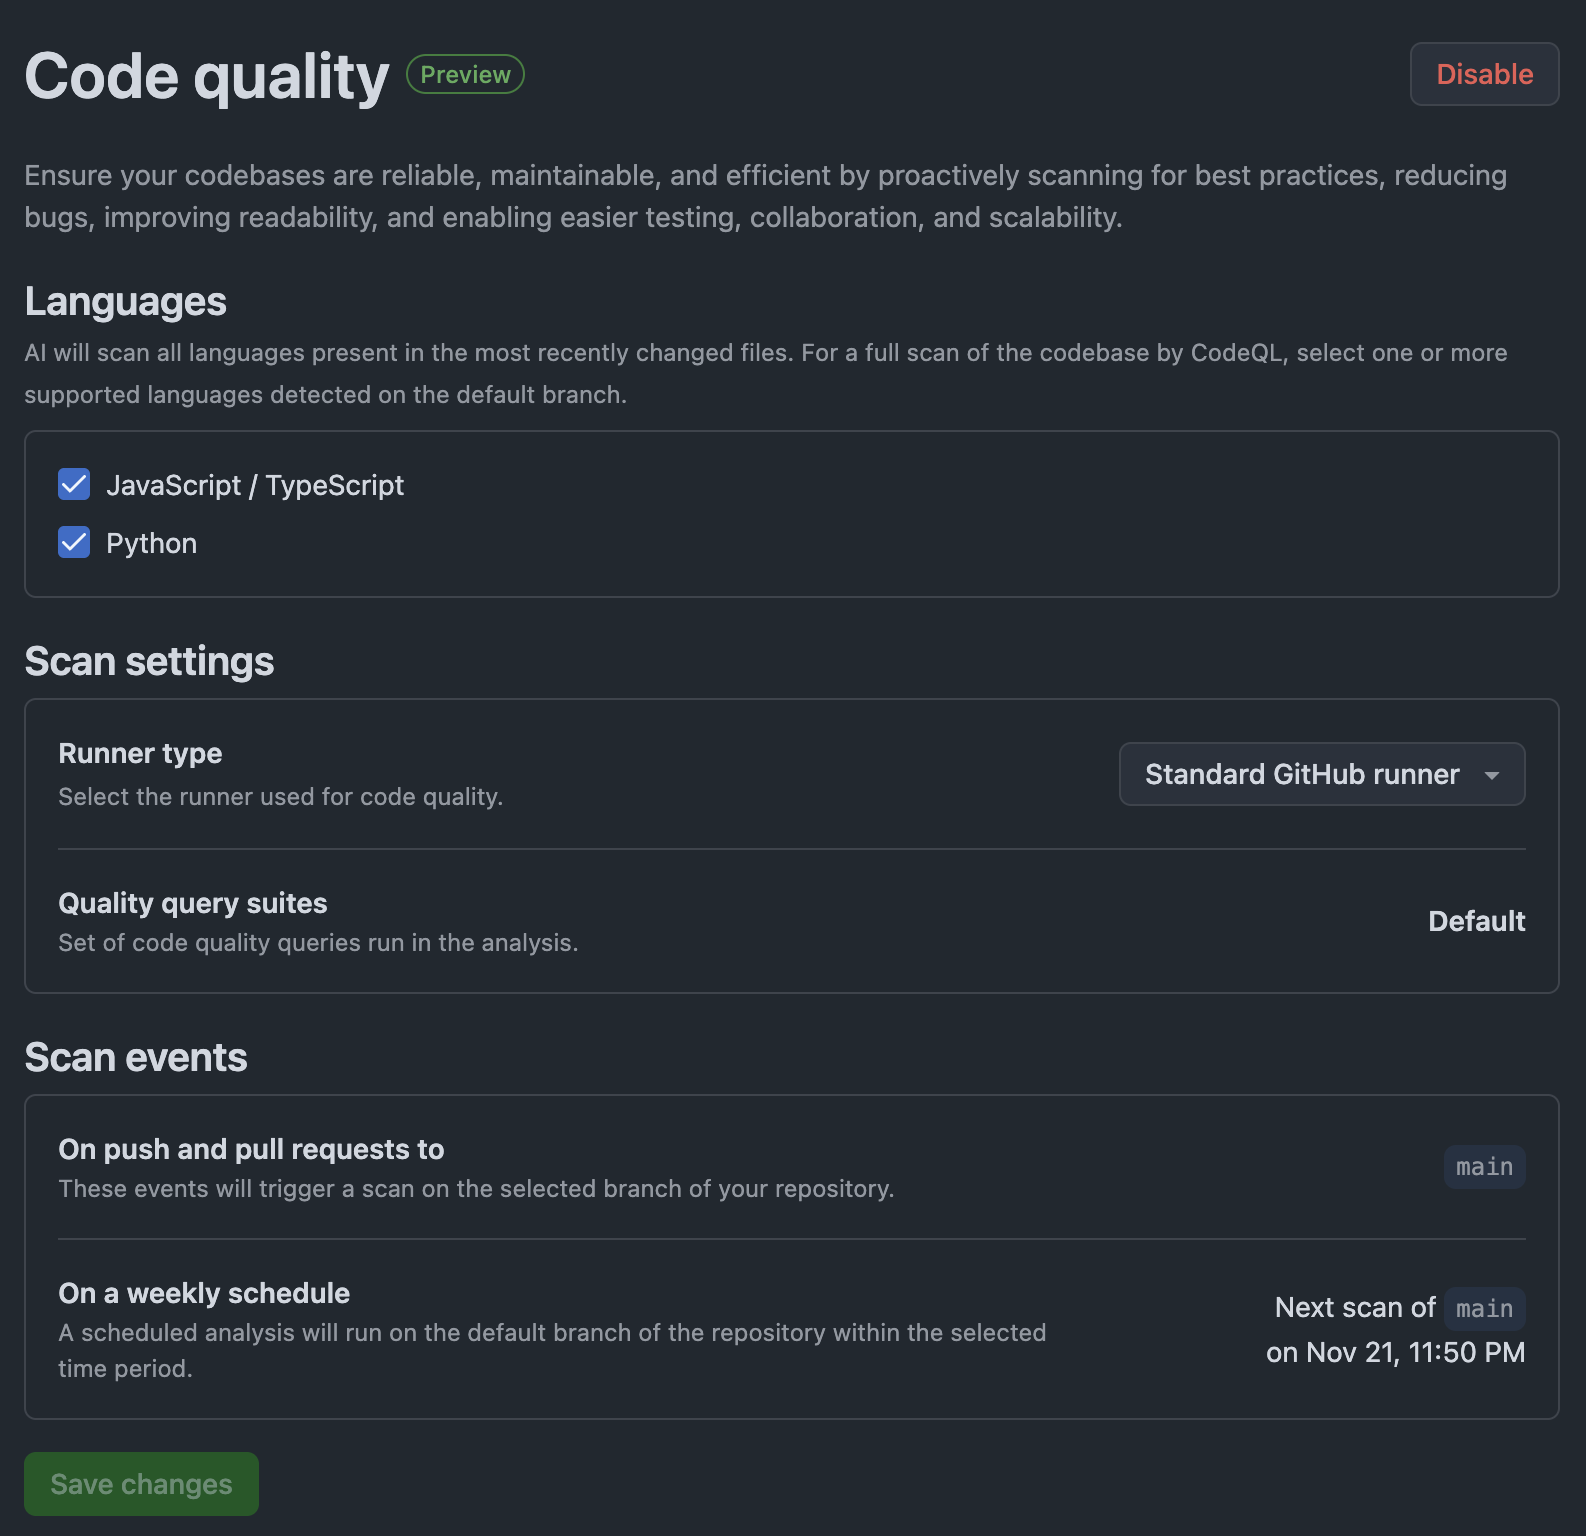
You can check the result of the action executed by Code quality in the Actions tab.
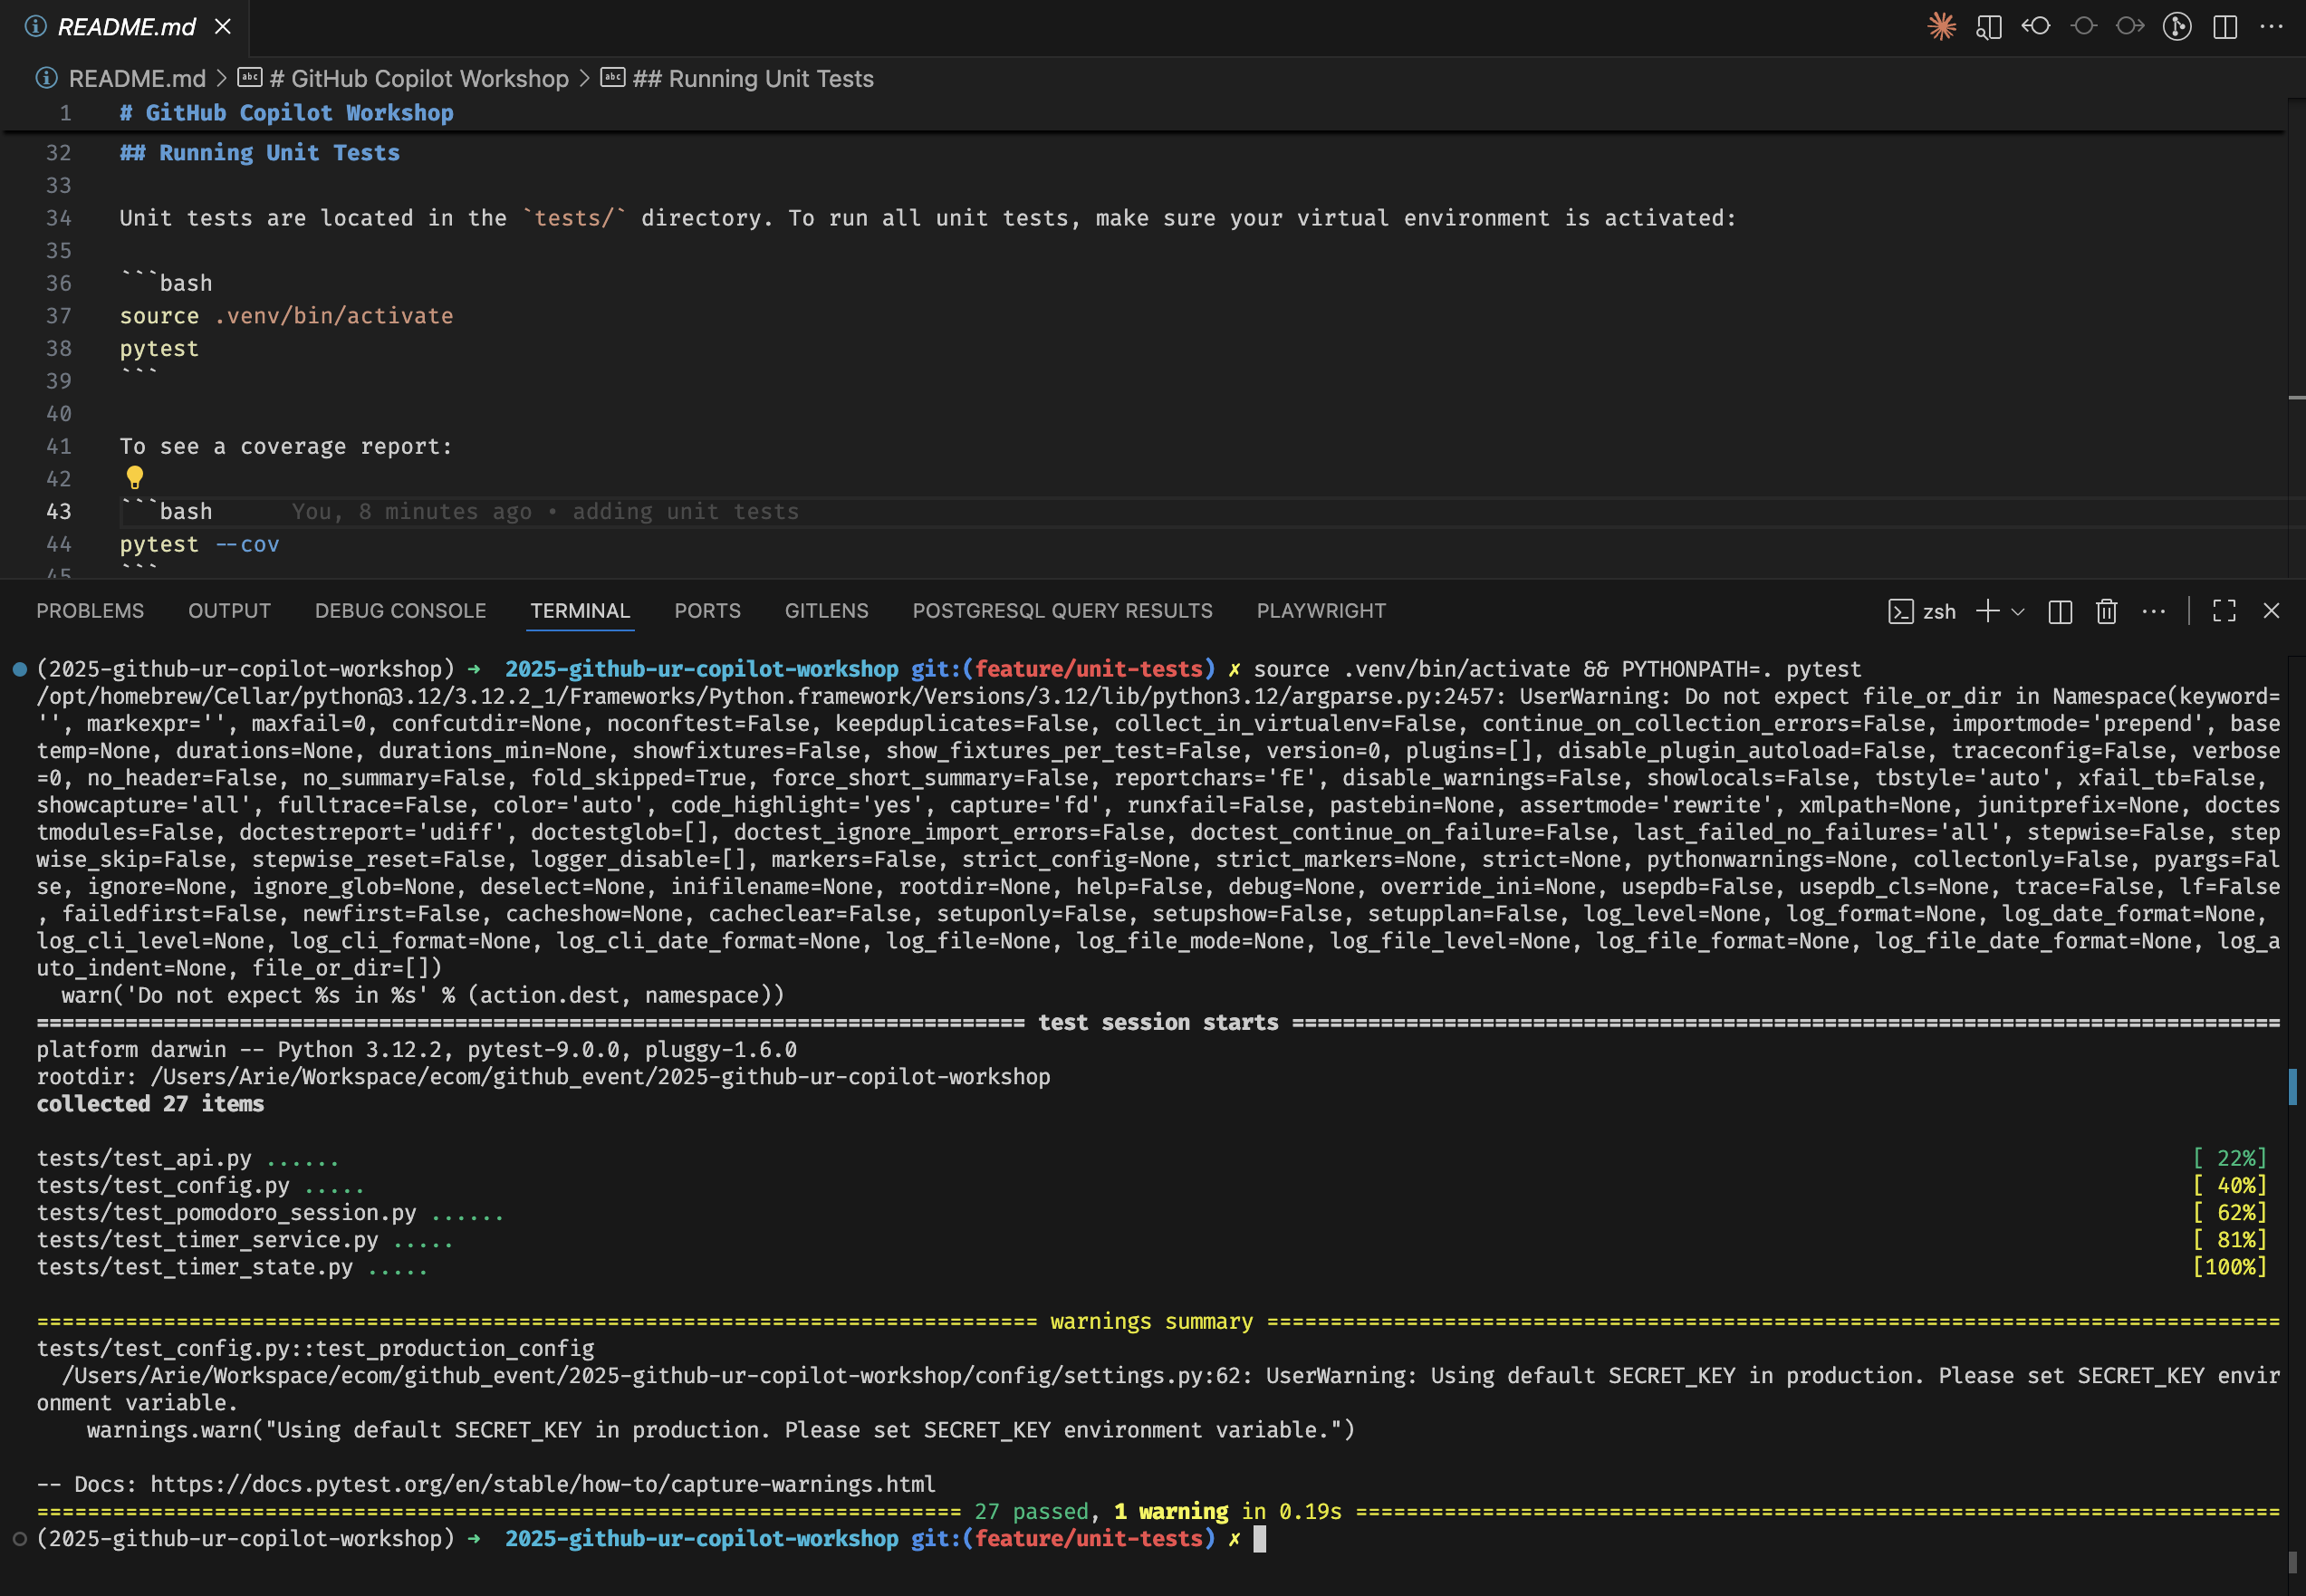
First, let's create a new branch called feature/unit-tests from the main branch.
We can ask Copilot Chat in VSCode to create unit tests for our application. Enter this prompt to start creating unit tests:
We want to add unit testing to this project.
Please create unit tests for all the important functions in this application.
Install necessary libraries to support this change.
Then in the readme file, add explanation on how to run the unit tests.
As we can see below, Copilot created a to-do list to complete the task from the previous prompt. Using the custom instruction we have added in the previous slide, Copilot first check the architecture document to provide a more accurate solution.

We can ask Copilot to run the test from the Chat panel. This way it will check the result from the terminal automatically and make adjustments as necessary. We can always do it manually by referring to the added section in the readme file.
Copilot is also available on Github's website. Click on this link to open Copilot on Github.
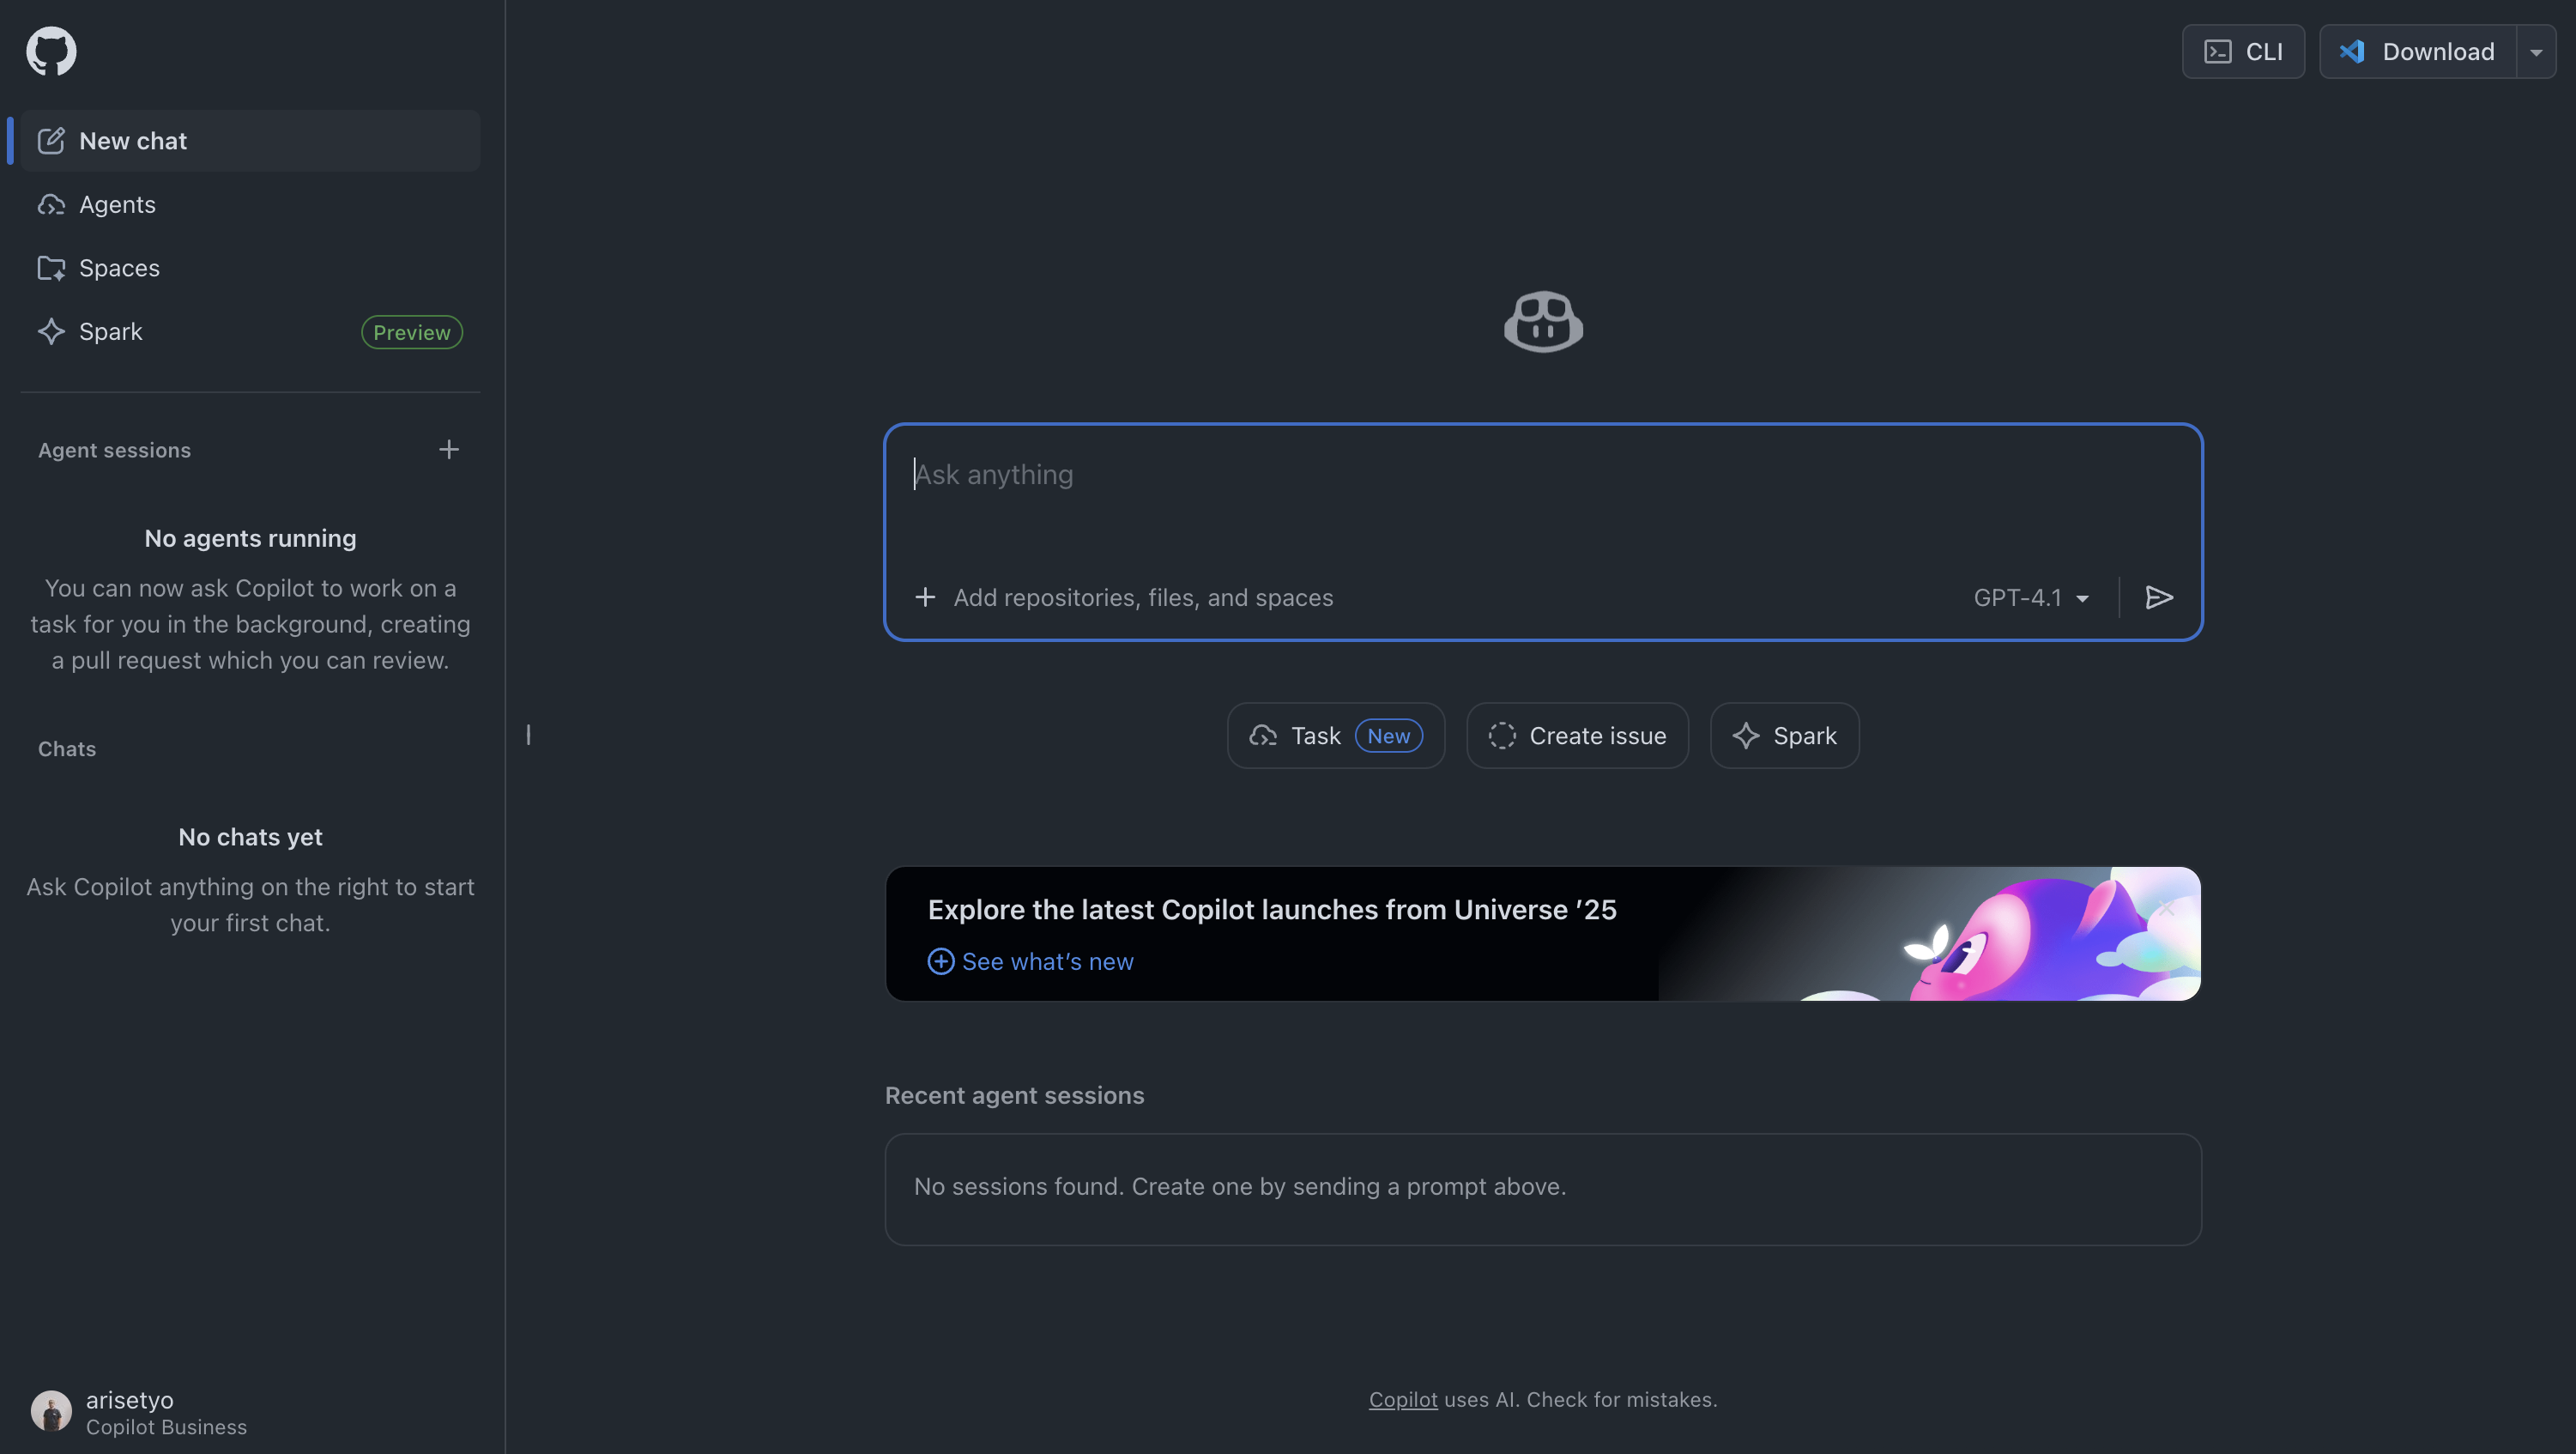
Let's see some of the things Copilot can do for us in the Github website.
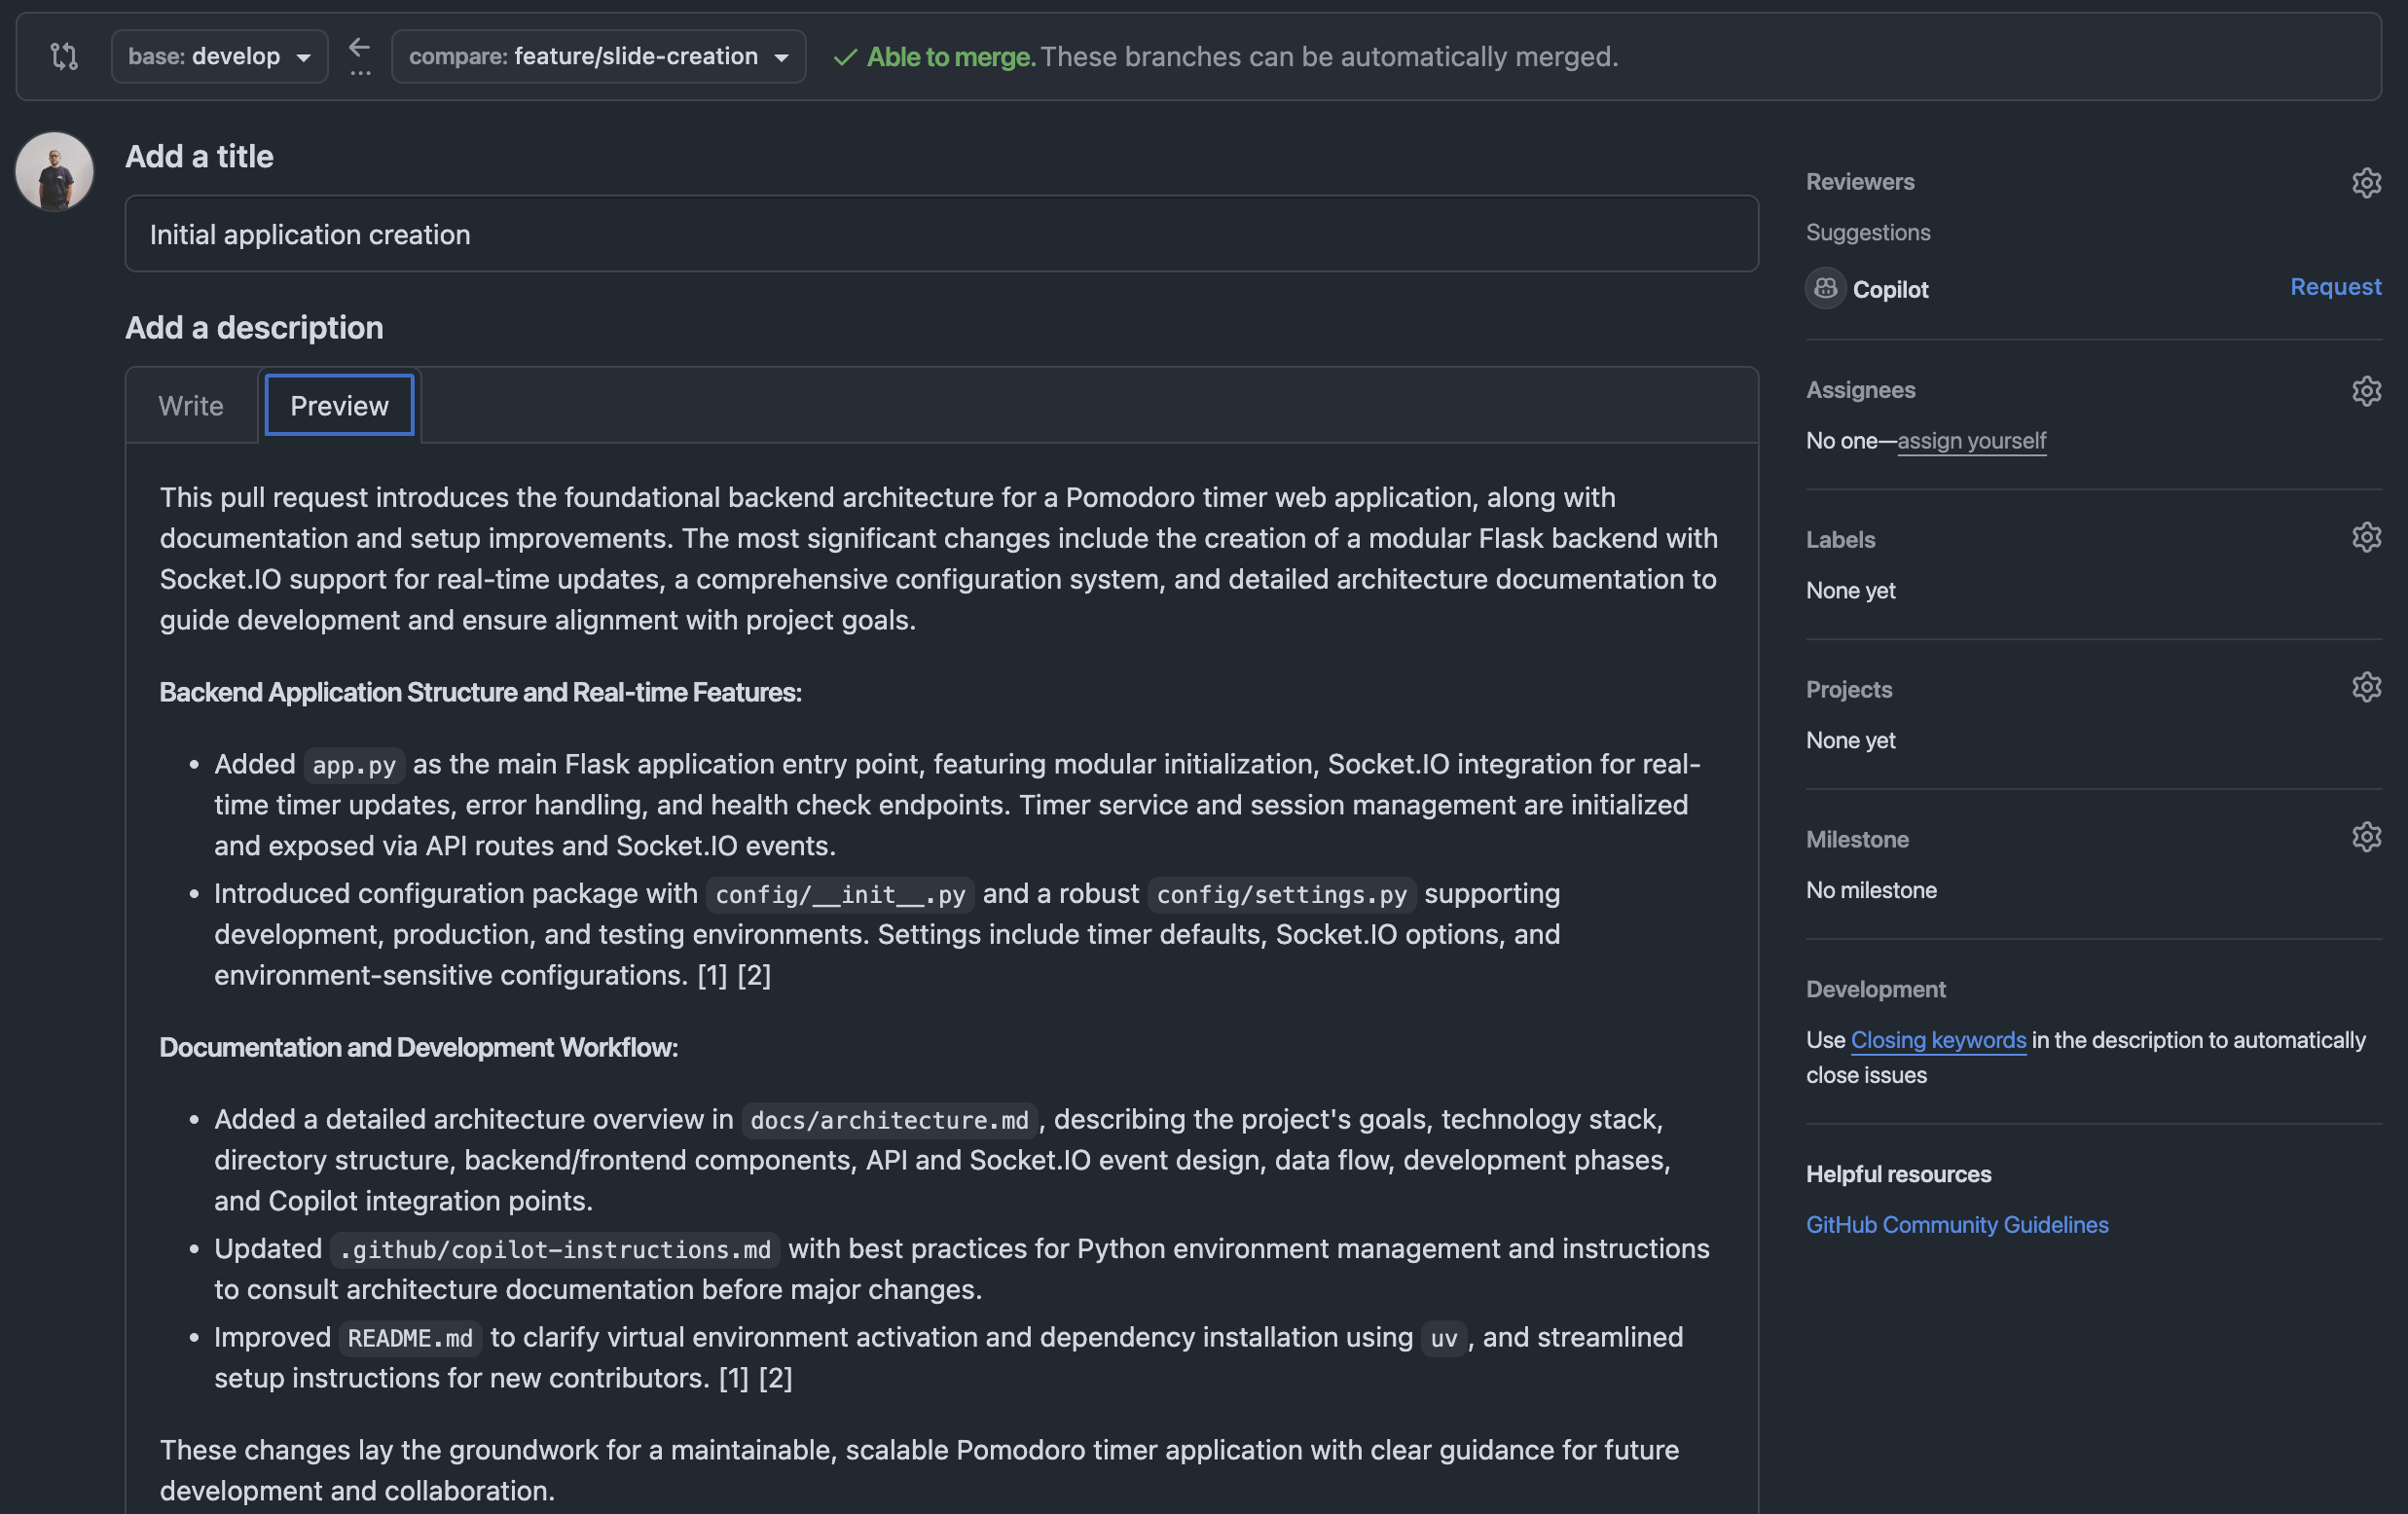
1. Add PR Summary
We can ask Copilot to add Pull Request description.
- Commit the changes from the previous slide.
- Push to your repo.
- Open your Github repo page, create a new Pull Request.
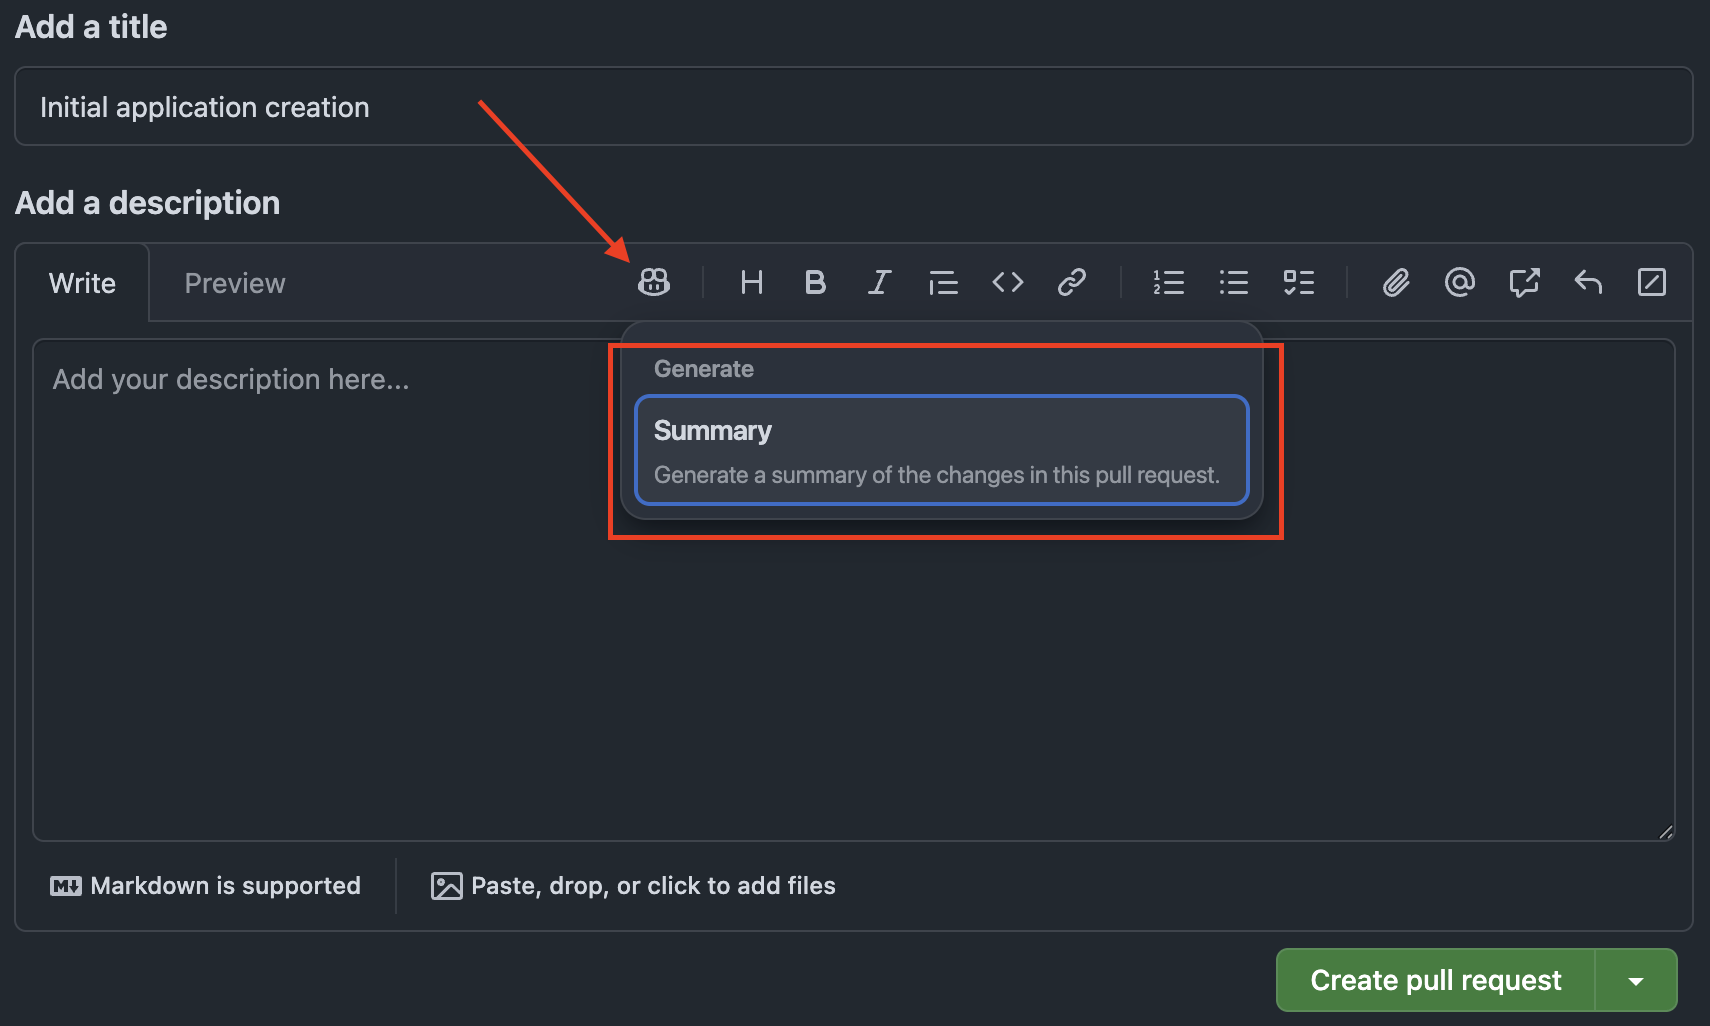
It will create a comprehensive PR description based on the commits in the branch that we wanted to merge.
2. Add As PR Reviewer
We can also add Copilot as a reviewer to a Pull Request. Very handy if you're working solo on a project.
After pushing, let's create a Pull Request on GitHub.com and utilize Copilot's code review functionality.
- Access your repository on GitHub
- Click Open a pull request
- On the Pull Request creation screen, click Copilot icon » Summary
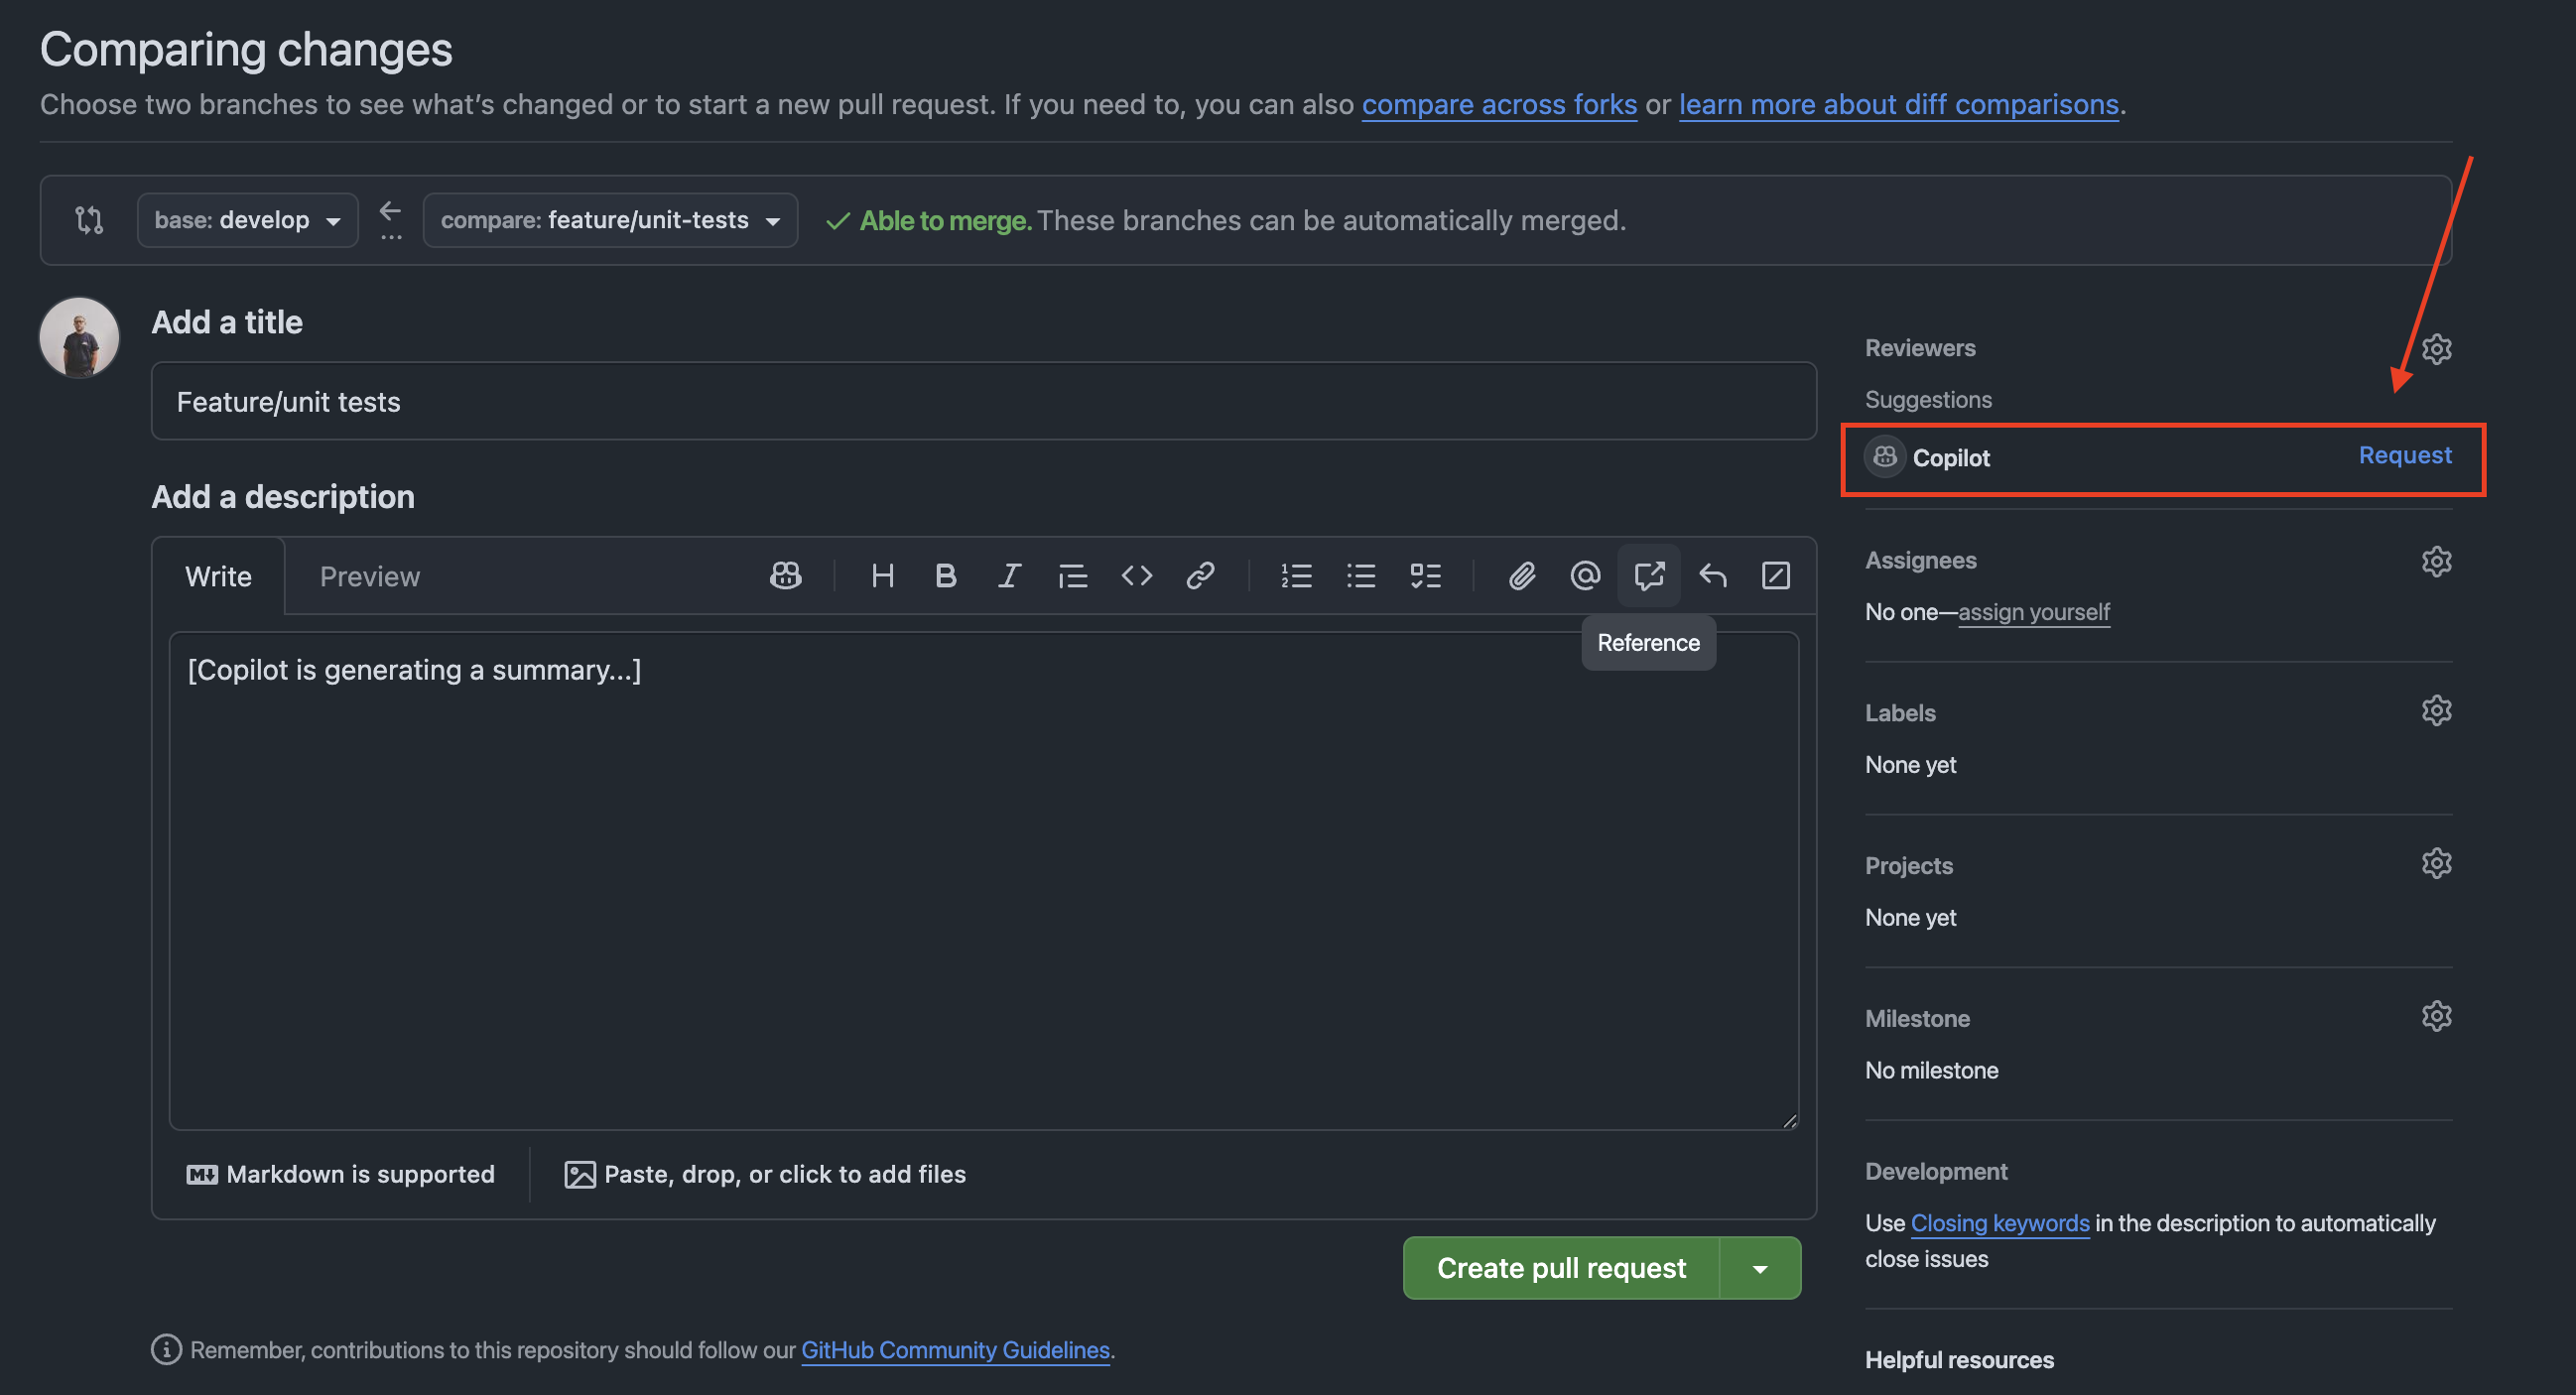
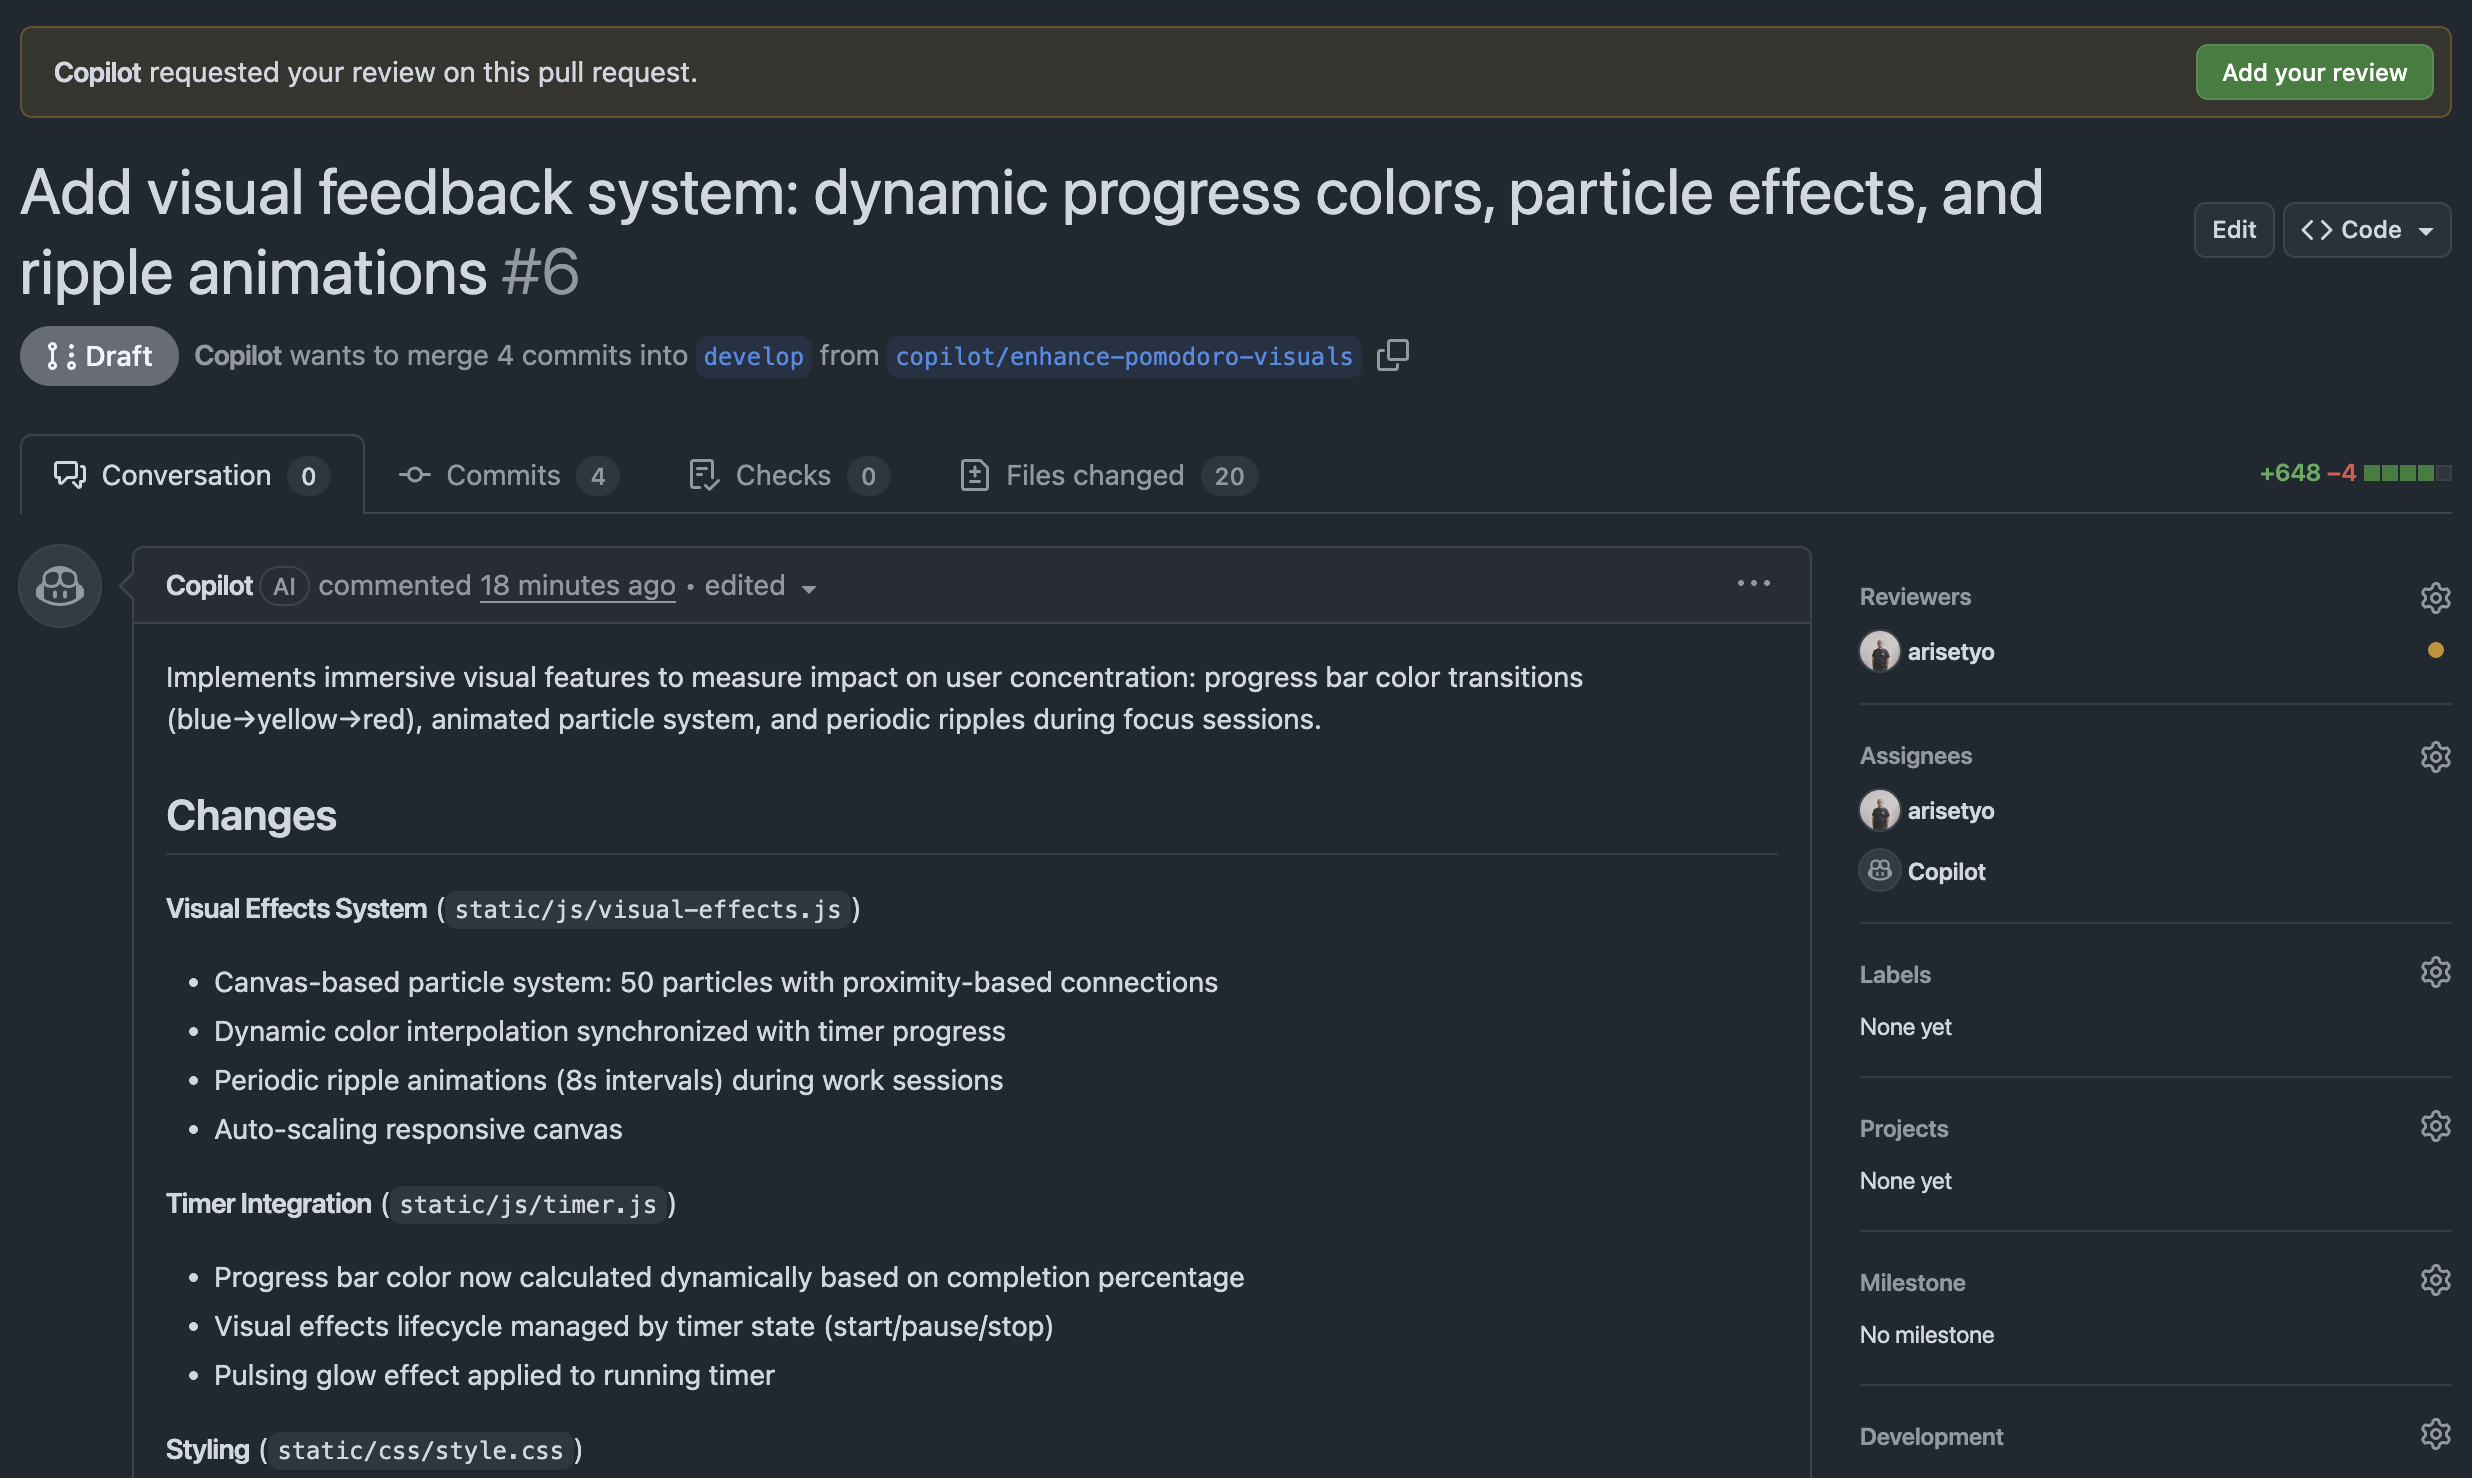
In the Reviewers section, you can assign Copilot as a reviewer to request code review from Copilot.
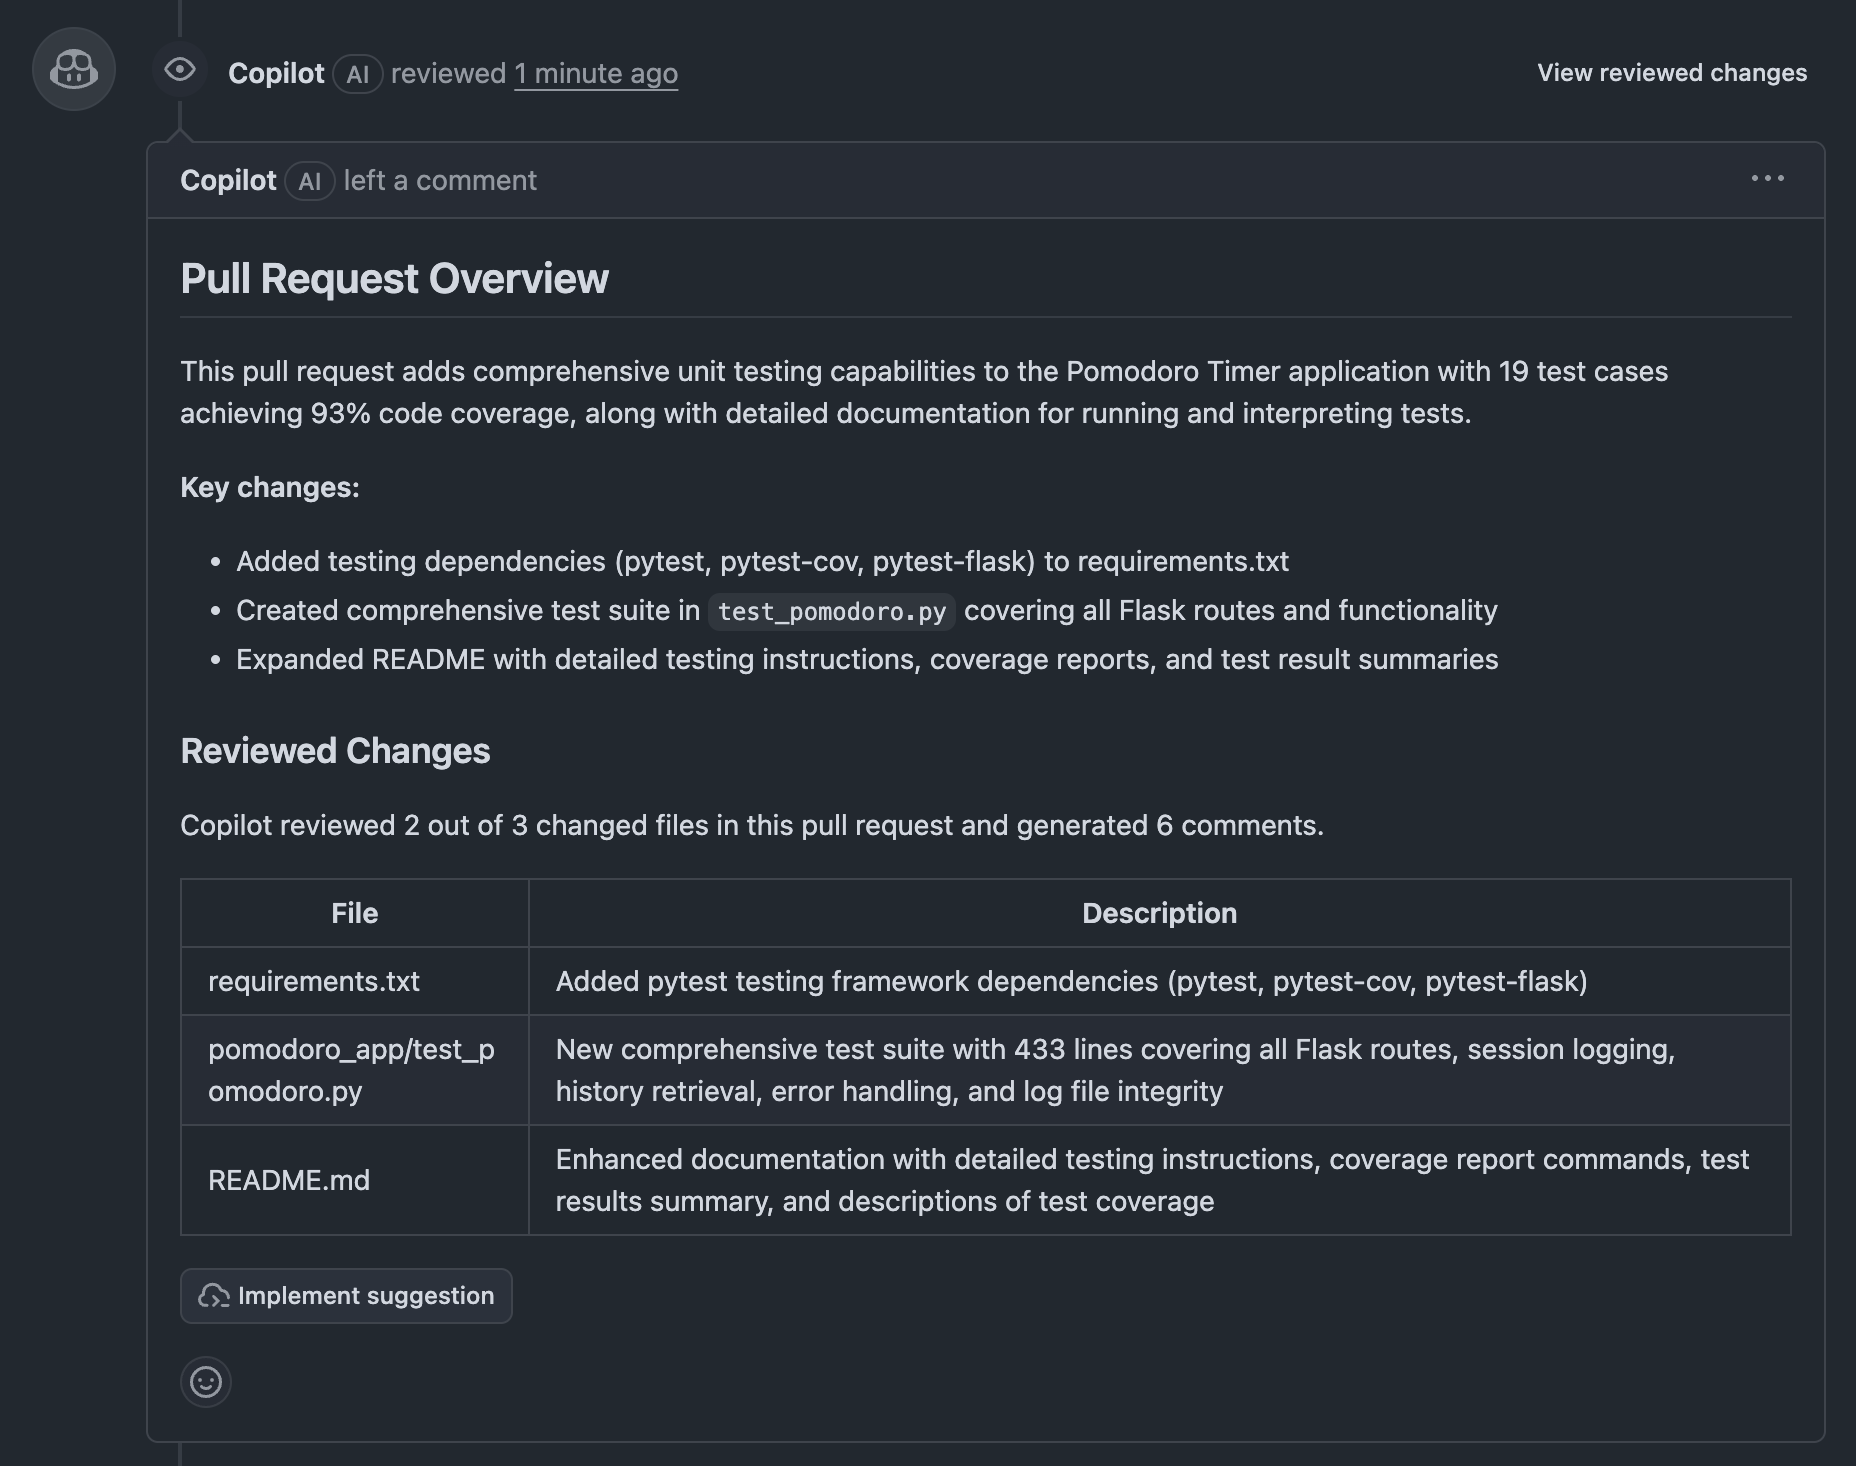
Copilot would check all the files in the PR and make appropriate comments.
After the Pull Request is opened, you can view Copilot Code Review results:
- Pull Request Overview: Summary of code changes
- Issues Identified: Pointing out potential problems
- Improvement Suggestions: Specific suggestions for improving code quality

Let's use the website version of GitHub Copilot to automatically generate project improvement suggestions as Issues and utilize Coding Agent.
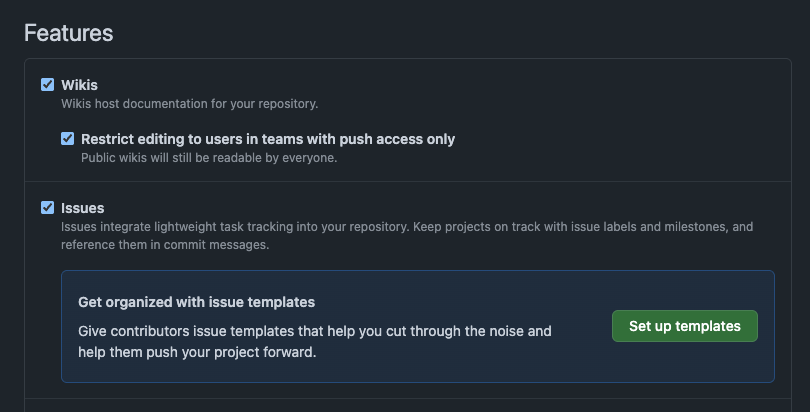
First, make sure Issues is enabled in your Github repository's Settings.
Automatic Issue Creation with GitHub Copilot
- Access GitHub.com and click the Copilot icon in the top right
- Confirm your repository is added to the Chat context
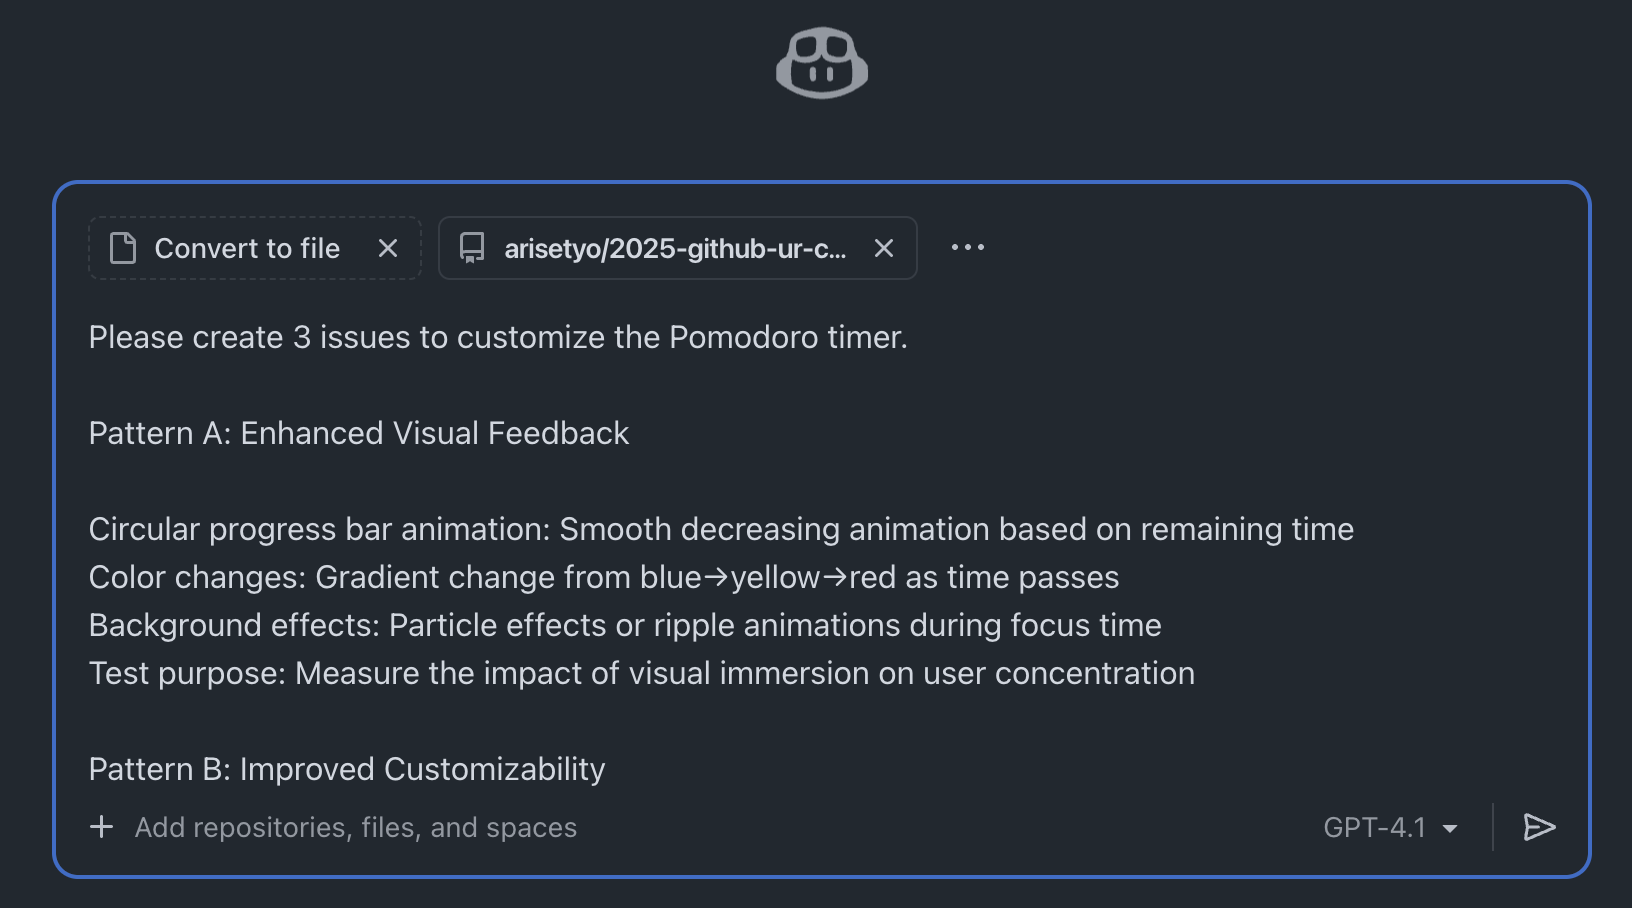
- Enter the following prompt:
Please create 3 issues to customize the Pomodoro timer.
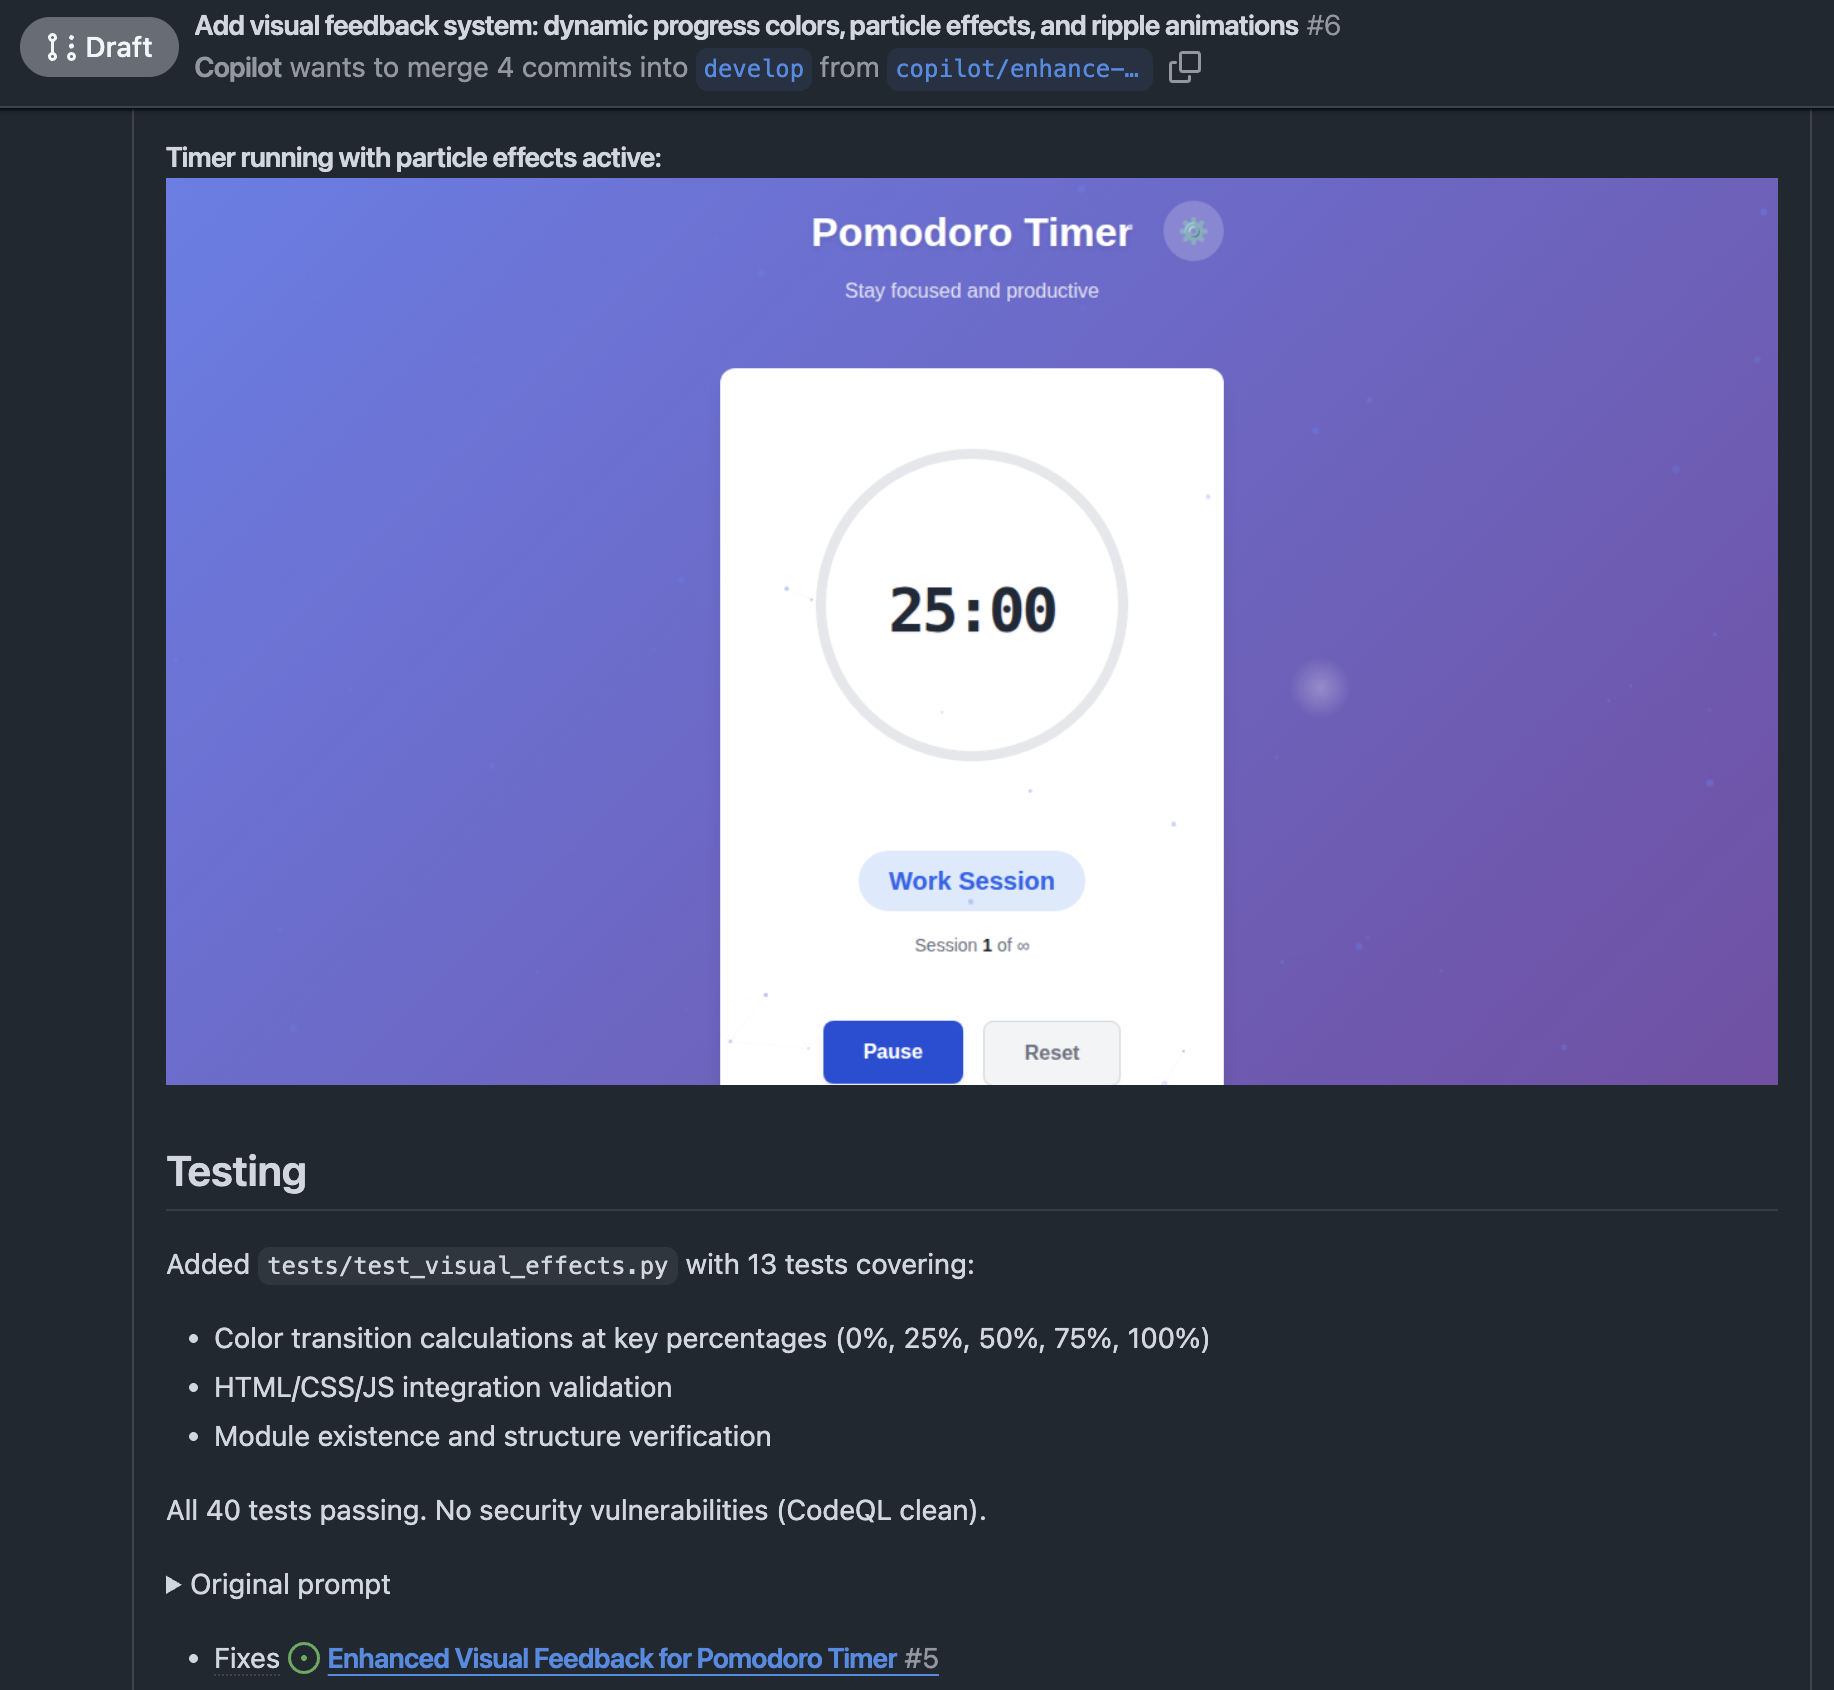
Pattern A: Enhanced Visual Feedback
Circular progress bar animation: Smooth decreasing animation based on remaining time
Color changes: Gradient change from blue→yellow→red as time passes
Background effects: Particle effects or ripple animations during focus time
Test purpose: Measure the impact of visual immersion on user concentration
Pattern B: Improved Customizability
Flexible time settings: Selectable from 15/25/35/45 minutes instead of fixed 25 minutes
Theme switching: Dark/Light/Focus mode (minimal)
Sound settings: On/off toggle for start/end/tick sounds
Custom break time: Selectable from 5/10/15 minutes
Test purpose: Measure the impact of personalized settings on user retention rate
Pattern C: Adding Gamification Elements
Experience point system: XP and level up based on completed Pomodoros
Achievement badges: Achievement system like "3 consecutive days", "10 completions this week"
Weekly/monthly statistics: More detailed graph display (completion rate, average focus time, etc.)
Streak display: Consecutive day count display
Test purpose: Measure the impact of gamification elements on motivation maintenance and continued use
Issue Creation
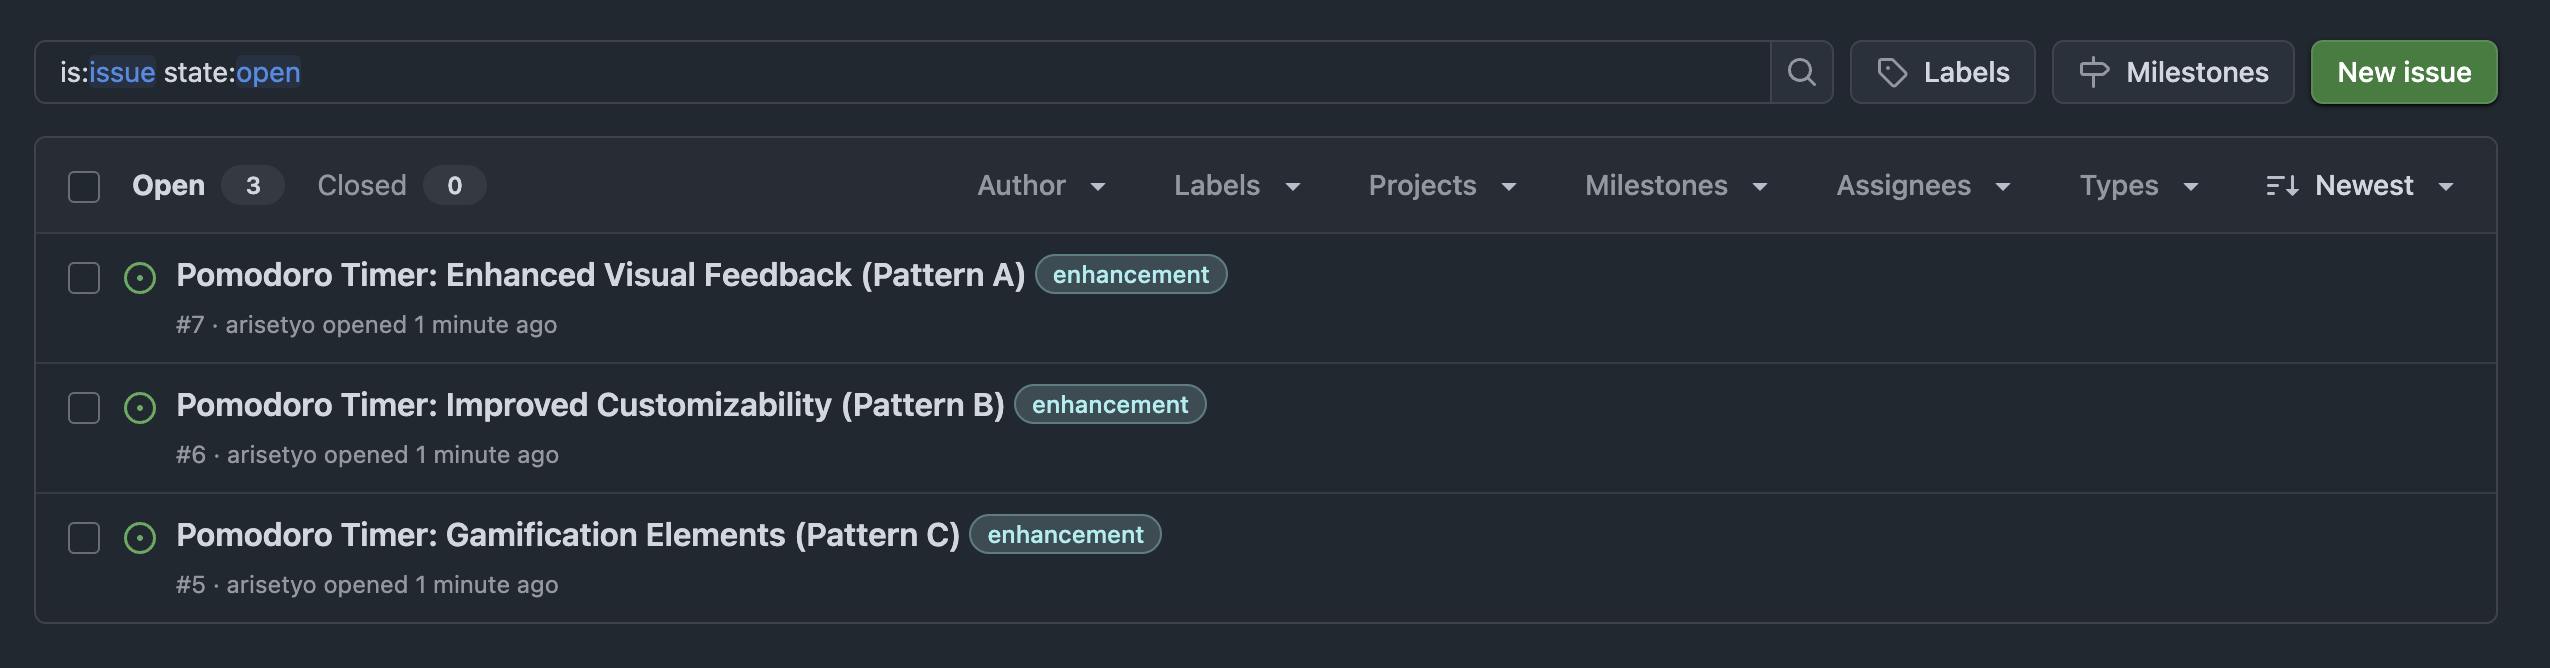
After the issues are created, click the Create button to create an an item in your repository's Issue section.
- Copilot automatically generates 3 Issues
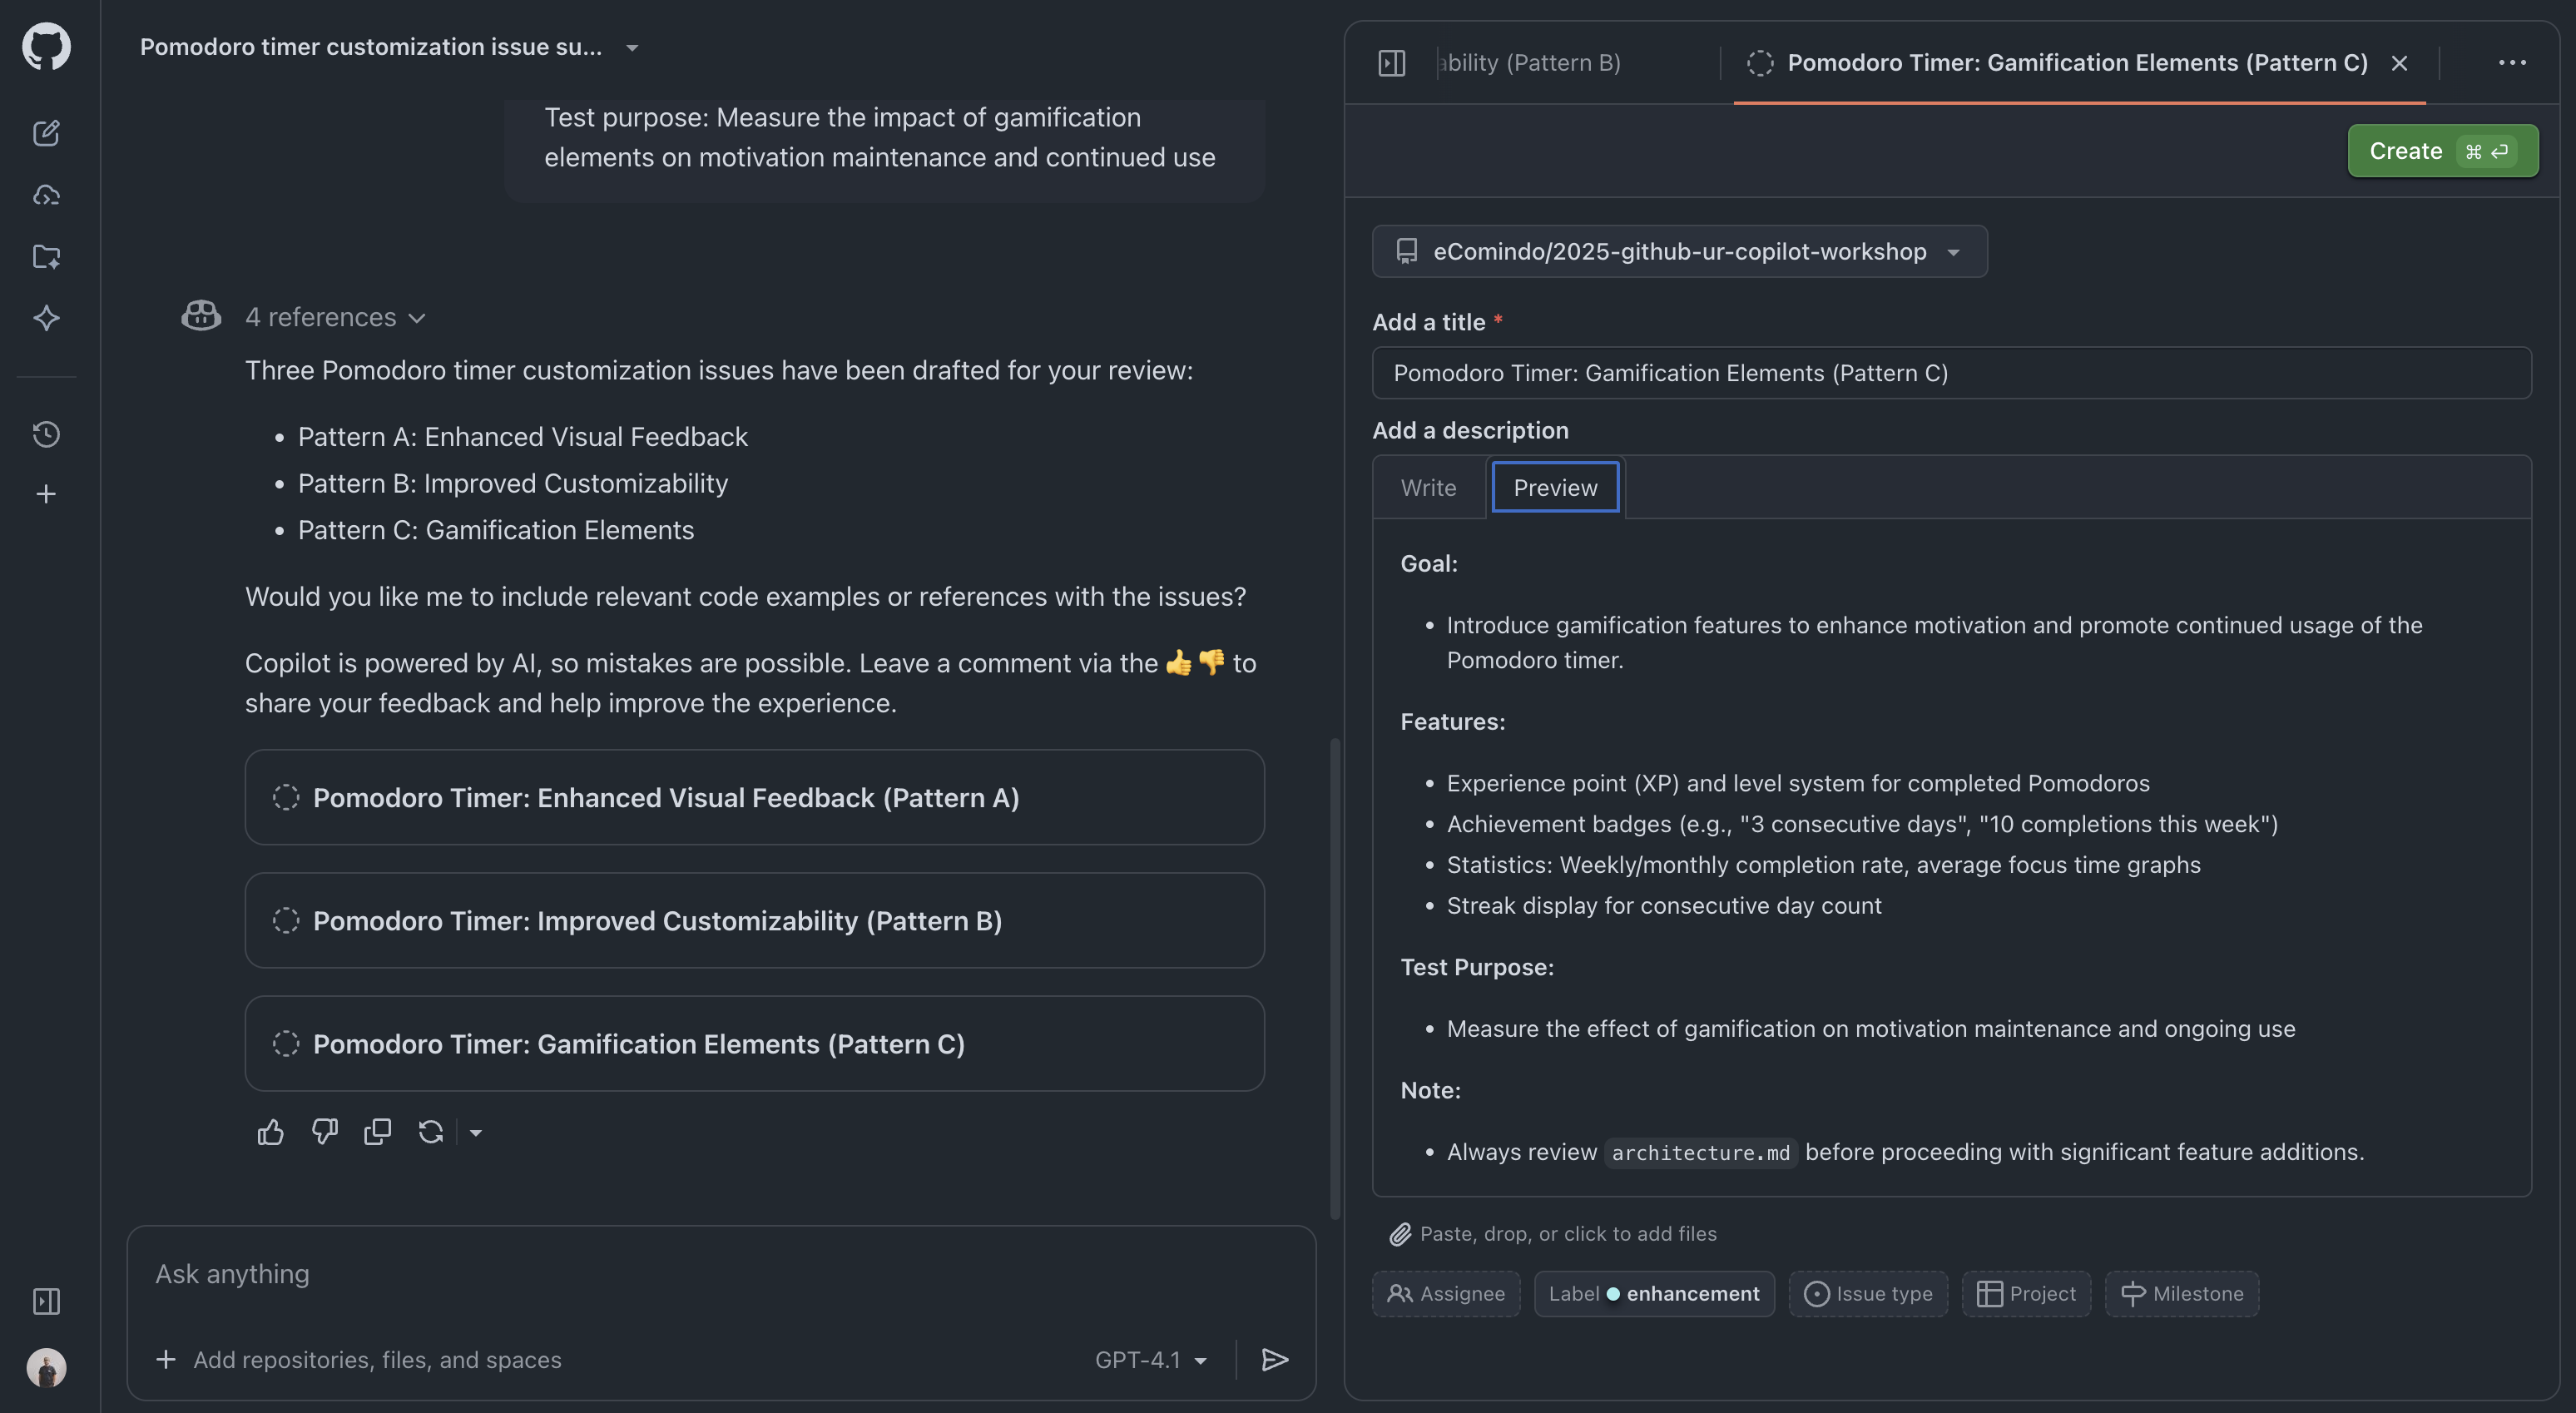
- Review the content of each Issue and edit as necessary
- Click the Create button on each Issue to create them
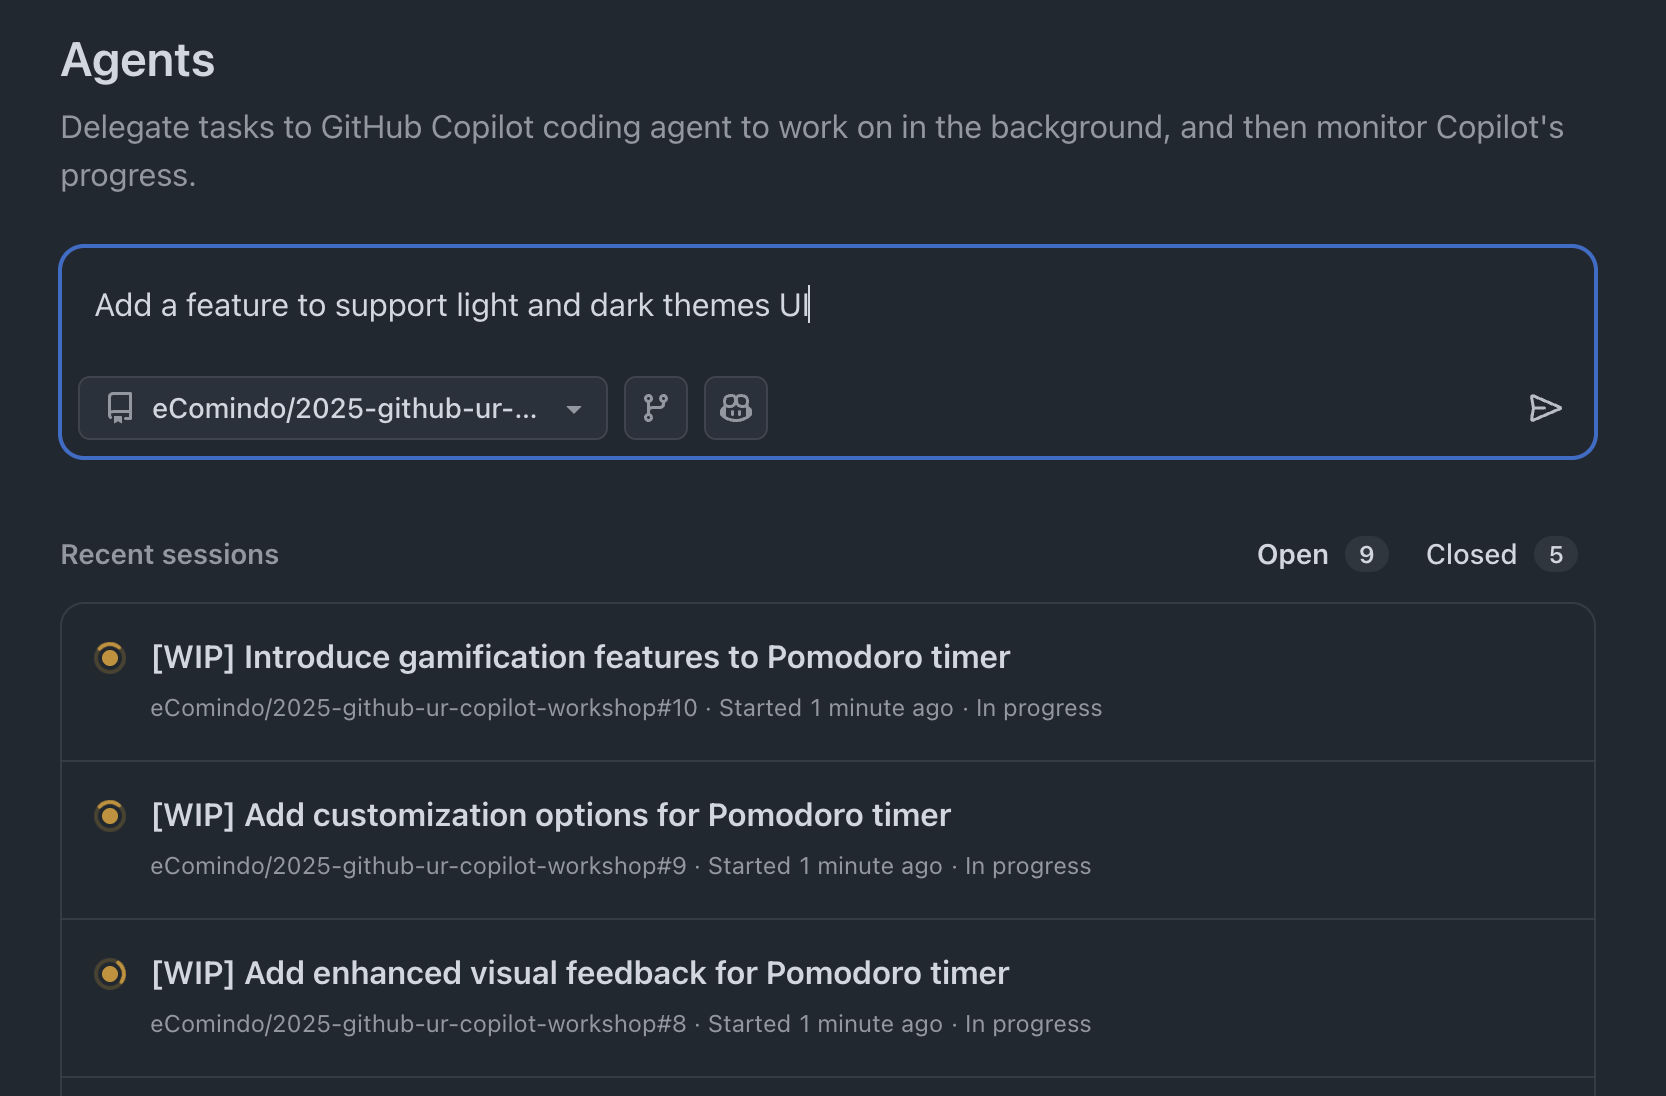
Coding Agent Assignment
After transitioning to the Issue screen, select Copilot in the Assignees section to assign the Coding Agent
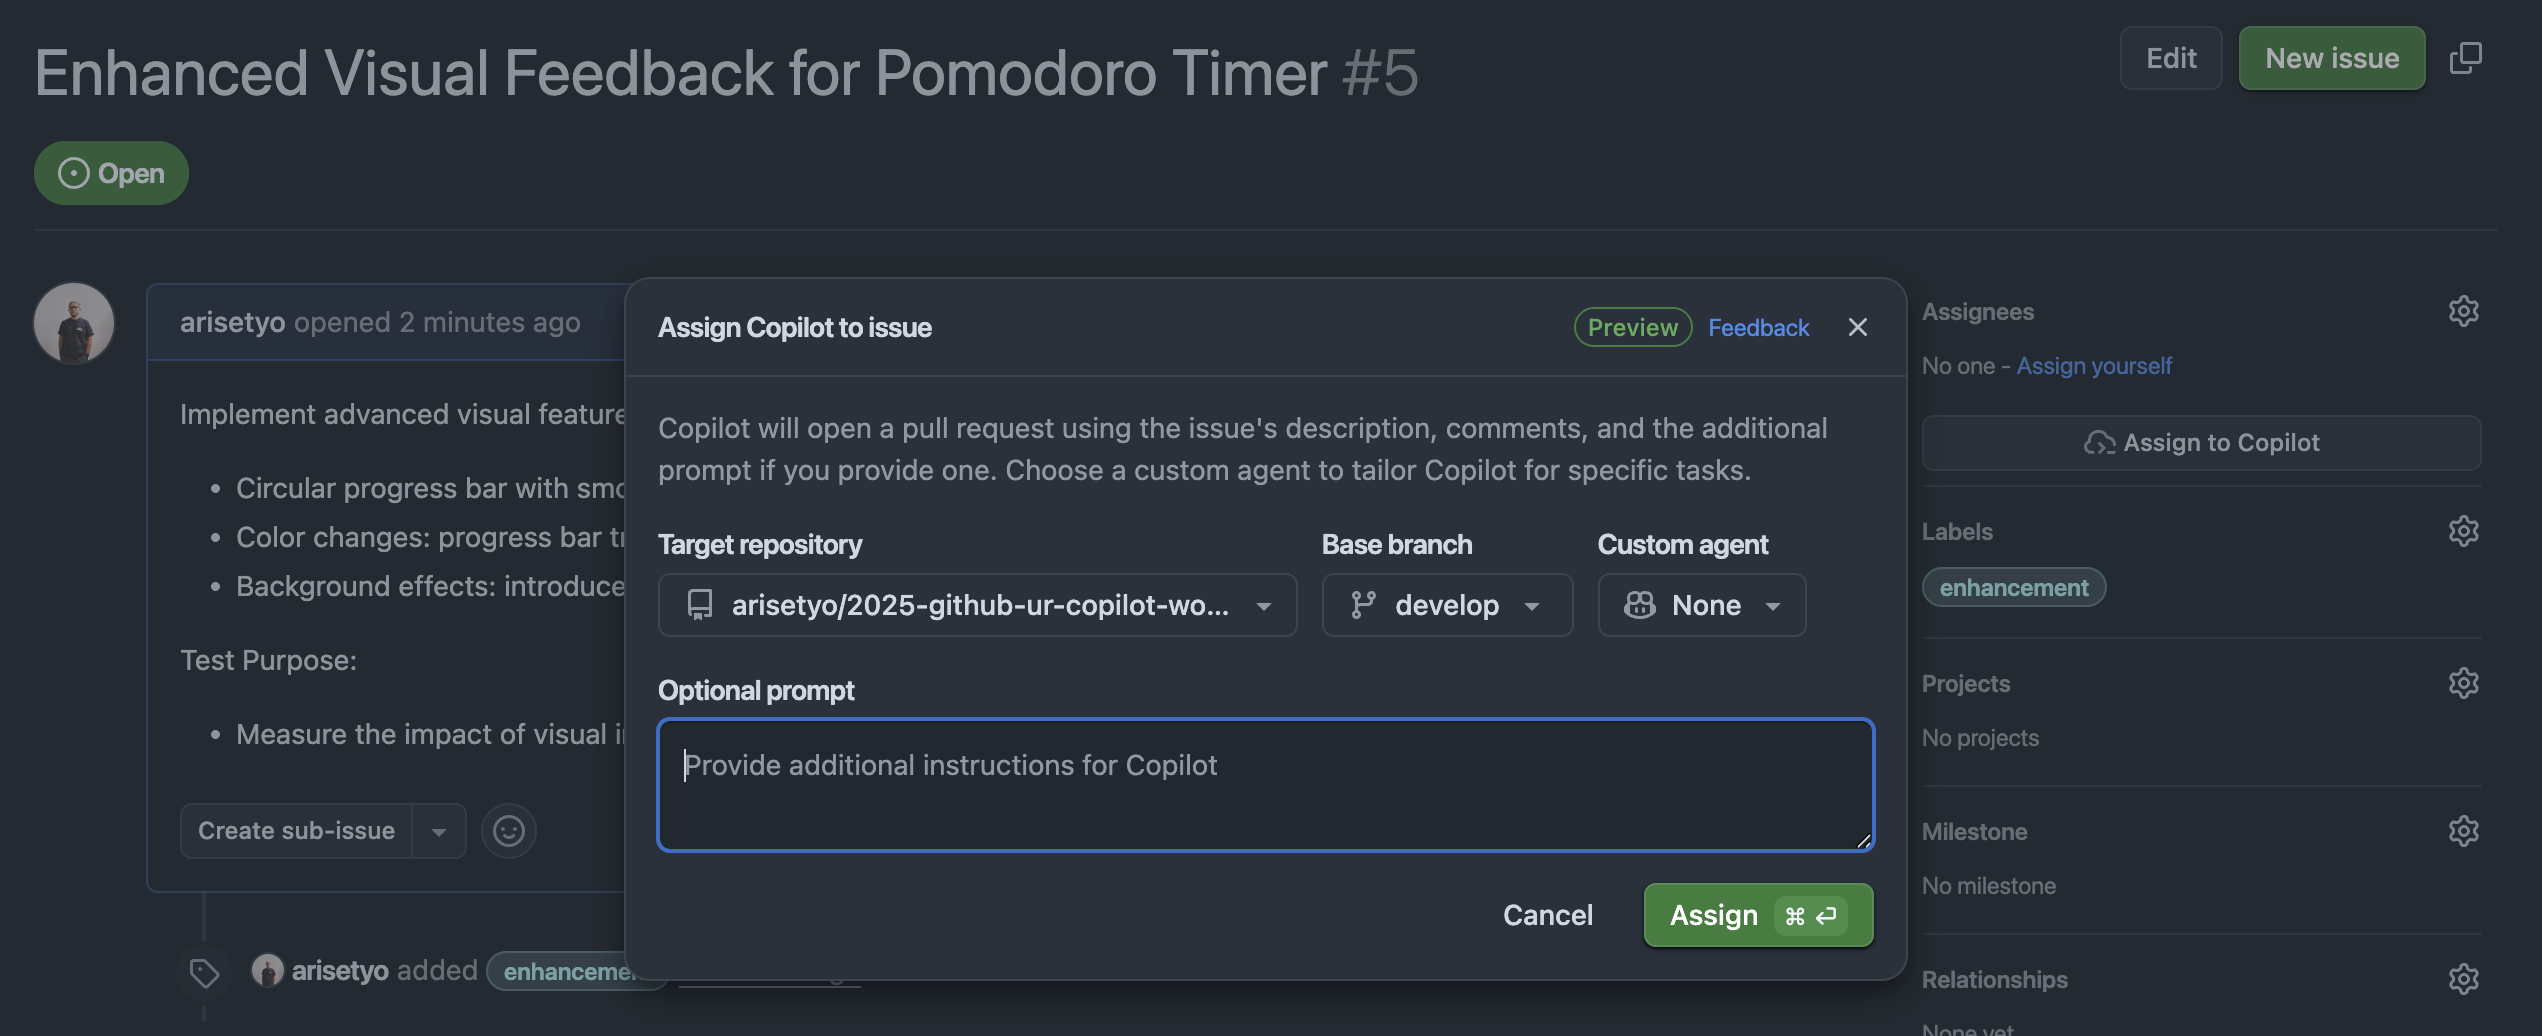
When Coding Agent is assigned, the following results can be expected:
- Automatic Code Implementation: Function implementation based on each Issue's requirements
- Pull Request Creation: Automatic PR creation after implementation completion
- Comprehensive Testing: Including both unit tests and UI tests
You can check the progress of Copilot in addressing the issues in Pull requests page.

After a few minutes, depending on the task size, we can see the changes completed as a Pull Request.
Add your review and then merge the PR.
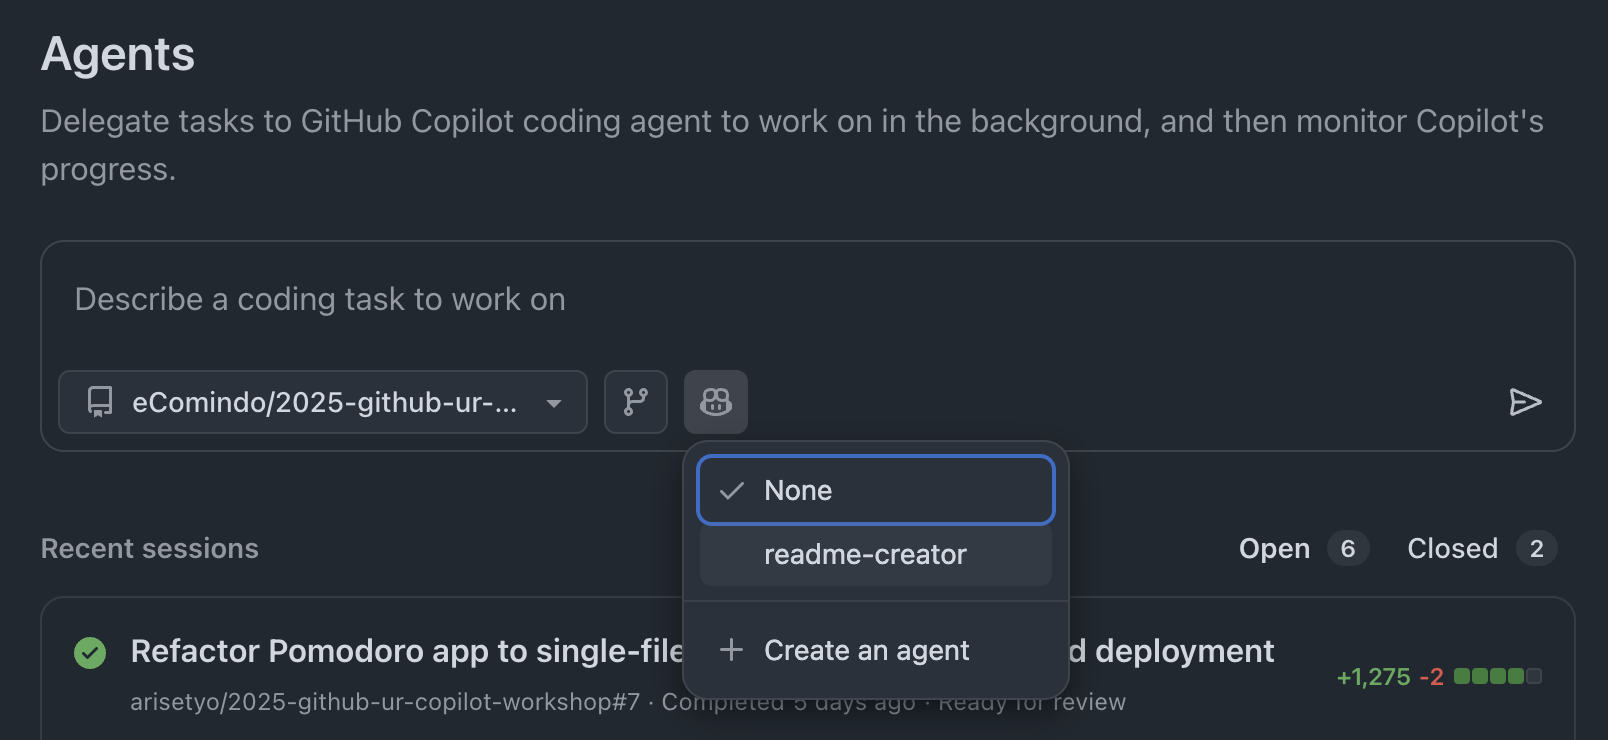
From the Agents page on Copilot online, you can delegate a coding agent to work on a new task while other coding agents are working on the previous issues.
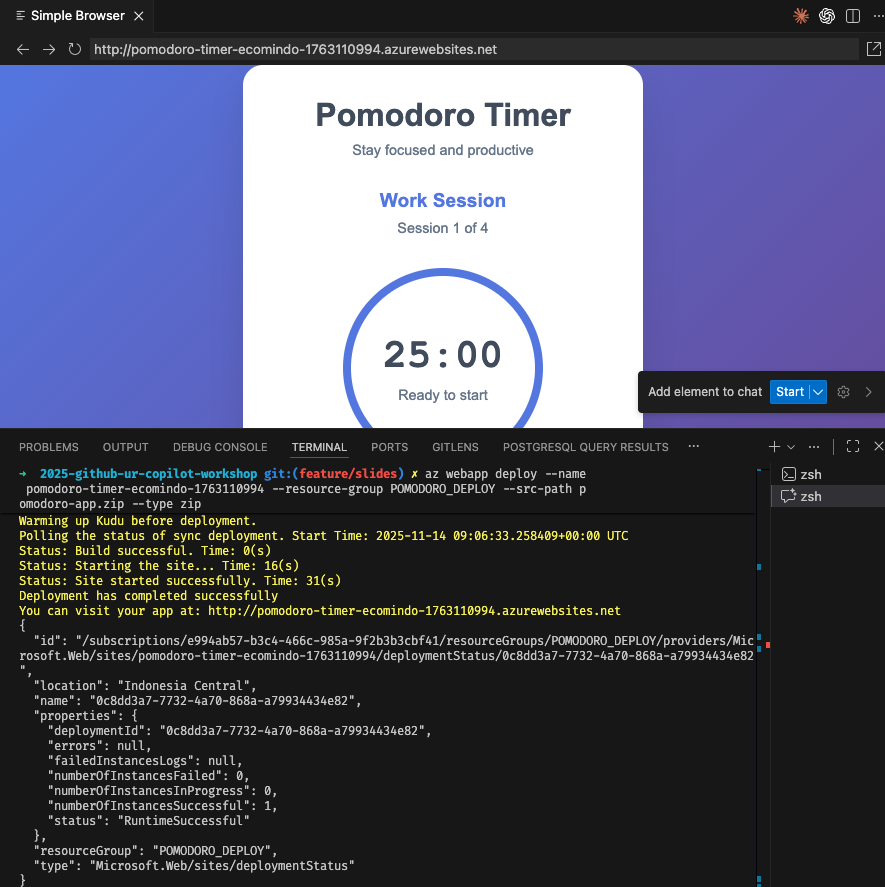
Let's deploy our work online. Before we start, login to Azure via the command line.
az login
Then, enter the prompt provided by the workshop to start the deployment process. Make sure Copilot Chat is in Agent mode.
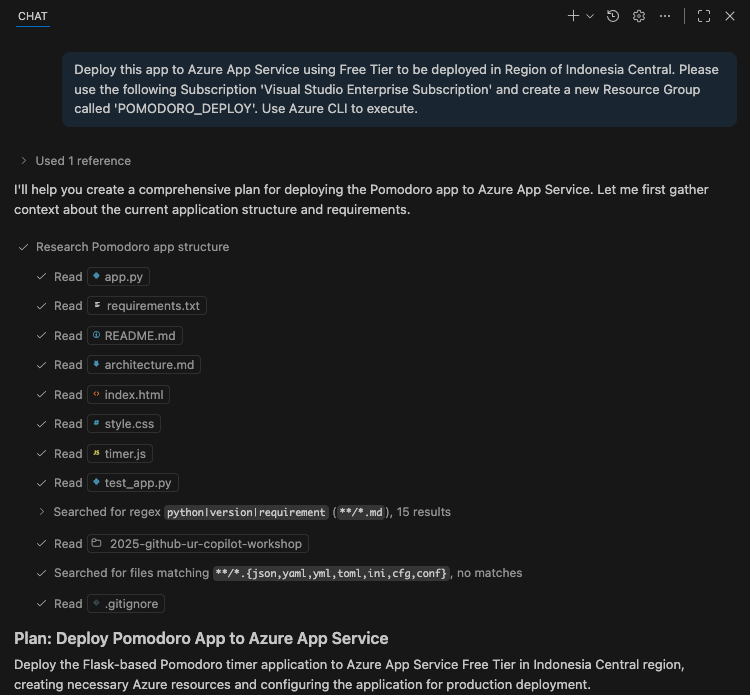
Copilot can open a simple browser to test whether the deployment is successful.
What We Learned Today
In this workshop, we learned using Github Copilot to do the following:
- Using specifications to develop an application
- Code explanation and improvement
- Creating documentation and unit tests
- Utilizing agent functionality
- Adding issues and development of new features
Next Steps
- Try using Copilot in actual projects
- Challenge more complex application development
- Keep up with new Copilot features
Resources
Great work!